
Install a Release Station on a Mac
We recommend a zero-deployment installation of the Release StationPrint Release Stations place a print job on hold and allow users to release it when required. Often a Release Station is a dedicated PC terminal located next to the printers, however, Release Stations can take other forms such as a web browser based interface. Some common examples where Release Stations can be used include secure printing, approved printing, and authentication. In a secure printing environment jobs are only printed when the user arrives at the print area and confirms his or her identity. This ensures the user is there to collect the job and other users can't "accidentally" collect the document. In some organizations it may be appropriate to hold jobs until they are approved by selected individuals. A good example would be a teacher approving printing on an expensive color printer. Hold/Release queues can be used as a form of authentication in an unauthenticated environment. Users must authenticate prior to releasing their jobs allowing PaperCut NG to confirm their identity., so it is automatically upgraded when the application is upgraded. We do support local installation of Release Stations, but this topic assumes the zero-deployment install.
Step 1: Set up a Mac workstation near the printer
The Release Station terminal (normally a budget workstation system) should be located close to the printers so users can release the jobs and pick up the printing nearby. The Release Station terminal should meet the following requirements:
- Apple Mac OSX 10.8+
- 2GB or more of system memory
- Attached to the network so that it can communicate with the Application ServerAn Application Server is the primary server program responsible for providing the PaperCut user interface, storing data, and providing services to users. PaperCut uses the Application Server to manage user and account information, manage printers, calculate print costs, provide a web browser interface to administrators and end users, and much more..
Step 2: Set the workstation to automatically log in (optional)
If you want the Release Station to automatically start when the terminal is rebooted, you need to set the workstation to automatically log in.
-
Create an account for the Release Station to log in with. The account should be a normal local or domain user and not have any administration privileges.
- Set up automatic log in on the workstation. For more information, see Set your Mac to automatically log in during startup.
Step 3: Set up the Release Station to run on startup
To set the Release Station software to run on startup:
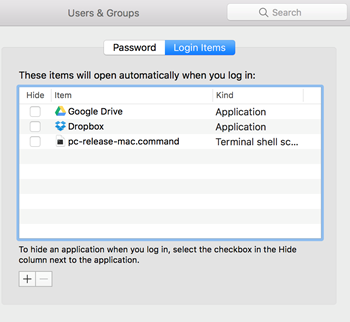
- Open System Preferences; then select Users & Groups.
- Select the user account that you created in Step 2.
- Click Login Items.
- Click + at the bottom of the screen; then browse to your PaperCut MF server share under [app-dir]/release.
-
Select pc-release-mac.command.
- Reboot the system.
You can also run the Release Station by copying the files from the server hosting the Application Server to the dedicated workstation. These files are located under [app-dir]/release.
This runs the Release Station in default mode with default configuration options. You can change the default configuration by modifying the following file:
This configuration file has many options that allow you to customize the Release Station behavior and look. For more information about the Release Station modes, see Release Station interfaces.
Step 4: Lock down the Release Station machine
You should lock down the Release Station terminal to stop users from performing some operations.
These operations can be restricted by using the built in Parental Controls in Mac OS. For more information, see Set up parental controls.
Step 1: Configure the Release Station (optional)
This step is required only if the default mode or settings need to be changed.
The Release Station configuration is stored in the following file:
This configuration file has many options that allow you to customize the Release Station behavior and look. The options are documented in the configuration file. For more information about the options, see Standard Release Station settings.
Step 2: Enable Release Station support for the printers
By default, print jobs are sent directly to the printer and not held by the Release Station. To enable Release Station support on a printer:
-
Click the Printers tab.
The Printer List page is displayed.
-
Select a printer.
The Printer Details - Summary page is displayed.
- In the Hold/Release Queue Settings area, select the Enable hold/release queue check box. This ensures that jobs are held in the print queueA print queue displays information about documents that are waiting to be printed, such as the printing status, document owner, and number of pages to print. You can use the print queue to view, pause, resume, restart, and cancel print jobs. until users are ready to release their jobs.
-
In Release mode, select one of the following:
-
User Release—(default) allows users to release and view only the jobs printed under their name/user account.
-
Admin/Manager only release—jobs can only be released by administrators or hold/release queue managers.
Tip:To configure multiple printers with hold/release queue support, use the Copy settings to other printers function. To use this, configure one printer as required, click Copy settings to other printers; then select the printers to copy the settings to.
-
-
Click OK.

You can copy Release Station settings from printer to printer using the Copy settings to other printers action.
Step 3: Perform testing
Perform some tests to see print jobs in the Release Station.
- Print to a printer with Release Station support enabled.
- Open the Release Station application.
-
Log in to the Release Station as the user who performed the print.
The print job should be displayed in the list.
- Click the Print link to release the job or Cancel to cancel the job.