Prevent jobs being released from an MFD Release Station when a device is in error
To block the release of jobs on a device when an error is reported:
- Enable blocking job release to a device in error
- (Optional) Change the default errors that will block jobs being released
- (Optional) Copy the release queue settings to other devices with hold/release enabled
- For more information about blocking the release of jobs to a printer in error from a web-based Release StationPrint Release Stations place a print job on hold and allow users to release it when required. Often a Release Station is a dedicated PC terminal located next to the printers, however, Release Stations can take other forms such as a web browser based interface. Some common examples where Release Stations can be used include secure printing, approved printing, and authentication. In a secure printing environment jobs are only printed when the user arrives at the print area and confirms his or her identity. This ensures the user is there to collect the job and other users can't "accidentally" collect the document. In some organizations it may be appropriate to hold jobs until they are approved by selected individuals. A good example would be a teacher approving printing on an expensive color printer. Hold/Release queues can be used as a form of authentication in an unauthenticated environment. Users must authenticate prior to releasing their jobs allowing PaperCut NG to confirm their identity., see Prevent jobs being released from a web-based Release Station when a printer is in error.
- For more information about blocking the release of jobs to a printer in error from a Standard Release Station, see Prevent jobs being released from a Standard Release Station when a printer is in error.
- You cannot block jobs from being released from a Fast ReleaseFast Release is a print release (Secure/Find-Me Printing) solution that uses off-the-shelf card readers available from multiple manufacturers. A Fast Release terminal is connected to the network (not the printer) allowing it to be used with any printer. A USB card reader is connected to the the Fast Release terminal and users use their proximity card to authenticate. PaperCut releases the users held print jobs to the printer assosiated with the Fast Release terminal. terminal.
-
The following device types support blocking job release to devices in error:
- Ricoh SDK/J and SmartSDK
- Gestetner
- Lanier
- Nashuatec
- Kyocera
- Triumph Adler
- UTAX
- Olivetti
- Sharp OSA
- HP OSA
- Toshiba eConnect
- Samsung
- Lexmark
- Dell Embedded LeSF
- Toshiba LeSF
- Canon
- Xerox (EIP 3.0+)
- Fuji Xerox
- Toshiba v2
- OKI Open Platform
- Toshiba MDS
- Ricoh SDK/J and SmartSDK
Step 1: Enable blocking job release to a device in error
-
Click the Devices tab.
The External Device List page is displayed.
-
Select a device.
The Device Details page is displayed.
-
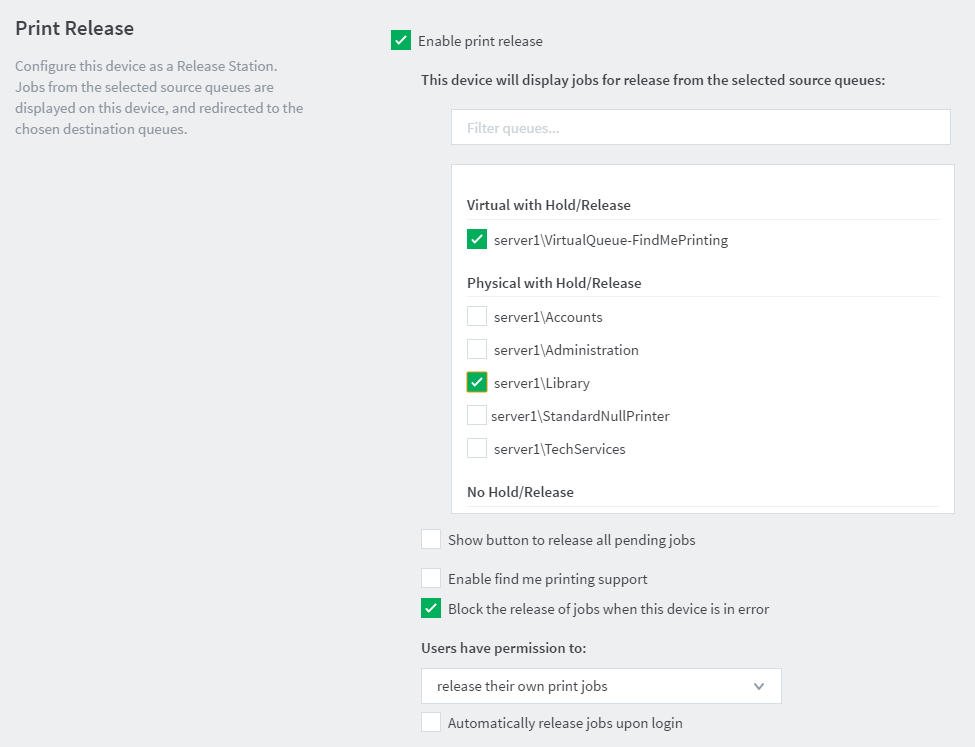
In the External Device Settings area, select the Enable print release check box.
-
Select the Block the release of jobs when this device is in error check box.
Note:- You cannot select to both not release jobs when a device is in error AND Automatically release jobs on login.
- This check box is available only for supported devices—not all devices are supported.

-
Click OK.
Step 2: (Optional) Change the default errors that will block jobs being released
PaperCut MF gives you the flexibility to roll out the prevention of job release to devices in error in a manner that suits your unique requirements. By default, the following reported errors will block the release of jobs:
- noPaper
- doorOpen
- jammed
- offline
- inputTrayMissing
- outputTrayMissing
- markerSupplyMissing
- outputFull
As soon as a user logs into an MFD, the Application ServerAn Application Server is the primary server program responsible for providing the PaperCut user interface, storing data, and providing services to users. PaperCut uses the Application Server to manage user and account information, manage printers, calculate print costs, provide a web browser interface to administrators and end users, and much more. will start polling the SNMPSimple Network Management Protocol (SNMP) is a component of the Internet Protocol Suite as defined by the Internet Engineering Task Force (IETF). It consists of a set of standards for network management, including an application layer protocol, a database schema, and a set of data objects. Devices that typically support SNMP include routers, switches, servers, workstations, printers, modem racks and more. status of the device. In most cases, the state of the device will be updated in less than 5 seconds. We recommend using the default list of errors, but if you need to exclude any of these errors or add any additional errors, follow the steps below.
For example, the default list does not include a low toner error because a user can continue to print even when this error is displayed. If you want to prevent the release of jobs when toner is low, you can add the lowToner error type to the default list.
The selected errors apply only to the selected device.
-
Click the Devices tab.
The External Device List page is displayed.
-
Select a device.
The Device Details page is displayed.
-
Click the Advanced Config tab.
-
In Quick find, enter ext-device.block-release-on-error.snmp-error-list. The default value is DEFAULT, which includes all of the errors listed above. You can customize this list by either adding extra error types, or removing some of the default error types.by copying the list and then removing individual errors.
-
In Value:
-
Paste the following full list of error types:
lowPaper,noPaper,lowToner,noToner,doorOpen,jammed,offline,serviceRequested,inputTrayMissing,outputTrayMissing, markerSupplyMissing,outputNearFull,outputFull,inputTrayEmpty,overduePreventMaint
- Delete any error types you do not want to use.
-
-
Click Update.
To reset the device errors to the default list
-
Click the Devices tab.
The External Device List page is displayed.
-
Select a device.
The Device Details page is displayed.
-
Click the Advanced Config tab.
- In Quick find, enter ext-device.block-release-on-error.snmp-error-list.
-
In Value, enter DEFAULT.
-
Click Update.
-
Release a test print job to a device in error to check if there were no copy and paste mistakes.
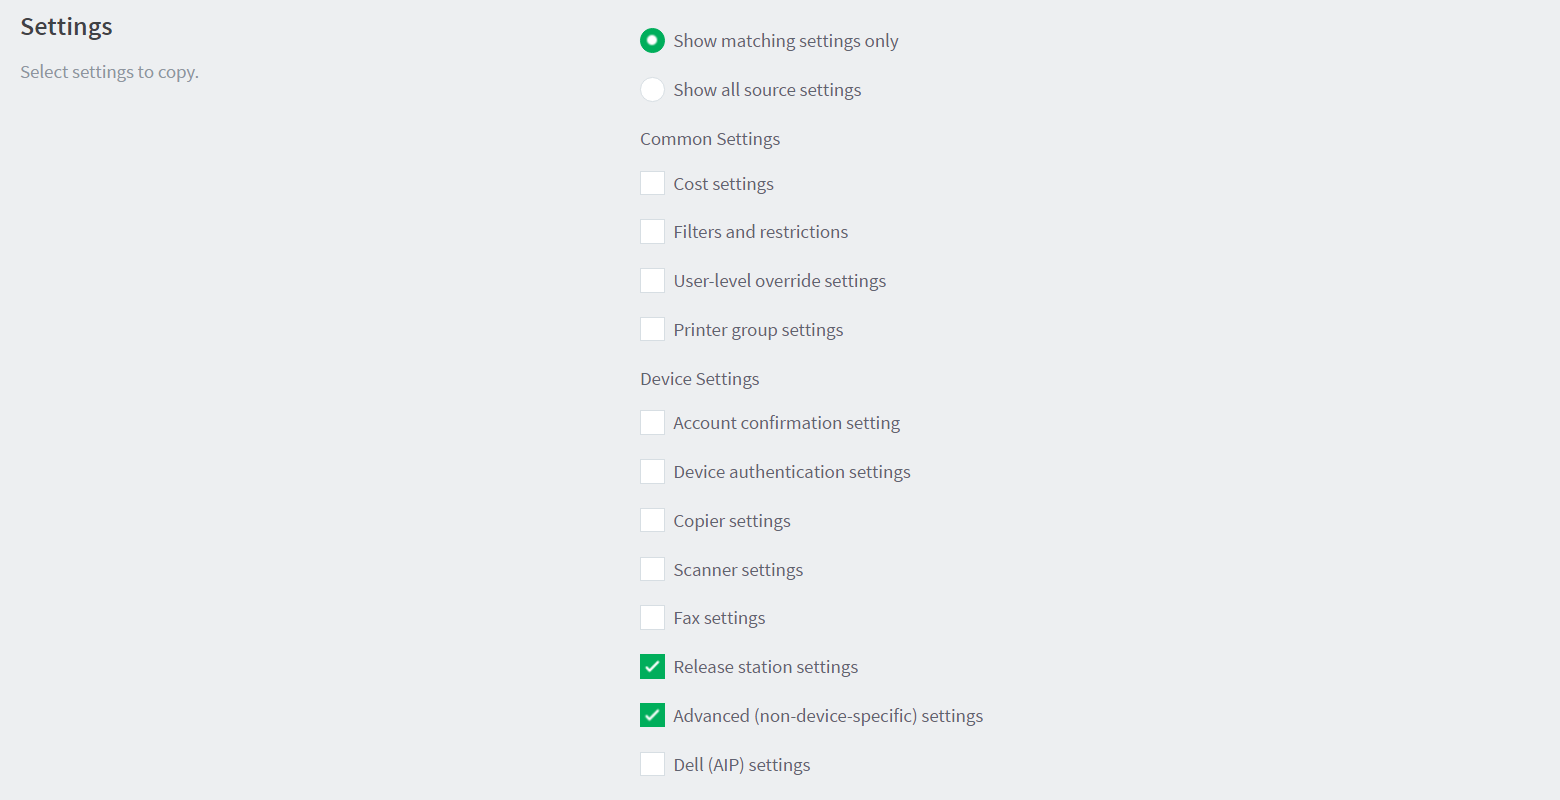
Step 3: (Optional) Copy the release queue settings to other devices with hold/release enabled
Rather than repeating the above steps for each device, you can copy the hold/release settings and apply them to selected or all devices.
-
Click the Devices tab.
The External Device List page is displayed.
-
Select a device.
The Device Details page is displayed.
- In the Actions menu, select Copy settings to other devices.
-
In the Target area, select the rest of the devices to which you want to copy the hold/release behavior.
Caution:This action copies all hold/release settings. Do not copy to devices that should not have hold/release enabled, or that have other hold/release settings that you want to remain different.
- In the Settings area, select Show all source settings.
-
Under Device Settings, select:
- Release station settings—copies the Release Station settings
- Advanced (non-device-specific) settings—(optional if you have modified the default error list) copies the config keys, including the config keyA config key stores information about a specific advanced setting in PaperCut. Config keys are editable by an administrator in the Config Editor. used to specify the errors that will block the release of a job

-
Click Copy.