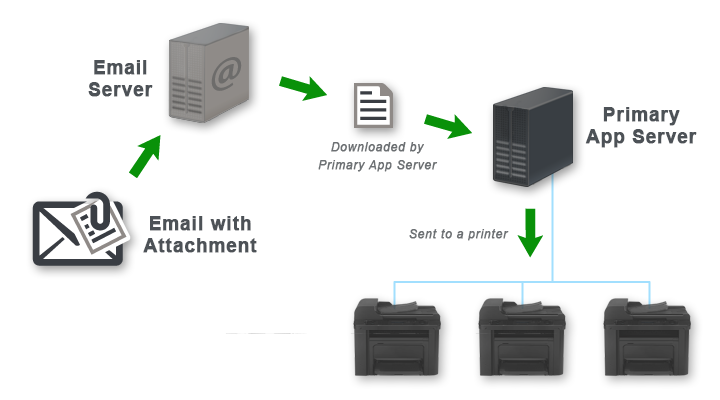
Email to Print allows users to print by emailing their documents to a special address. No client software or drivers are required, providing a simple way for your organisation to print from any device that can send an email.
Email to Print is part of a collection of solutions to manage mobile and BYOD printing. For more information see Chapter 23, Mobile & BYOD Printing.
Each printer has a unique email address e.g.
[email protected]Users compose an email, attach printable document(s), and email to the printer's address.
PaperCut receives the email and prints the documents on behalf of the user.
Easy to use, easy to set up.
Works with nearly any device (anything that can send an email with an attachment).
Supports PDF and picture file attachments. Additionally supports Microsoft Office attachments when a Web Print Sandbox is configured.
All print options are locked to the OS print queue defaults.
Tip
It is possible to set up multiple OS print queues for the one printer with different default settings e.g. one for single-sided, one for double-sided.
Tip
Email to Print can be used in conjunction with Find Me Printing. Rather than one email address per printer, there can be a single address for multiple printers. Users could then release their jobs at the printer of their choice.
Tip
Email to Print can be used in conjunction with PaperCut Internal Users. This allows users without a domain account to register their own account with an email address. See the section called “Internal Users (users managed by PaperCut NG)” for details.
Email to Print can also be used to create a guest printing solution for visitors and guests with BYOD devices. See the section called “Anonymous Guest Printing” for details.
When processing Email to Print jobs, PaperCut will connect to a single mailbox on a mail server. The mailbox will receive the emails of all printers, where each printer has its own email alias. This is achieved in one of three possible ways:
Email forwarding - If options 1 and 2 are not possible with your email server, another option is to configure one mailbox per printer. Each mailbox could then forward all mail to the "main" mailbox e.g.
[email protected]is a mailbox that forwards to[email protected].Dynamic aliases - Many email servers support the dynamic alias "
+syntax" e.g.[email protected]gets delivered to theprintingmailbox. This is the simplest option to set up and maintain. However, removing or renaming a dynamic alias doesn't stop emails for the now defunct printer name. Also, the email addresses are arguably not as nice to look at!Server-side aliases - The email address for each printer is an email alias of the mailbox e.g.
[email protected]is an alias of[email protected]. This is the recommended approach when using Google Apps (gmail) and Outlook.com.
Pick a strategy that suits your environment and you are ready to start.
Configure your SMTP server details in PaperCut at → .
This is required so PaperCut can respond to user emails e.g. to let them know their job has been received.
Tip
When configuring your SMTP settings, use a real, attended From address. Users may reply to this address to ask questions. They will have a better experience if they receive a reply.
Configure a user facing server address at → → → .
Email to Print sends emails to users that include links to the PaperCut server, so it needs to know the server's network address. If you would like to support Email to Print from the internet, this address will need to resolve both internally and externally to your network i.e. a fully qualified public DNS name.
For more details see the section called “Server address presented to users”.
Set up a new mailbox on your email server. Email to Print supports mailboxes with either POP3 or IMAP protocols.
This mailbox will receive all emails for Email to Print. Each email will be deleted from the email server after it has been processed, so the storage requirements should not be large.
Tip
If you are using Gmail to host your mailbox, there are default actions for emails deleted. These actions are based on the protocol being used. POP3 keeps a copy of the email in the Inbox, while IMAP archives it. If you prefer a different behavior, you can log into the Gmail account and change the following settings:
→ → → -
Delete,MarkorArchive[your org's] copy→ → → -
Archive,Move to the BinorDelete foreverImportant
Do not use your personal email address for testing, unless you want to print every PDF ever sent to you! One of our developers did this. It wasn't pretty.
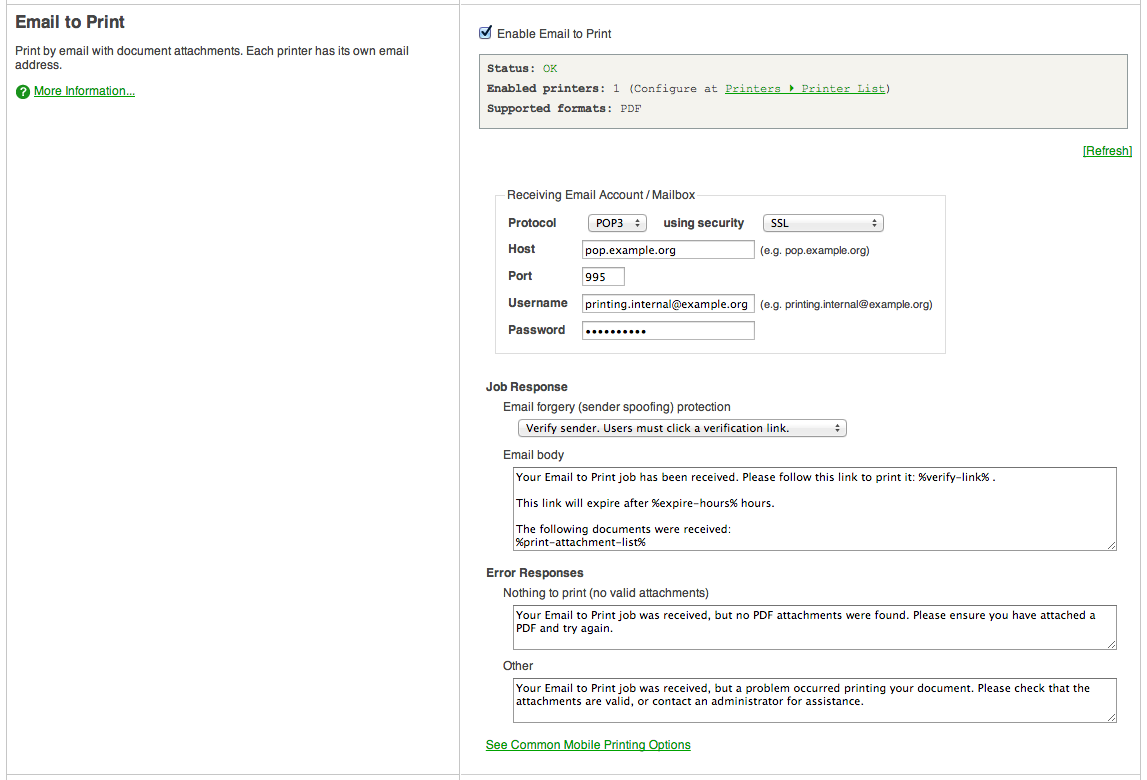
Navigate to → → and check Enable Email to Print.
Configure the section Receiving Email Account / Mailbox according to your mail server and newly created mailbox. Note that with some email servers, the Username may not be in the email address format.
The remaining settings are discussed later in this chapter. The default values will suffice for testing.
Navigate to → and choose a printer for Email to Print testing.
In the Email to Print section, give the printer a unique and simple email alias.
Depending on your chosen alias type, configure the email server to point the new email alias to the Email to Print mailbox (see the section called “Before You Start: Aliases”).
Pick a test user account from the Users, tab and ensure it has an associated email address you can send an email from (the Primary email or Other emails fields). If you don't have a test email account, you can temporarily assign your own email address to the test user.
From the test user's email address, compose a new email, attach a PDF, and send it to the printer's email address (the alias, not the mailbox).
In a short time you should receive a verification email (discussed in the section called “Customization”). Click the link in this email. Your job should now print!
Note: Jobs maybe held pending further action when features such as account selection or hold/release queues are in effect. You will need to address this as per a normal print job. See the section called “Interaction with other features” for details.
Check your job printed successfully, and inspect the print log at → .
If you want to support Microsoft Office document attachments in addition to PDF and picture files, please see the section called “Adding support for Microsoft Office Documents”.
Continue with the section called “Customization” below to tweak settings to your site's needs.
The following customization settings can be found at → → .
- Sender Verification
This option controls how PaperCut will respond when it receives an Email to Print job from a user.
The default setting, Verify sender. Users must click a verification link., will send an email with a link the user must click before their job is printed (or proceeds to the next stage, such as a hold/release queue). The purpose of this setting is to verify the sender of the email actually owns the email address, as it is often trivial to fake/forge/spoof the sender address. In the Email body for this setting, the special replacement marker
%verify-link%is required.If verification of the sender address is not important, the setting Do not verify sender. Respond to job with confirmation. may be used. When this setting is used, jobs are processed immediately, and the user receives an email to let them know their job was received. In the Email body for this setting, the special replacement marker
%client-url%may be used as a link to the Mobile Client, which will show the job's status.- Anonymous/Guest Submission
This item enables the sending of Email to Print jobs from anonymous guest users. These jobs are sent to a special guest printer alias. Jobs will be logged to the specified user (default is
guest-user.)See the section called “Anonymous Setup” for more information.
- Error Responses
These options allow the customizing of response emails sent to users when things go wrong.
Nothing to print (no valid attachments) - Used when an email is received but no valid attachments were found. The user might have forgotten to attach their document, or perhaps attached an unsupported document type.
Other - Used when any other problem occurs e.g. if the document was corrupt and couldn't be printed, or something went wrong with the print driver attempting to print.
See the section called “Self association for emails and email verification/validation” for additional customization settings that apply to both Email to Print and Google Cloud Print.
When users have pop-ups configured, jobs will hold until the pop-up is addressed e.g. for shared account selection the user must choose an account to allocate the job to, before it will be printed. When using Email to Print, pop-ups may be addressed using the Mobile Client. To make this easy, the default job response templates include links to the Mobile Client. If most or all of your users have pop-ups configured, you may like to tweak the templates to indicate they must follow the included link to progress their job.
For more information about the Mobile Client see the section called “Mobile Client”.
Hold/release queues allow jobs to be held in a queue and later released by a user. This can be used, for example, to require that users are physically at the device to collect their job ("secure print release").
Hold/release queues can be used with Email to Print in the same way as other job types. For more information on hold/release queues see Chapter 13, Hold/Release Queues & Print Release Stations.
Find Me Printing removes the need for a user to choose a printer when printing their job. Instead they print to a "virtual", sometimes called "global", queue. They then release their job at the device of their choosing. PaperCut handles routing of the job to the right printer.
Find Me Printing can be used with Email to Print in the same way as other job types. For more information see Chapter 14, Find Me Printing and Printer Load Balancing.
Internal Users are users that only exist in the PaperCut database, not in the organization's domain. They can be used to set up users for printing quickly (or have users set up their own account) without having to go through the normal process of creating full domain accounts.
Internal Users may be combined with Email to Print, allowing users to register their own account (and email address) to set themselves up for printing. The recommended approach is as follows:
Enable internal user self-registration (see the section called “Internal Users (users managed by PaperCut NG)”. This adds a link to the login screen for users to create a new username, password and email.
Enable email self-association (see the section called “Unknown emails and email self-association”). This allows jobs from unknown email addresses to be held until the email "becomes known". When the user sends their first job via Email to Print, they will receive a response email asking to verify their email address by logging in. This default template should be changed to say "If you do not have a username, please create one via the Register link on the login screen" or something similar.
After the user has verified their email address, their job will continue to print. Future jobs will print as per normal.
Email to Print will print PDF and picture file attachments by default (See the section called “Supported Applications and File Formats” for full details). You can add support for Microsoft Office document attachments by configuring a Web Print Sandbox running Microsoft Office. The Web Print Sandbox functions as a document conversion service. Incoming email attachments are sent to the sandbox, and the associated Microsoft Office program automatically converts the source document to a PDF file which is then sent to the printer.
Please see the section called “Sandbox Mode Setup” for information on how to set up a Web Print Sandbox running Microsoft Office.
The following is a list of considerations when moving from a test Email to Print environment that is working as desired, to a wider or organization-wide rollout.
Create and publish printer aliases for all printers available via Email to Print. This could involve:
Adding the printer's email to a sign on the printer
Publishing a web page with email addresses for all printers
Adding printer email addresses to a shared address book
Modify the procedure for creating new printers in PaperCut to optionally include an Email to Print alias.
The following Email to Print settings are for advanced users or special cases, and should not normally need to change. They can be found in the PaperCut config editor. See the section called “Using the Config Editor” for more information on advanced configurations.
| Config Name | Description |
|---|---|
email-printing.attachment-min-image-bytes |
Often emails have small images attached as part of the email signature, which users are not likely to want printed. To avoid printing these images, Email to Print will ignore image attachments smaller than this value. The default value is 20000 bytes. |
email-printing.debug |
This can be set to |
email-printing.service-freq-secs |
By default, PaperCut will check (poll) for new emails every 20 seconds. This config item can change the polling frequency. Less than 20 seconds is not recommended so not to burden the email server. If this value is too large, users will find that sometimes jobs will take a long time to print. How long "too long" might be will vary between sites. |
email-printing.imap-read-folder |
By default, PaperCut will look at the 'Inbox' folder of the mailbox. This is usually the right setting for most mailboxes. When using IMAP as the protocol, emails can be from any folder on the mail server; so if you would like to read emails from a specific folder (e.g. setting a rule to forward emails with attachments to a pre-defined 'PrintQueue' folder) you can set the folder name here. |
Table 23.4. Email to Print Advanced Configuration
As the user communicates with Email to Print through emails, there is little opportunity for setting print options. Instead, PaperCut will attempt to use default settings for the printer.
Email to Print printing is performed by the PaperCut Print Provider running on the print server for the target printer.
On CUPS print servers, Email to Print will use the default printer settings.
On Windows print servers, default printer settings are configured under: → → →
However, these printer settings are not available when the Print Provider service is running under the SYSTEM account, which is the default. If you want Email to Print to use the Windows printer defaults (Printing Preferences) then you will need to run the Print Provider service under a user account that has access to the Windows printer settings.
You can do this in:
→ → → .
Find the PaperCut Print Provider service and select
→ .
Set a user account that has access to the Windows printer settings.
When printing large image file attachments, Email to Print may need to rotate and/or scale the image to make it fit on the page.
To do this, Email to Print assumes a page size of either A4 or Letter. If an image is too large to fit on an A4 or Letter sized page, Email to Print will rotate and/or scale down the image as needed to fit.
- Q: Can multiple documents be printed at once?
- Q: Can a job be printed on more than one printer at a time?
- Q: Will you add support for HTML formatting in the reply emails?
- Q: I encrypt/sign my emails, do you support PGP and similar features?
- Q: I'd like to support Email to Print without assigning email addresses to users (and without requiring users to associate their own address with their account) i.e. to allow printing without user-level control. Will you add support for this?
- Q: My email server supports SPF (Sender Policy Framework) header checking. Can you add functionality to send a confirmation response when it checks out, and a verification response when it doesn't?
- Q: My users are having my Email to Print response emails flagged as spam. How can I prevent this?
- Q: The links in my PaperCut response emails contain IPs. How can I use a DNS name?
- Q: The Email to Print status in the admin interface says there is an error. What should I do?
- Q: Email to Print jobs are not coming out of the printer, but the status in the admin interface says OK. What should I do?