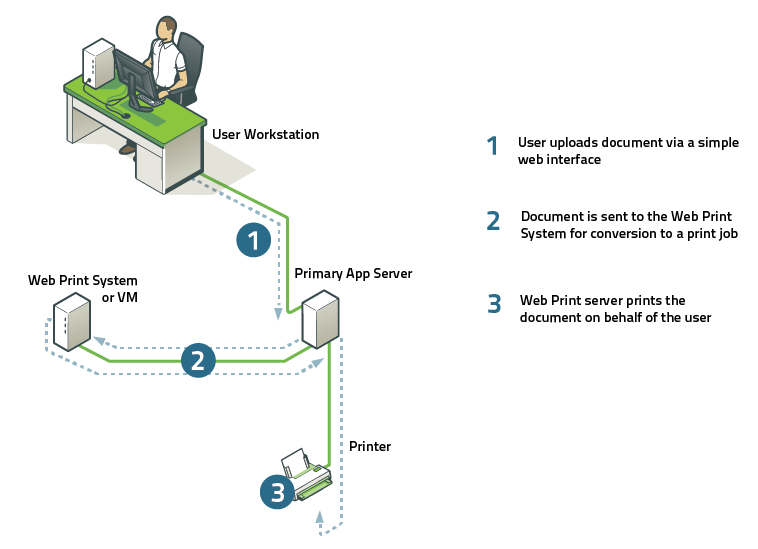
Web Print is a driver-less printing service that allows users to print by uploading documents from a web browser. No client software or driver installation is required. Web Print provides a simple way to enable printing for laptop, wireless and anonymous users without the overhead of installing printer drivers and managing server authentication.
The recent growth in popularity of laptops and other small devices such as Netbooks and smart phones is changing the landscape of network printing. Where it was previously normal to only allow printing from in-house systems, there is now a growing need to support casual printing from user-owned devices. Providing users with information about how to configure these devices can be inconvenient and complicated, due to issues such as drivers and authentication, and in some situations may not be possible at all.
Due to this complexity, many organizations opt to simply disallow printing from user-owned systems. A common workaround in these environments is for users to send themselves a document (e.g. via email, on a USB drive) and print from an in-house system. Web Print works in a similar way: it allows a user to upload their file to an in-house system (known as a Web Print server) and have this system perform the printing on their behalf.
With Web Print, users are authenticated when they log into the PaperCut NG end-user web interface. Any documents they upload can then be tracked against their user name. Users have access to the standard selection of features normally available for in-house printing, including access to shared accounts.
Some of the key features of PaperCut's Web Print solution include:
Simple wizard style interface, accessed from any web browser.
Users authenticate with their regular (network / domain) logins.
100% web based. No drivers, client software, or browser plugins required.
File uploads with progress indicator (in the style of GMail attachment uploads).
Supports popular document formats including PDF, DOC/DOCX (and other Microsoft Office Word formats), XLS/XLSX (and other Microsoft Office Excel Formats), PPT/PPTX (and other Microsoft Office PowerPoint formats) and Microsoft XPS (XML Paper Specification). Web Print also supports common image formats including JPG, GIF, PNG, TIFF and BMP.
Users select printers from an auto-generated list or a clickable printer map, which can be designed or imported using open standards and free software.
Web Print works in two ways.
It can print PDF and picture files directly.
It can accept popular file formats and convert them to print jobs using common external applications. This is done by orchestrating applications such as Adobe Reader TM, Microsoft Office TM and the Microsoft XPS Viewer as background server-side tasks. Using this approach ensures that maximum print compatibility and quality is maintained.
Important
Adobe Reader, Microsoft Office and XPS Viewer are not supplied with PaperCut. It is your responsibility to purchase and conform to the licensing requirements of any third party software.
The following table lists the supported document types and associated applications that Web Print may use to render and print jobs. Before some file formats can be accepted as an upload, its supporting application must be installed.
| Document Type | File Format(s) | Direct Printing | Supported External Applications |
|---|---|---|---|
Portable Document Format | Support built-in (all platforms) | Adobe Reader 9, Adobe Reader X (10), Adobe Reader XI (11) | |
Picture File | JPEG, TIF, BMP, PNG, GIF | Support built-in (Windows only) | |
Spreadsheet | XLS, XLSX, etc. | External application required | Microsoft Office Excel 2007, 2010, 2013 |
Presentation | PPT, PPTX, etc. | External application required | Microsoft Office PowerPoint 2007, 2010, 2013 |
Word Document | DOC, DOCX, etc. | External application required | Microsoft Office Word 2007, 2010, 2013 |
Microsoft XPS | XPS | External application required |
Microsoft XPS Standalone Viewer (Essentials Pack) - For more information please see the section called “XPS Viewer Installation Instructions” |
Table 23.5. Web Print File Formats and Applications
Before setting up Web Print it is worth considering any security implications. Because Web Print allows any user with access to the PaperCut NG user web interface the ability to upload a document for printing, it naturally increases surface area for attack.
More specifically, security vulnerabilities that might usually be considered local, because they are triggered by opening a document in a Microsoft Office application or Adobe Reader can become a remote vulnerability. This is because these same applications are used to render print jobs on the server after the user has uploaded their document.
Much of the security risk can be mitigated through security best practice, such as regularly applying security updates to the orchestrated applications. Organizations that are very security conscious may wish to consider the sandbox approach. Sandboxing the Web Print server provides an extra layer of protection/isolation.
Web Print may be configured in one of two possible modes: Default Mode or Sandbox Mode.
Default Mode involves running the Web Print software on the same system as the PaperCut NG primary server. On Windows, it runs as a Service. This is the fastest and easiest way to get Web Print working. However, only printing of PDF documents (and picture files on Windows) is supported in this mode. When Web Print is running in Default Mode, Microsoft Office applications are not available due to limitations in the applications. (See the section called “Default Mode Setup”.)
Sandbox Mode uses a sandboxed or virtualized system, isolated and dedicated to the task of processing Web Print jobs or converting documents for Email to Print. Sandbox Mode takes a little more time to configure but offers several advantages, including improved security and more supported document formats. (See the section called “Sandbox Mode Setup”.)
| Primary Server Type | Default Mode | Sandbox Mode |
|---|---|---|
Microsoft Windows | Yes (PDF and picture files only) | Yes. All formats supported |
Apple Mac | Yes (PDF only) | Yes. All formats supported |
Linux running CUPS | Yes (PDF only) | Yes. All formats supported |
Novell OES Linux | No. Default Mode not supported | Yes. All formats supported |
Table 23.6. Web Print Setup Options (by platform)
Default Mode involves running the Web Print software on the same system as the PaperCut NG primary server. It is the fastest and easiest way to get Web Print working. It is suitable for testing Web Print functionality or where only PDF support is required.
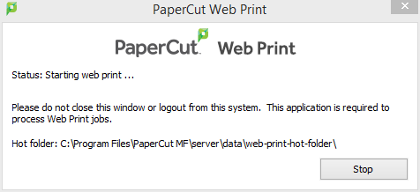
In Default Mode the Web Print software runs as a service (background process or daemon) that is responsible for watching a directory for documents submitted by users e.g. PDFs. When a new document is detected, the background process opens the document and prints it.
This section describes how to configure Web Print on the same Windows system as the PaperCut primary server. This is the fastest and easiest way to get Web Print up and running on a Windows system. Due to the inability of Microsoft Office or XPS Viewer applications to run as a system service, these file formats are only available on Windows when Web Print is configured in sandbox mode. See the section called “Sandbox Mode Setup” for more information.
Web Print Default Mode supports the printing of PDF documents and picture files by default on Windows systems. No additional configuration should be required.
Important
Check in Windows Services, that the Web Print service is configured to start automatically. Also, start the service now, if needed.
To confirm that everything
is configured correctly, check the Web Print Status section under
→ → . The status should be listed as OK. The Web Print option will also need to
be enabled on at least one printer. If there are any status issues, or if basic Web Print testing produces
some errors, please consider these limitations/requirements:
The printers targeted for use via Web Print must be queues that are managed by the Primary PaperCut Server. This includes print servers with the PaperCut Secondary Server installed.
If you wish to print to remote printers, then the PaperCut NG Web Print server needs to run under a user account that has permission to access these printers.
Create a new user account called
webprint(or equivalent). If it is not possible to create a domain user or the system is not a member of a domain, then create a local user account instead. The password for this account should be set to never expire. At a minimum, this account needs access to all the printers you wish to print to.The printers (as configured on the server) must have working compatible drivers.
Administrators may find the following log file useful in diagnosing issues:
[app-path]/providers/web-print/[platform]/logs/web-print.logAs a final step you will need to enable Web Print for each printer via the → → → checkbox.
The Web Print Default Mode supports PDF documents by default on
Mac and Linux systems (running CUPS). No additional configuration should be required. To confirm that
everything is configured correctly, check the Web Print Status section under
→ → . The status should be listed as OK. The Web Print option will also need to
be enabled on at least one printer. If there are any status issues, or if basic Web Print testing produces
some errors, please consider these limitations/requirements:
The printers targeted for use via Web Print must be queues that are managed by the Primary PaperCut Server. This includes print servers with the PaperCut Secondary Server installed.
The printers (as configured on the server) must have working compatible drivers.
Linux: The Primary Server must be running CUPS version 1.2 or higher.
Administrators may find the following log file useful in diagnosing issues:
[app-path]/providers/web-print/[platform]/logs/web-print.log
Default Mode for Novell OES Linux and iPrint is not available. Novell OES users should implement the Sandbox Mode (in the following section).
A Web Print Sandbox (in Sandbox Mode) runs the Web Print software in a dedicated Windows system, often a virtual machine. Documents are opened and rendered by standard GUI applications such as Adobe Reader and Microsoft Office applications.
Use Sandbox Mode when you need to:
Support printing of Microsoft Office documents from Web Print
Support printing of Microsoft Office documents from Email to Print
Render documents in a secure, sandbox environment away from your main server.
Sandbox Mode takes a little more time to configure but offers several advantages, such as support for Microsoft Office formats and improved security. Security is gained by opening and printing documents on an isolated system, separate from the PaperCut primary server; with the only connection between the two being a simple file share / mapped drive.
Tip
PaperCut is shipped with a high quality rendering engine for PDF documents. However, if you require documents to be rendered by Adobe Reader, this is also supported. Simply install Adobe Reader in your Web Print Sandbox.
Prerequisites:
A dedicated, standalone, cleanly installed system or virtual machine.
Windows operating system (suggested: Windows Vista or later).
Adobe Reader 9 or later (optional)
Microsoft Office 2007, 2010 or 2013 (to support Office formats)
Microsoft Standalone XPS Viewer / XPS Essentials Pack (to support Microsoft XPS) - download here
To set up Web Print in Sandbox Mode:
Make sure Default Mode is disabled. See Important box below:
Important
First, before setting up Web Print in Sandbox Mode, ensure Web Print in Default Mode is disabled as follows:
On Windows, stop and disable the
PaperCut Web Print ServerSystem Service (set its Startup type to Disabled).On Mac and Linux, use a text editor to edit the file
[app-path]/providers/web-print/[platform]/web-print.confand change settingenabledtoenabled=off.Remove the Web Print status files (named
web-print-server.activityandweb-print-server.status) located in the hot-folder/Applications/PaperCut NG/server/data/web-print-hot-folder.Restart the server (or services) to ensure the change is applied.
Set up a new virtual machine using VMware Server, Microsoft Virtual Server or VirtualBox, or set up a standalone system e.g. a dedicated desktop PC. This system will house the Web Print server software and any required printing applications, and will be termed the Web Print server.
This system does not need access to all network resources, but will need access to the hot folder share. This is created later in step 7. It will also need access to printer shares if used for Web Print (not Email to Print).
Important
Ensure that the system clocks on the primary server and the web print sandbox are synchronized to a common clock. Time differences between these systems may cause problems with the web print system.
Create a new user account called
webprint(or equivalent). The password for this account should be set to never expire. At a minimum, this account needs access to the printers, the ability to run local programs, and the ability to access the hot folder share (created in step 7).Skip this step if using the Sandbox for Email to Print only. Log in as the
webprintuser. Add print queues for the printers that should be made available to users via Web Print. The print queues should be added in the same way they would to a workstation. They should point to the print queues hosted on the print server, i.e. a Network Printer mapped to\\server\printer-share. It is important that the jobs pass via the queue on the server - do not add a Local Printer. You should also add the printers using the print server's machine name and not an IP address.Install one or more of the applications listed in Table 23.5, “Web Print File Formats and Applications”. The applications installed will determine which file formats are available to users for printing.
As the
webprintuser, open a file in each of the installed applications and print to several different printers, ensuring that all works as expected. IMPORTANT: Make sure you permanently acknowledge any license agreement screen, initial-run wizard, or customer experience program dialog during this process.Tip
When installing Microsoft Office applications, choose all optional components for installation. This will prevent printing issues occurring due to missing components.
Adobe Reader X introduced a Protected Mode setting which prevents printing from the command interface used by Web Print. Using Adobe Reader therefore requires the Protected Mode feature to be disabled. Web Print will automatically disable Protected Mode for your
webprintuser. (You may also disable Protected Mode manually by disabling the setting in Adobe Reader under → → )
Configure the Web Print server to automatically log in as the
webprintuser on startup. The service will then run when Windows is started, and be logged in as this user.Automatic logon for Windows Vista/7
Tip
Windows Vista/7 machines on a domain may require direct editing of the registry as described here: Microsoft Technet - Configuring Accounts to Autologon. You may want to consider a Group Policy Object (GPO) to make the registry changes.
The primary server and the software on the sandboxed Web Print server communicate via a standard network file share. On the PaperCut primary server, share the folder
web-print-hot-folderlocated at[app-path]\server\data\web-print-hot-folder\. The hot folder facilitates communication between the primary server and the Web Print server.Tip
By default, Web Print will use this folder, not a sub-folder. You do not need to create a sub-folder in this folder.
Samba sharing on Linux
On the Linux PaperCut primary server, name the share
PCWebPrint, and adjust both the Sharing and Security (NTFS/file) permissions of thePCWebPrintshare to allow thewebprintuser read and write access.The following Samba configuration settings may be useful.
    [PCWebPrint]
          comment = PaperCut Web Print Hot Folder
          path = /home/papercut/server/data/web-print-hot-folder/
          public = no
          writeable = yes
          read only = no
          valid users = webprint
You will also need to add the
webprintusername to Samba viasmbpasswd -a [username]and you should consider disabling the[home]shares in yoursmb.conf.Important
Ensure that your umask and Samba settings allow for the
papercutlinux user to be able to read and write to all files in theweb-print-hot-folder. When using Novell and Linux it is possible that the Web Print Sandbox will create files owned by a different user than the PaperCut Application Server runs as, preventing the files from being accessed.Samba sharing on Mac
On the Mac PaperCut primary server, adjust both the Sharing and Security (NTFS/file) permissions of the
PCWebPrintshare to allow thewebprintuser read and write access.Create a user in Users & Groups, which will be used to read and write to the shared folder. Name the user
webprintand assign it to theadmingroup.In Sharing -> File Sharing, share the folder
[app-path]\server\data\web-print-hot-folder\and add Read & Write permissions for thewebprintuser.Click on Options... on the same menu and check the
webprintuser under Windows File Sharing.Set read access to everyone on the web print hot folder and any files under it by creating a new ACL. Open the Terminal app and type under
[app-path]\server\datafolder:sudo chmod +ai "everyone allow read,file_inherit" web-print-hot-folder
Log in to the Web Print server as the
webprintuser. Map theW:drive to the hot folder share you have defined. Ensure that the option Reconnect at logon is selected when mapping the drive. If yourwebprintuser's credentials on the PaperCut primary server are different from the Web Print Sandbox's user, click on Connect using different credentials and enter them.Test that the file share can be accessed and written to from the Web Print server (e.g. by creating a new text file on
W:). It is also recommended to test in the other direction as well, and confirm that files created on the primary server in the folderweb-print-hot-foldercan be opened/seen by the Web Print server.Run the main PaperCut NG installer on the Web Print server, and select the Web Print server installation (sandbox mode) install option.
Configure the
webprintuser to run[app-path]\providers\web-print\win\pc-web-print.exeat login i.e by adding a shortcut to the user'sStartupfolder.Reboot the system. Ensure the system automatically logs in as the
webprintuser when it starts up, and that the PaperCut Web Print dialog is displayed shortly afterwards.See the section called “Troubleshooting Web Print Problems” for assistance if the dialog indicates an error.
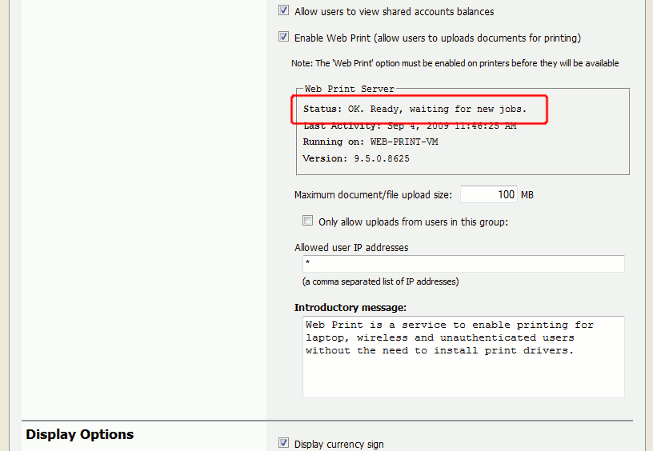
Log into the PaperCut NG admin interface and navigate to → → .
In the section titled Web Print Server, ensure that the Status is OK. If the status indicates an error, see the section called “Troubleshooting Web Print Problems” for assistance.
If your sandbox is for Email to Print only, you should see the full set of supported document types in the setup section. If there is a problem, you should temporarily enable Web Print so you can take advantage of the additional status information provided in the Web Print setup.
The Web Print setup is now complete and ready for testing. Continue at the section called “Web Print Testing and Feature Tour” to submit a test print job and test functionality.
As a final step you will need to enable Web Print for each printer via the → → → checkbox.
This section covers the usage and main features of Web Print. For detailed configuration, see the section called “Web Print Configuration”.
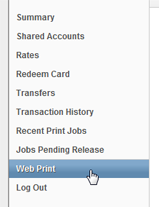
Log into the PaperCut NG user interface and click the Web Print link in the navigation menu.
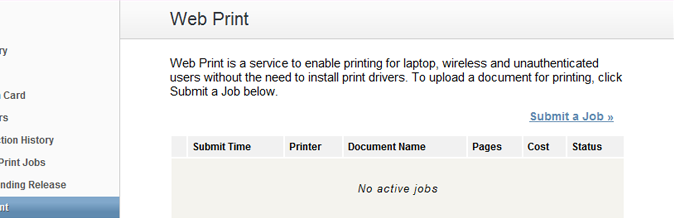
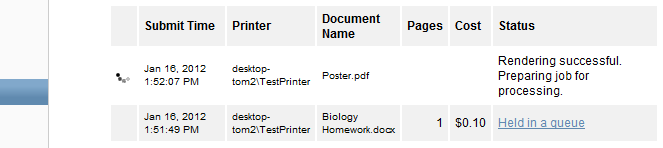
The front page contains a list of active and recently submitted Web Print jobs for the logged in user. At first, the list will be empty. Later, the list will show the status of submitted jobs.
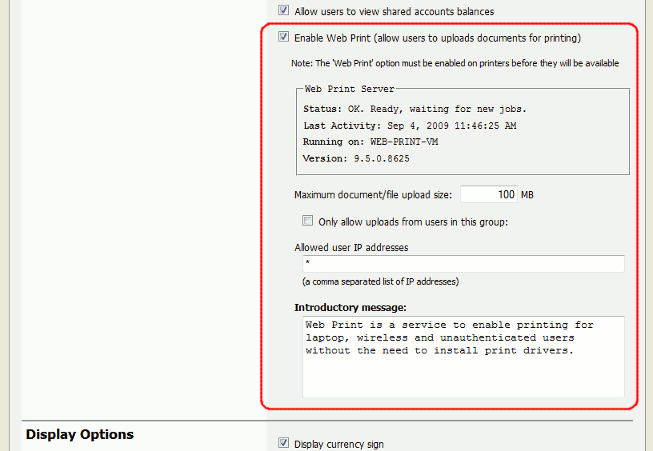
The message at the top of this page may be customized e.g. to include site specific information or other details users may need to know. See the Introductory message option in Figure 23.38, “Web Print settings in the admin interface”.
The administrator may restrict access to the Web Print feature by group, by IP address/range, or disable the feature entirely. See the section called “Advanced Web Print Configuration” for details.
Click Submit a Job to start the Web Print wizard.
The first step of the Web Print wizard is selecting a printer. This is the printer that the uploaded document will print to.
The printers available for Web Print are chosen by the administrator. See the section called “Administrator Settings” for details.
The printer list may be replaced with a clickable map or other custom content. See the section called “Designing Printer Maps / Custom Printer Selection Lists” for details.
Tip
Web Print works great in conjunction with hold/release queues and Find Me Printing (print job redirection / load balancing).
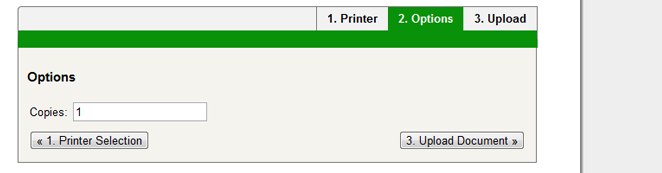
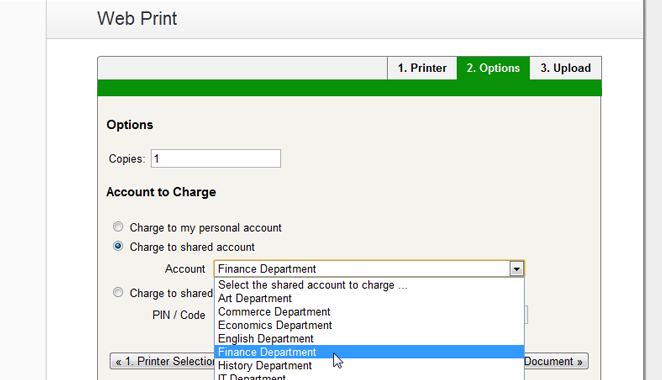
After selecting a printer, the second step is to select the print and/or account selection options. Most users will simply see an option to select the number of copies to print:
The maximum number of copies a user may submit is configurable via the
user.web-print.max-copiesconfig editor key. See the section called “Advanced Web Print Configuration” for details.Users with print account selection options will see additional options on this page, equivalent to what they would see on their popup:
Note
The developers hope to be able to support grayscale and duplex print options in the near future.
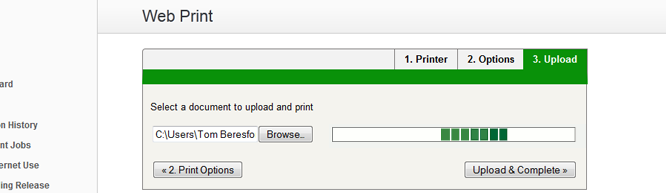
After selecting the print options and/or account selection settings, the third and final step in the Web Print wizard is to upload a document to print. This page lists the applications and associated file extensions that are supported.
If a supported application/file extension listed in the section called “Supported Applications and File Formats” is not shown on this page but you expect it should be, see the section called “Troubleshooting Web Print Problems” for assistance.
Once a document has been selected and is pressed, the file will begin uploading to the server.
The maximum file size a user may upload is configurable, with a default of 100MB. See the option Maximum document/file upload size in the section called “Advanced Web Print Configuration” for details.
Once the document upload is complete, the user is returned to the front Web Print page. The table now displays the status of the user's job. The status will change to indicate the progress of the job from rendering to printing, and job details such as cost and number of pages will be populated when known. The user may stay at this page to track the status of the job, or navigate away / close their browser - the job will not be affected.
At this stage the PaperCut application server accepts the uploaded document and sends it to the Web Print server. The Web Print server renders the document into a print queue by automating the process of opening the application (e.g. Adobe Reader) and printing to the target printer.


Administrators must nominate which printers are available with Web Print. Smaller organizations may wish to make all printers available, while larger organizations may want to restrict to a subset e.g. limiting access to printers located in public areas. A printer can be web print enabled via → → → .
Tip
To easily enable all printers for use with Web Print:
Select Enable Web Print (users may upload documents to print) on the [Template printer].
Copy the setting to all other printers using Copy settings from printer to printer.
General Web Print configuration settings can be found in the admin interface at → → .
| Setting | Description |
|---|---|
Enable Web Print (allow users to uploads documents for printing) | When enabled, a Web Print item appears in the navigation menu of the user web interface, and users are able to use Web Print functionality. When disabled, this item is not visible, and the Web Print functionality is not available to users. |
Maximum document/file upload size | If a user uploads a document greater than the specified size (in MB), their upload will be rejected. |
Only allow uploads from users in this group | This option may be used to restrict Web Print access to a particular group of users. When this option is enabled users not in the specified group will not see the Web Print item in the navigation menu. |
Allowed user IP addresses |
This option may be used to restrict Web Print access to a selected IP address range. For example, access might be limited to systems on a wireless network (i.e. force users on the wired network to use standard print queues). Address ranges may be entered in the format: |
Introductory message |
This message appears on the first page after a user clicks the Web Print item, and can be used to explain the service, offer site-specific advice or other information to assist the user. HTML is supported, e.g. <p> tags may be used to start a new paragraph, or an <a> tag may be used to provide a link. |
Table 23.7. Web Print Settings
The print options selected during the Web Print wizard are currently limited to the number of copies to print. Other print options such as grayscale, duplex, paper size etc. are selected based on the default options of the print queue.
When printing an image file, Web Print will rotate and/or scale down the image if needed to fit the image onto the page.
If it is important to provide the user with a print option choice (e.g. when the same printer has trays for
Letter and Legal paper), two print queues may be created and set up with different default settings e.g. one
print queue called Library Printer (Letter) defaulting to the Letter size and tray, and
a second print queue (pointing to the same physical printer) called Library Printer (Legal)
defaulting to the Legal size and tray.
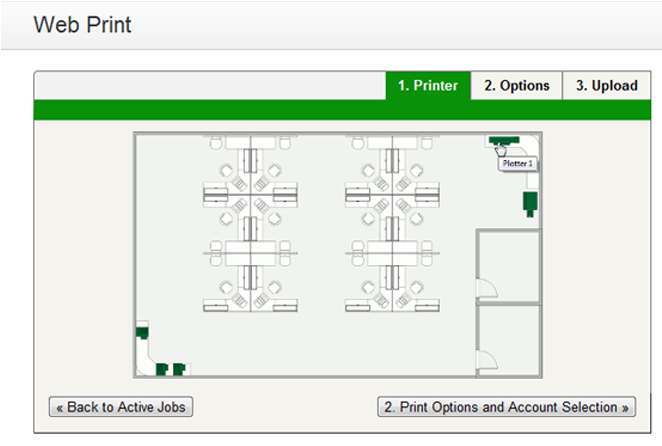
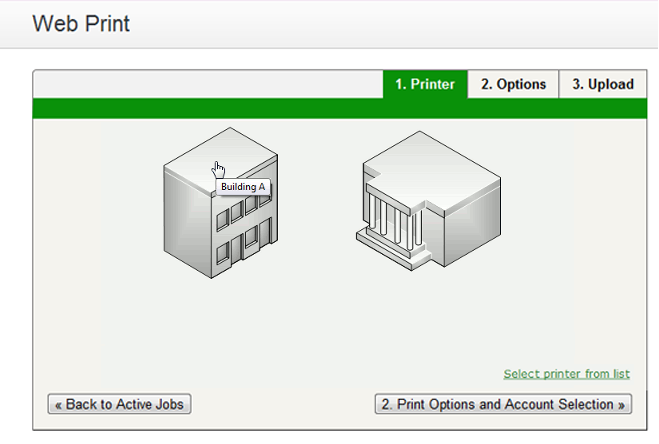
Part of the Web Print wizard involves selecting the target printer from a list. This is great for most environments, but organizations with many printers or large sites may prefer something that provides users with more context about the printer they are selecting.
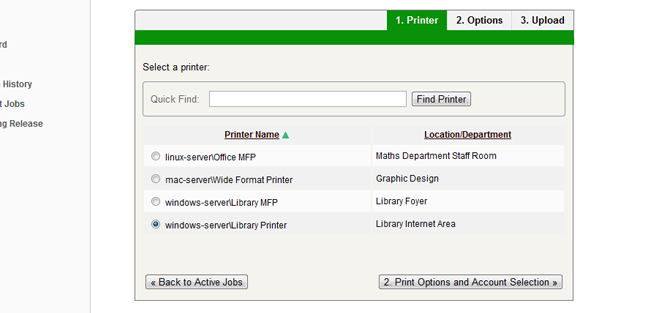
Figure 23.39. Web Print: selecting a printer from the list, which may be replaced with a map or custom list
Using a graphical map can assist users to find the most convenient printer. A map allows a user to select a printer by location, rather than guessing the printer's location based on its name. Using printer maps or other types of custom printer lists in PaperCut NG does not require any special or proprietary software - they can easily be implemented using open standards and free software.
Custom content is loaded in place of the printer list, by placing the appropriate file at
[app-path]/server/custom/web/ as described in the following table:
| File Name | Description |
|---|---|
| If this file exists, it will be loaded as an HTML page and displayed in an in-line frame (iframe), in place of the printer selection list. The HTML may contain any content or images, including links to other pages (which will also be loaded in the iframe by default). |
| If this file exists, it will be loaded as an SVG page, and displayed in an iframe in place of the printer selection list. The SVG may contain links to other pages or other SVGs. An SVG can be created using software such as Microsoft Visio or the free/open source Inkscape, and is a convenient way of displaying a map or floor plan with clickable links. |
Table 23.8. Files used for custom printer selection in the Web Print wizard
Tip
Any custom content placed in [app-path]/server/custom/web/, such as additional
images, can be accessed via a URL beginning with /custom/. For example if a file named
floor-plan.png is placed in [app-path]/server/custom/web/ it can
be accessed via the URL /custom/floor-plan.png.
Tip
The custom printer map is displayed in an iframe with dimensions 776px x 400px. If the content is larger than this, then scrollbars will be visible (the area will not be expanded to fit the content).
This example runs through the process of creating a printer map using HTML with image maps. This method is most suitable if you have floor plan images and/or aerial photos of your site (in PNG or JPEG format). If you have a plan in SVG/vector graphic format then the section called “Example 2: Creating a Printer Map Using SVG” may be more suitable.
The source for this example can be found at
[app-path]/server/examples/printer-maps/html-image-map/.
For this example, we will create a printer selection map with two layers: a site plan, and floor plans. Users first choose a building from the site plan, then a printer from the building's floor plan. We have two buildings: Building A and Building B. Each building has one floor of interest, with identical floor plans and five selectable printers.
The first step is to create a file named
printer-map.htmlat[app-path]/server/custom/web/. This file will be loaded as an HTML page in an iframe in place of the default printer selection list, and may contain any content you choose; including links to further pages. Open this file in a text editor.We then add the site plan image:
<img src="site-plan.png" usemap="#buildings"
       style="width: 422px; height: 190px; border: none;" />
The
usemap="#buildings"attribute tells the image to look for an image map with the namebuildings. Image maps allow you to make parts of an image "clickable". For more information about the HTML<map>element see xhtml.com's map element reference.Now we define the image map.
<map name="buildings">
    <area shape="poly" coords="" href="building-a.html"
          alt="Building A" title="Building A" />
    <area shape="poly" coords="" href="building-b.html"
          alt="Building B" title="Building B" />
  </map>
Here we have defined a new image map called
buildings, with two clickable areas. These areas are polygon shapes (shape="poly"), which means we can specify a list of points that will form the outline of the clickable area (i.e. the area inside the points will be clickable).Clicking the first area will load the page
building-a.html. Thealtandtitletags provide information about the link, and display a tooltip when the user hovers over the area.We have defined two areas and the pages they will link to, but we have not yet defined the coordinates for these areas. This is done using the
coordsattribute of the twoareatags. Using an image editor, we can find coordinates for the outline of the two areas. Most image editors, including MS Paint, display pixel coordinates when hovering the mouse over the image.Using the image editor, we find the following points for Building A (the lefthand building), starting from the top left corner, in
(x,y)format:(0,48), (84,0), (143,34), (143,142), (60,190), (0,155). Pixels are counted from the top-left corner of an image, so the coordinate(60,190)means "60 pixels from the top, 190 pixels from the left".We repeat the previous step for the second building to get coordinates similar to:
(242,50), (320,4), (422,63), (422,135), (332,190), (226,131).Now that we have the clickable area coordinates, we can define them in our image map.
The definition for the
areatag when using apolytype shape, tells us that the coordinates are specified in a list of x,y coordinates (i.e. "x1,y1,x2,y2...xn,yn"), so we enter the coordinates in thecoordsattributes as follows:<map name="buildings"> <area shape="poly" coords="0,48,84,0,143,34,143,142,60,190,0,155" href="building-a.html" alt="Building A" title="Building A" /> <area shape="poly" coords="242,50,320,4,422,63,422,135,332,190,226,131" href="building-b.html" alt="Building B" title="Building B" /> </map>Opening
printer-map.htmlin a web browser should now display the site plan image. Hovering the mouse over each building should display the link cursor, and indicate a link to the respective pages.The next step is to create the
building-a.htmlpage. Using a similar process to the existing page, we addfloor-plan.pngand create an image map for it:<img src="floor-plan.png" usemap="#printers" style="width: 600px; height: 362px; border: none;" /> <map name="printers"> <area shape="rect" coords="4,289,22,307" href="" alt="building-a\Printer 1" title="building-a\Printer 1" /> <area shape="rect" coords="33,342,51,360" href="" alt="building-a\Printer 2" title="building-a\Printer 2" /> <area shape="rect" coords="58,342,76,360" href="" alt="building-a\Printer 3" title="building-a\Printer 3" /> <area shape="rect" coords="521,7,566,23" href="" alt="building-a\Plotter 1" title="building-a\Plotter 1" /> <area shape="rect" coords="571,88,592,129" href="" alt="building-a\MFP 1" title="building-a\MFP 1" /> </map> <div>Building A (<a href="printer-map.html">back</a>)</div>This map is mostly similar to the previous one, except that we have defined five rectangle shapes (
shape="rect") and provided a link back to the main site plan (printer-map.html).Rectangle shapes in an
<area>element are defined with the coordinates of top-left and bottom-right corners ("x1,y1,x2,y2").Now we have the images and shapes in place for the site plan and one building's floor plan. To finish off this building, we now need to define what happens when each printer is clicked. This is done using a JavaScript function
selectPrinter. CallingselectPrinter('my-server', 'Library Printer')will submit the form on this step of the Web Print wizard, selecting the printer calledLibrary Printer, hosted on the print server calledmy-server.We can call this JavaScript function when one of the defined areas is clicked by setting the
hrefattribute as follows:<area shape="rect" coords="4,289,22,307" href="javascript:parent.selectPrinter('building-a', 'Printer 1');" alt="building-a\Printer 1" title="building-a\Printer 1" />Repeat the previous step for the remaining printers, taking care that the server and printer names are entered correctly. Note that the printer name is the printer's unique name on the print server, and may be different to the printer's "share name".
Repeat the steps for creating
building-a.htmlto createbuilding-b.html(or simply copy the file and modify to suit).Test the Web Print wizard to ensure that clicking on a building takes you to that building's floor plan, and clicking on a printer submits the form to select that printer. Note that if the names you've used for the printers don't actually exist in your PaperCut NG server, then you'll see an error message about the printer not being available. You may like to modify the details for one of the printers to match a real printer so that the wizard can be tested end-to-end.
The source for this example contains some additional tweaks to improve browser consistency, such as removing the border and white background of the iframe in Internet Explorer.
This example explains how to use an SVG image for a clickable printer map. This method is most suitable if you have plans or drawings in a vector format that can be saved as SVG. Otherwise the section called “Example 1: Creating a Printer Map Using an HTML Image Map” may be more suitable.
An example SVG floor plan with clickable printers can be found at
[app-path]/server/examples/printer-maps/html-image-map/.
Modern web browsers are capable of displaying an SVG file in a similar way to displaying a web page. Mozilla Firefox and Opera can display SVGs "out of the box", and Microsoft Internet Explorer can display SVGs using the Adobe SVG Viewer add-on. In addition to drawing the image, parts of the image may be made "clickable" to provide links to other pages or, as in this case, to call a JavaScript function that selects a printer.
In this example we will describe how to take an existing SVG image, and make parts of it clickable so a printer may be selected.
Tip
A Microsoft Office Visio drawing can be saved as SVG and used in this example.
Download and install Inkscape, the free/open source vector graphics editor, and use it to open your SVG.
Select the object that should be made "clickable". You should see a dotted background around the object.
Right-click the object and select Create Link.
Right-click the object and select Link Properties.
In the Link Properties dialog that appears, enter a value for the Href field like:
javascript:parent.selectPrinter('server', 'printer');, whereserveris the name of the print server, andprinteris the name of the print queue.Repeat to create links for each printer in the image.
Select → and choose a file type of
Plain SVG (*.svg). Save the image to[app-path]/server/custom/web/printer-map.svgon the PaperCut NG server.Try testing with the Web Print wizard. The SVG should be visible on the first step of the Web Print wizard, in place of the printer list. Clicking a printer should move on to the next step.
The following advanced configuration options are available via the config editor. See the section called “Using the Config Editor” for information about using the config editor.
| Config Name | Description |
|---|---|
web-print.job-idle-timeout-mins |
If a Web Print job remains unchanged for longer than this period of time, it is considered finished and is "cleaned up". The document and associated files are removed, and the job will no longer appear in the user's list of current Web Print jobs. The default idle job timeout is 20 minutes. |
web-print.job-rendering-timeout-mins |
The Web Print server is given this length of time to render a Web Print document. If a print job has not been generated from the document after this time, the job is marked as errored and associated files are removed. The default job rendering timeout is 5 minutes. |
web-print.max-copies | This is the maximum number of copies a user may print via Web Print. This option exists to prevent users accidentally (or thoughtlessly!) printing too much. |
web-print.hot-folder |
When a user uploads a file via the Web Print interface, it is written into the "hot folder", along with
a |
Table 23.9. Web Print Config Editor Keys
The following configuration options are available in the Web Print server configuration file, located at
[app-path]/providers/web-print/[platform]/web-print.conf.
| Config Name | Description |
|---|---|
hotfolder | The location of the Web Print hot folder. This is generally a mapped drive letter (Windows) or a mount point that maps to a file share (Mac, Linux). It may also be a local path, if the Web Print server software is running on the same system as the PaperCut NG primary server. |
debug |
Set to |
options.pdf |
Set to
Set to |
Table 23.10. Web Print Server Config File
- Q: Why are some file formats not available? (Supported file formats listed in are not listed under OptionsMobile & PrintWeb PrintStatus page, or not accepted when uploading a file.)
- Q: The status in the admin interface or on the Web Print dialog is indicating an error. What can I do?
- Q: The Web Print service is running as the SYSTEM account, and does not have access to render print jobs.
- Q: Where is the Web Print logs folder?
- Q: Why is my print queue "currently not available"?
| Q: | Why are some file formats not available? (Supported file formats listed in the section called “Supported Applications and File Formats” are not listed under → → → page, or not accepted when uploading a file.) |
| A: | First, check the section called “Supported Applications and File Formats” to see that the file format is supported in the mode that the Web Print server is running in. Some file formats are only supported in sandbox mode.
Next, ensure that the associated application is installed and working. If running in sandbox mode, log
in as the
The next step is to check the Web Print log files. The Web Print server has a
handler for each supported application. Each handler has a log file, which may
provide more information about why the file format is not available. The handler log files are named
Open the log file that matches the application of interest in a text editor (e.g.
For further assistance, contact support. |
| Q: | The status in the admin interface or on the Web Print dialog is indicating an error. What can I do? |
| A: |
|
| Q: | The Web Print service is running as the SYSTEM account, and does not have access to render print jobs. |
| A: |
|
| Q: | Where is the Web Print logs folder? |
| A: | The logs folder is located on the system running the Web Print server software.
On Windows the location of the logs folder depends on configuration and the Windows edition. Logs may be
written to |
| Q: | Why is my print queue "currently not available"? |
| A: | When using the Web Print interface, some print queues may be giving you the error message: Errored: Printer '\\servername\queuename' is currently not available. This can be caused by trying to use Web Print on a print queue that has been deleted, or by trying to print to a print queue that is not installed on the Web Print Sandbox. Please confirm this, by logging into the Web Print Sandbox as the Web Print user, and attempting to print to the above print queue. NoteIt is important that the jobs pass via the queue on the server - do not add a Local Printer. You should also add the printers using the print server's machine name and not an IP address.
|
Microsoft Windows XP and Server 2003 administrators can easily install the Microsoft XML Paper Specification Essentials Pack (XPSEP), which contains the XPS viewer from the Microsoft website. Versions for both 32bit and 64bit are available. By default, Windows Vista and Windows 7 will include a compatible XPS Viewer if .NET Framework 3.0 is already installed.
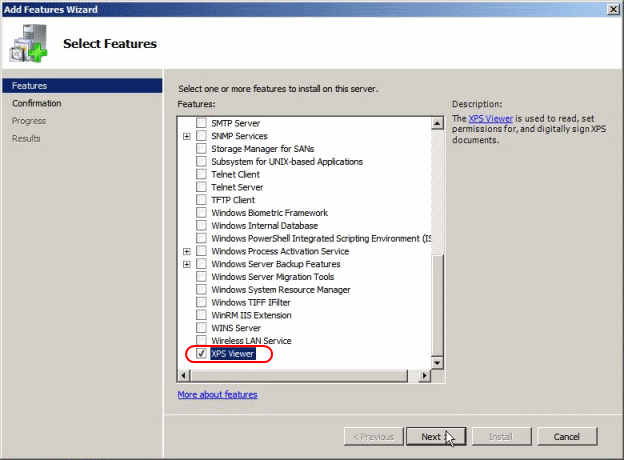
Customers running Microsoft Windows Server 2008, must install the XPS Viewer from the Features module of the Server Manager MMC snap-in.
Load the Server Manager MMC snap in via → → .
Right-click on Features and select Add Feature.
Check the tickbox for "XPS Viewer", and click Next.
Click Install on the 'Confirm Installation Selections' dialog box.
Click Close when the installation is complete.