Table of Contents
The Web Cashier is a simple web interface that provides a till/cashier to facilitate simple transactions using PaperCut NG accounts. It's specially designed for non-technical staff in educational organizations. For example the cashier user may:
Charge end-user accounts, or shared accounts, for ad-hoc services such as laminating, binding or library fines.
Deposit funds to a user's personal printing account, usually after receiving a cash or electronic payment.
Although it is possible for an administrator to perform account adjustments at any time, the Web Cashier interface is a simpler interface designed specifically for non-technical users such as office administration staff, library staff and service counter staff.
Web Cashier can be used in a variety of ways. Some examples:
The library teacher can use Web Cashier to charge students for various services such as document binding, laminating, or library fees without handling cash. Services are charged to the user's balance and they receive an itemised transaction acknowledgment slip, which can be printed or automatically emailed if needed.
Office staff can accept payments from users and then credit the user's balance using the simple Web Cashier Deposit screen (e.g. add extra quota or top-up an account over the counter). Web Cashier screens are simple and only present information tailored specifically to the cashier user's role. (Purchase, Deposit or Both). This approach is ideal for smaller organizations who do not have the transaction volumn to justify Pre-Paid TopUp cards or an online payment gateway (see Chapter 13, TopUp/Pre-Paid Cards).
When people leave an organisation they can be provided with the balance of their account and the transaction can be recorded as a "refund" item, created by the PaperCut NG administrator. The items are configurable and depend on the services the organization may want to provide.
Web Cashier is not enabled by default and must first be set up by the PaperCut NG administrator. To set up Web Cashier:
Enable it by clicking the button under → → .
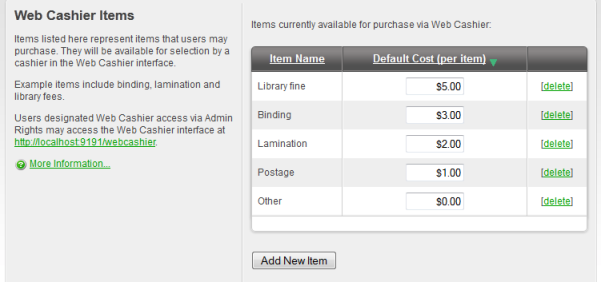
To set up Web Cashier to sell ad-hoc services or products (items) the administrator should first define them. To add an item:
Press the button.
Give the item a name or short description.
Enter a default cost.
Press .
To delete an item click on the delete link. It is also possible to change the default cost of the item later.
Optionally customize the text displayed on the Purchase and Depositscreens or header of acknowledgment slips. Examples are provided. For more configuration details see the section called “Advanced Web Cashier Configuration”.
Access Web Cashier using the URL
http://[server-name]:9191/webcashier.This will be the URL you provide to your Web Cashier users later (e.g. Office/Admin/Service-desk staff).Perform some test transactions and ensure Web Cashier is set up to your requirements.
Grant Web Cashier user privileges to the users that will require access (i.e. teacher, office staff, librarian, etc.). To read more about assigning Web Cashier access to users or groups see the section called “Assigning Web Cashier User ”