The PaperCut NG activity tracking and charging is implemented using 100% server-side technology. User Client software is not required as part of the activity monitoring process.
Note
The use of client software for activity monitoring could open up security problems as client software is readily accessible to end-users. By design PaperCut Software developers endeavor to implement all monitoring at the server level eliminating client-side loopholes. The client software supplied with PaperCut NG is simply a presentation layer around server-side implementation.
Client software is provided to facilitate four tasks:
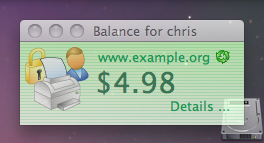
Allow users to view their current account balance via a popup window.
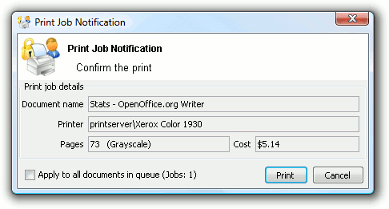
Provide users with a "last chance" before printing, confirming what they are about to print.
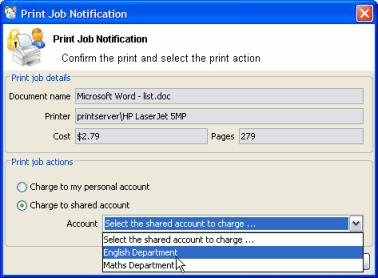
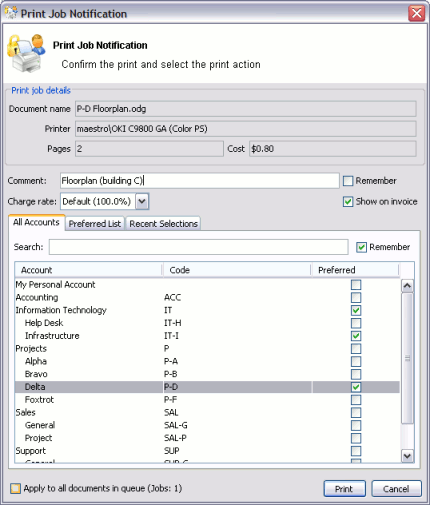
Allow users to select shared accounts via a popup, if administrators have granted access to this feature.
Display system messages such as the "low credit" warning message or print policy popups.

The client software is available for most major platforms including:
Microsoft Windows
Mac OS X
Linux and Unix
The client software and deployment tools are installed automatically on the server under the
[app-path]\client directory. On a Windows based server this directory is automatically
shared in read-only form providing network users with access to the client executables.
The following chapters contain further information about the user client:
Command line and config options are discussed in the section called “User Client Options”.
Customization of the user client is discussed in the section called “Customizing the User Client Tool window”.
Tip
The behavior of the user client, such as where on the screen it pops up or which option is selected by default, can be customized. This is discussed in the section called “User Client Options”.
To educate the users about the user client, administrators might find the sample information sheets helpful.
The PaperCut NG client software may be deployed to workstations using a variety of deployment methods.
The deployment options are covered in detail in the [app-path]\client\README.txt file.
Options include:
If you're after a manual "setup wizard" style installer, run the program
client-local-install.exelocated in the network sharePCClient. You can access this share by typing the following address into Windows Explorer.\\<MyServer>\PCCClient\win, whereMyServeris the name of the server where PaperCut NG is installed.Administrators looking for an automated install/deployment option should consider the "zero install" strategy. This is the recommended strategy for most Windows network environments as it's 100% self-maintaining.
Administrators can also consider deploying via MSI package, allowing the Client software to be remotely installed via Group Policy. This option is available for advanced sites which already leverage MSI packages for staged software deployment and continuing with this existing procedure is desirable.
The recommended approach with Windows networks is the "zero install" strategy. This involves configuring the workstations via group policy or
otherwise, to run the client executable directly off the PCClient share - a share set up during installation. This avoids
the need to undertake a separate installation process on each workstation and ensures the client software is automatically updated in
conjunction with server updates.
The client can simply be run directly from the PCClient share setup on the server. Two executables provide
this launch functionality:
    pc-client.exe
    pc-client-local-cache.exe
pc-client.exe will launch the client directly off the network share. The "local-cache" version
(pc-client-local-cache.exe), is a smarter version that first copies itself and associated files to the
local drive and launches itself from there. The local-cache version has the advantage that any future startups will use the
local copy and hence minimize network traffic. The cache is self-managing and kept up-to-date ensuring that any new versions of
the client are automatically and transparently copied down to the client.
Using pc-client-local-cache.exe is recommended on large networks. It does however require a globally writable
cache directory. By default the cache is created in a directory on the system drive (normally C:\Cache). An
alternate cache can be specified with the --cache command-line switch. Administrators should ensure than
standard users have write access to the system drive, or manually create the cache directory if required.
The zero-install deployment option is not appropriate for all situations. A local install is recommend on Windows Laptop systems
that are not permanently connected to the network or centrally managed by network administrators. The
client-local-install.exe program can assist end users with a standard "setup wizard" install process.
This installer may also be streamlined / automated by using command-line options, see
the section called “Automating / Streamlining Installation on Windows” for more details.
The recommended way to launch the pc-client-local-cache.exe on startup is to add a line to your
Domain login script:
cmd /c "start \\servername\PCClient\win\pc-client-local-cache.exe --silent"
See below for other automatic start options.
For more information on alternate deployment options see the [app-path]\client\README.txt
file.
The User Client software is available as a silent-install MSI (no clicks or wizards). This option is available for advanced sites which already leverage MSI packages for automated software deployment and upgrades using Active Directory Group Policy options. Please note that using the pc-client-local-cache.exe version of the User Client is our recommended method for most deployments, as all updates are automatically pushed to client machines. The MSI option discussed here must be manually updated.
The MSI package is a great option for organizations managing staged rollouts via Group Policy Filters. It is common in large organizations to progressively roll out new software as a series of small steps, for example the IT department may get the software first, followed by a roll out across the organization.
Important
Ensure these steps are conducted by an administrator experienced with Active Directory MSI software deployment.
Copy the all client files and subdirectories from
\\servername\PCClient\win\
into a versioned folder on your domain, alongside your other MSI-deployed software, e.g.
\\DeployedSoftware\papercut-client-12.5\
Do not deploy the MSI directly from the PaperCut install directory because the contents of this directory will change when PaperCut is upgraded. This will result in problems in your MSI deployments.
Please take note that unlike some other MSI packages you may have seen, this file is not a self-contained archive - it must be copied along with the rest of the PaperCut client files when preparing your deployment.
If you need to make adjustments to the client (such as modifying config.properties or adding a custom logo),
now's the time to do so. Changes made will be distributed to your domain as the MSI deploys.
Deploy the pc-client-admin-deploy.msi to your domain, as a Software Installation component
to a Group Policy Object. The procedure for MSI deployment via Group Policy is explained in
Microsoft's Knowledge Base: http://support.microsoft.com/kb/816102.
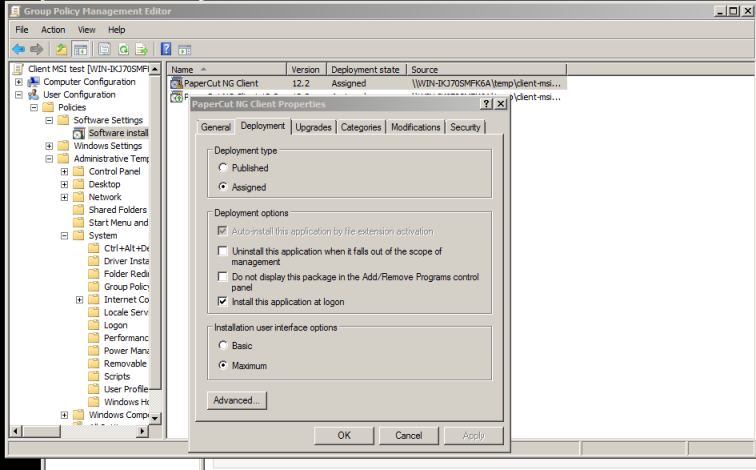
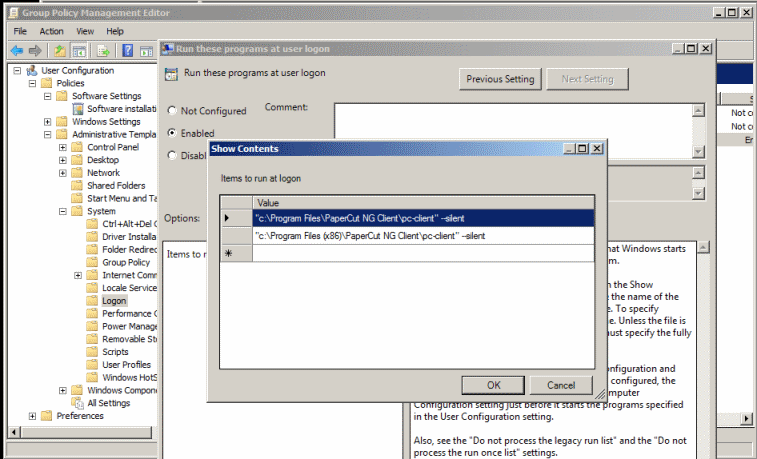
Configure pc-client.exe to launch automatically at startup, as you would for any other program. One option is to add the User Client application to your GPO's "Run these programs at user logon" setting, found under
→ → → →
Tip
If you need to deploy to a heterogeneous environment of 32 and 64-bit systems, the default install paths will be different
for each architecture. A simple solution to this path problem is to simply launch the client from both
C:\Program Files and C:\Program Files (x86) paths, as in the screenshot above.
The non-matching path will silently fail.
An alternate option is to start the client from an existing user logon script. An example of the line to add to the logon script is:
cmd /c "start "C:\Program Files\PaperCut NG\Client\pc-client.exe --silent"
Older machines may require an upgrade to the Windows Installer Service. If so, you will encounter this error message:
    "This installation package cannot be installed by the Windows Installer Service.
    You must install a Windows service pack that contains a newer version of the
    Windows Installer Package"
To resolve this, download and install the Windows Installer 4.5 Redistributable, from: http://www.microsoft.com/en-us/download/details.aspx?id=8483
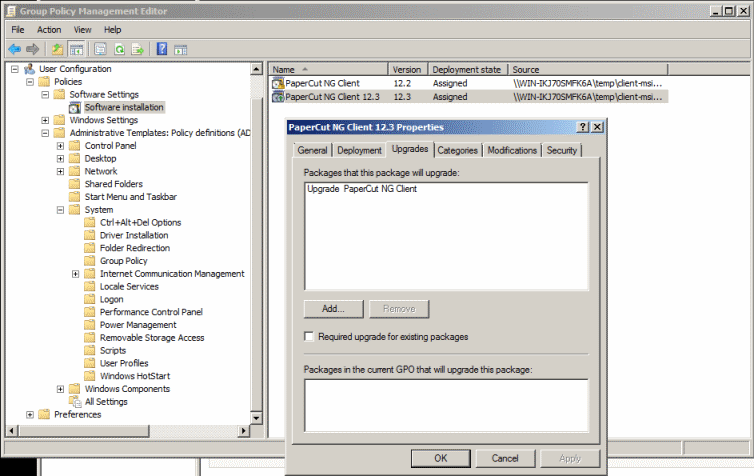
The procedure for upgrading an already-deployed installation of the client (e.g. from 12.3 to 12.4) is slightly different to that of the initial deployment - updated MSI packages need to be added to your original GPO as an upgrade item. For step-by-step instructions on the procedure, see Microsoft's Upgrade Guide at: http://technet.microsoft.com/en-us/library/cc783421%28v=ws.10%29.aspx
Please don't simply replace an old MSI with a newer version. If after following the instructions in the Microsoft article above you're still unsure how to proceed, please seek assistance, or contact technical support.
Windows 8 a introduced a new user interface called Metro. It has a tile based start screen or runs one application at a time. This user interface is also known as the "Windows 8-style UI".
When the Windows 8 user interface is in Metro mode, Windows Desktop applications are not visible. This includes notifications such as the PaperCut Client popup. Therefore the Client popup could be missed.
PaperCut uses a Toast notification to notify user in Metro mode that a notification requires their attention in Metro mode.
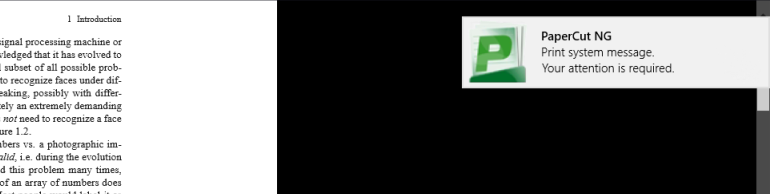
With the Toast notification, users working in metro mode will be notified of all PaperCut activities that require their attention in Desktop mode.
This section covers the installation of the PaperCut client on Apple Mac systems. The complexities of Mac printing in general are discussed in Chapter 27, Mac Printing in Detail. Before installing the client software, we recommend that administrators study Chapter 27, Mac Printing in Detail and ensure printing is working as expected.
The Mac client is a supplied as a native Mac .app package. It's a universal application
supporting Mac OS X 10.4 (fully patched) or higher on both PowerPC and Intel hardware.
The three common installation methods are outlined below cover most situations. The instructions for the "single user install" is very standard and should be able to be conducted by any Mac end-user. The other installation methods are more technically focused and aimed at Mac network administrators.
The client software will work best if Java 5 (or higher) is installed. Java 5 is available for OS X 10.4 or higher. If Java is not already installed, the installer is available from the Apple website. This simplest way to install Java is to run /Applications/Utilities/Java Preferences, and you will be prompted to complete the installation.
This method is suitable for a Mac computer used by a single user. For example, a personal Mac desktop or laptop.
The installation process simply involves clicking on the client-local-install program. This copies
the PCClient application into the over to the system's Applications folder and
starts the client in the "confirm network identity" mode. The simplest way to run the install process is to connect
to the server's pcclient share over the network, however alternate methods such as copying
the folder contents via a USB key or drive are also possible.
To install the Mac client from the server's share:
Start and Log into the Mac computer. Ensure it's connected to the network.
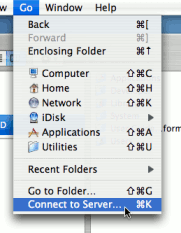
Open the Finder.
From the Go menu, select Connect to Server....
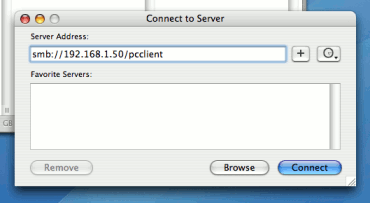
Enter the pcclient share's connection details like:
smb://server_name/pcclientEnter password information if requested.
Double-click the
client-local-installfile. This will execute a small AppleScript program that will commence the install/copy process.Test the application by double-click on the
PCClientapplication icon in the system's localApplicationsfolder.
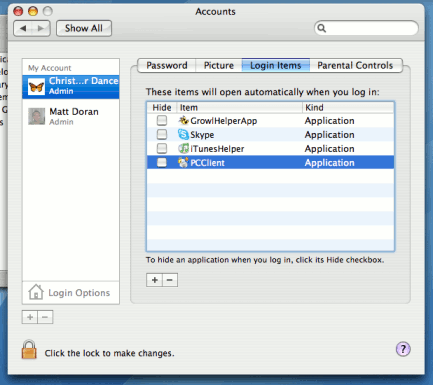
If the user needs the client for printing - for example to use the shared account popup - it's advisable to configure the application to automatically open upon start-up:
Open System Preference... from the Apple menu.
Select Accounts.
Select your login account.
Click the Login Items tab.
Click the
+button and browse and locate thePCClientapplication.Test by restarting the computer. The client should start automatically after the reboot and login procedure is complete.
On a multi-user Mac system, setting up a Login Item for each user would be a tedious task.
To streamline this process, the PCClient application can be configured to start on login via
the login hook. A login hook is an advanced Mac feature that works by running a script when a user logs in.
The PCClient package includes a command script resource that installs the login hook.
To install the client on a multi-user system:
Start and Log into the Mac computer. Ensure it's connected to the network.
Open the Finder.
From the Go menu, select Connect to Server...
Enter the pcclient share's connection details like:
smb://server_name/pcclientEnter password information if requested.
Drag the
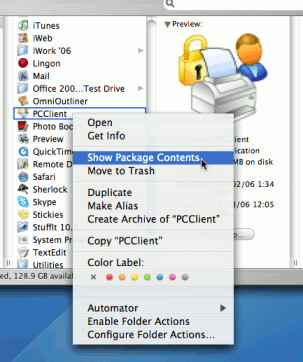
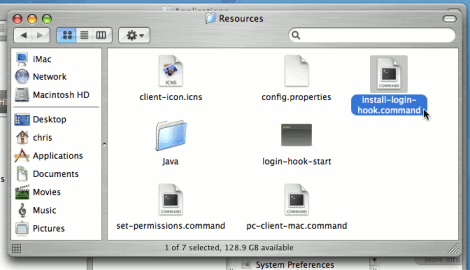
PCClientpackage over to the local hard disk's Applications folder. The copy process will commence.Control-click on the newly copied
PCClientapplication in the Applications directory. Select Open Package Contents.Navigate to
Contents/Resources/.Double-click on the
install-login-hook.commandscript.Restart the system and verify the client starts on login.
Important
If you're already using a login hook for other script tasks, the setup process will be different.
Instead in step 9, double-click on the set-permissions.command file. Then
insert the following line at the end of your current login script (all on one line):
/Applications/PCClient.app/Contents/Resources/login-hook-start
    "$1"
The set-permissions.command script ensures the software is set up with the
correct permissions, ensuring it's accessible to all users.
The login hook, once installed, can be removed with the terminal command:
sudo defaults delete com.apple.loginwindow LoginHook
This deployment method is for advanced Mac network administrators and is suitable for medium to large Mac networks. Knowledge of the Mac's Unix underpinning and scripting is required.
A more flexible option over locally installing the PCClient package on each Mac
system, is to directly launch the client from the pcclient share. The advantage
of this deployment method is that any updates applied on the server (and hence updates to the
client directory) will automatically be propagated to all workstations.
The process of setting up zero-install deployment will vary form network to network depending on the directory environment in use and administrator preferences. The process can however be summarized as:
Configure the Macs to mount the
pcclientshare as a volume on login or start-up.Configure a login hook to start the client off the share. The
install-login-hook.commandresource script explained in the multi-user install above may help.
The typical way to mount the share is to use mount_smbfs in a boot script.
See the Apple documentation on mount_smbfs at:
http://developer.apple.com/documentation/Darwin/Reference/ManPages/man8/mount_smbfs.8.html
Further information on Mac printing is available at Chapter 27, Mac Printing in Detail.
The PaperCut NG user client software may be deployed on Linux and other Unix based operating systems using the following installation procedure.
Linux and Unix workstations are supported via Java. Java version 5.0 or higher is required. Your Linux distribution may come with Java pre-installed or have the option to install. If no Java option exists, Sun Microsystems provides a self-install Java distribution for Linux and other major Unix platforms.
Ensure Java 5.0 is installed and the JAVAHOME environment variable is
defined on the PATH.
Like the Windows version of the client software, the Linux/Unix Java version is installed in the
~/client directory on the server. All files in this directory need to be copied,
or make available to the Linux/Unix workstation. Common methods include:
Copying the files from the server using file transfer programs such as FTP or scp.
If the server is Windows based, connecting using smbclient or the Gnome or KDE
smb://file browsing tools. The client files are shared via a read-only share called\\[server_name]\PCClient.If the server is Linux based, consider exporting the
~papercut/clientdirectory via NFS and mounting on the workstations. The client can then be ran directly from the mount.
If the workstation is used by multiple users, the client directory should be copied to a common location such as
/usr/local/papercut/client.
Open a command prompt and set execute permissions on the pc-client-linux.sh file as follows:
    cd /usr/local/papercut/client
    chmod 755 ./pc-client-linux.sh
Log on as a user (a user listed in the PaperCut NG system) in your preferred Linux desktop GUI environment.
Locate and execute the file /usr/local/papercut/client/pc-client-linux.sh. The PaperCut NG
client should open displaying the user's account balance.
It is usual to configure the client as a "Startup Program" or "AutoStart Program" launched during login. See your desktop documentation to see how to define a startup program.
A number of command-line options are available to change the client's behavior. More information can be found in Table A.2, “User Client command-line options”.