Table of Contents
Apple Mac printing is a complex topic and deserves its own chapter. The developers started on PaperCut NG for the Mac in 2006. Developing software on the Mac was an enjoyable experience and presented very few technical challenges. The challenges instead came in the area of general printer setup and idiosyncrasies with printer configuration. Mac administrators will be all too familiar with these challenges!
This chapter addresses Mac printer setup (on both the client and server) and presents solutions for common setup and deployment scenarios. The chapter is split into two sections:
1st Section: Organizations hosting their print queues on a Mac (e.g. Mac OS X Server)
2nd Section: Organizations hosting their print queues on Windows Servers but supporting Mac clients
In most cases only one section will apply on your network. As Mac systems have become more popular recently, many sites are opting for Mac print servers to support their Mac workstations. PaperCut can be installed directly on a Mac print server, offering native, end-to-end Mac printing.
This section discusses printer setup on systems where the print queues are hosted on a Mac system. For example, PaperCut NG is installed on a Mac system such as Mac OS X Server. See the next section if your print queues are hosted on a Windows server.
This section assumes Mac OS X Server (e.g. Mac OS 10.6 Server), however PaperCut NG also supports running on the workstation version of Mac OS X. These notes apply in part to both operating systems. The term 'server' is used to represent the system hosting the PaperCut NG software, and not necessarily the edition of Mac OS X.
Before we delve into configuring server based print queues in a Mac environment, we'll first take a few moments to discuss common terminology:
Note
Print Queue: There are typically two ways of providing shared multi-system access to a printer:
Configure each system to print directly to the device. The device needs to be networkable (e.g. have an Ethernet connection) and support multiple connections.
Configure a shared print queue. In this setup, only one system connects directly to the device (e.g. a server) and in turn the device is shared on the network via a print queue. Other systems on the network print to the shared queue rather than directly to the device.
Option 2 is regarded as a better solution on multi-user networks as it provides a higher level of scalability, allows for centralized administration, and allows administrators to move or remap devices without needing to propagate changes to workstations. PaperCut NG requires a shared print queue as it works by intercepting the jobs as they pass through the server's queue.
CUPS: CUPS is the print queue system used by Mac. This is the same queue system used by many other UNIX based platforms including popular Linux distributions. Apple is a major supporter of CUPS.
IP Printing: This is a generic term used to describe a number of print protocols that are used to exchange print documents between a computer, a server queue, or a physical printer. (Note: This term is also occasionally used incorrectly to describe the "JetDirect" print protocol discussed below)
IPP: This is an acronym for Internet Printing Protocol. This is the "native" print protocol used by CUPS and hence the Mac. It's a modern protocol designed to work well on modern networks including local networks, or even over the internet or a WAN.
LPR: LPR/LPD is the traditional UNIX based print protocol.
JetDirect/Socket: This is a very simple print protocol used to transmit print
jobs to a physical printer on a TCP network. The printer simply accepts connections on port 9100.
In Windows, this print protocol is often referred to as a Standard TCP/IP Port,
and in some cases generally as IP Printing. Almost all network printers support this method.
Bonjour Printing: This is not a print protocol, but instead is a way of publishing printers on a network so workstations can locate the device/queue.
Where possible we have designed PaperCut NG to work with all print protocols, however we do recommend some over others. The following setup procedure highlights methods that have shown to work in most environments.
The PaperCut NG compatible setup procedure can be summarized as follows:
Step 1: Install the printers on the server using a compatible driver
Step 2: Enable Printer Sharing
Step 3: Set up the printers on the workstations to point to the server's shared queue
Each one of these steps is discussed in detail below:
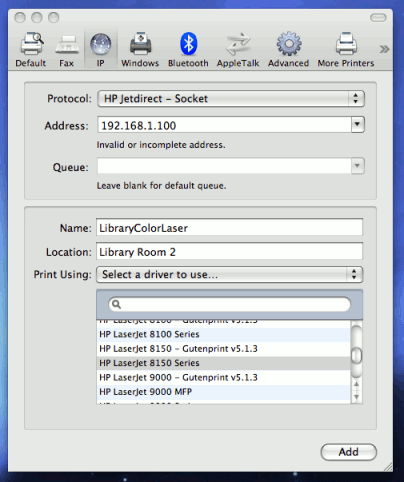
Install the printer on the system running PaperCut NG using a compatible driver. For example, a driver supplied by Apple or the manufacturer. If there is a choice of driver, opt for a Postscript or PPD based driver. Follow the manufacturer's suggested setup procedure, or Apple's recommended Queue setup procedure (Apple Print Services Administration Guide) if running on 10.5 Server. If the manufacturer supports various connection methods, we recommend using JetDirect/Socket if possible. Here is an example of a procedure that will set up a standard printer using a plain JetDirect/Socket connection on all Mac versions (server/workstation 10.4/10.5):
From the Apple Menu select System Preferences...
Select Print & Fax
Click on the + button to add a new printer
Click on the IP icon on the toolbar
Select HP Jetdirect - Socket in the Protocol list
Enter the printer's assigned IP address
For convenience, give the printer a simple name without spaces
Select the driver or printer model from the list and press
Test printing using a local application (e.g. Print a web page from Safari). Confirm that printing works as expected.
Important
For new printers it is necessary to configure PaperCut NG to monitor the new printer. This is discussed in the section called “Adding and Removing/Deleting/Ignoring Printers”.
Important
Continue to the next step only after printing from the server is working. If you have problems, see the troubleshooting section below.
Some high-end printer models support other connection methods such as LPR, IPP or even direct AppleShare or Boujour printing. If the printer offers the option to disable these protocols, e.g. via a web based configuration page, take the time to turn these off. This will minimize the chance of incorrect future configuration, and minimize the chance of a workstation user discovering the printer directly. Some printers also support access control via IP addresses. If available, consider setting access control so only the server IP can submit print jobs to the physical printer.
If your printer does not support JetDirect/Socket, consider using LPR as the 2nd choice.
Some printers support proprietary connection methods (e.g. selected Epson printers). Always try Jetdirect/Socket first and use proprietary methods as a last resort.
If you're not able to install or find a driver for your printer, try the Generic Postscript Driver/Printer.
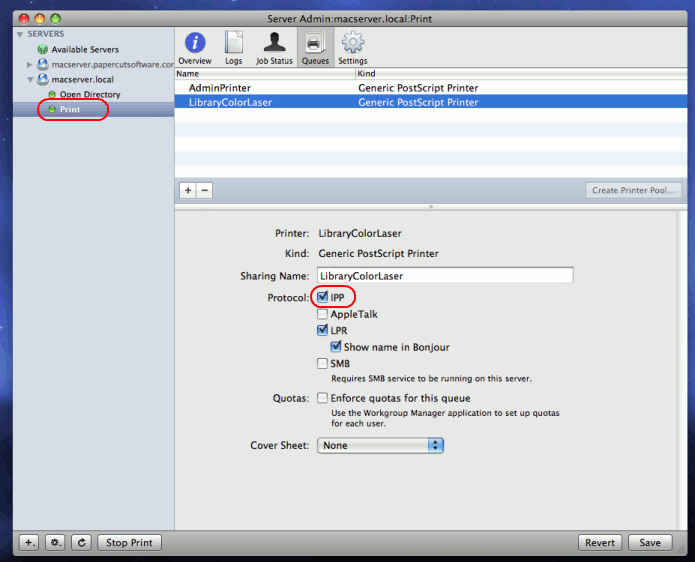
By default locally installed printers are not shared as public print queues. Printer sharing needs to be manually enabled. If you're running the workstation version of Mac OS X, this is done by enabling "Printer Sharing" under System Preferences. On Mac OS X Server, use the following procedure:
Open Server Admin, and select your server.
Select Settings, then Services and enable the Print service.
the change.
In the server list on the left, select your server, expand, and highlight the newly created Print service.
Select from the toolbar. Your newly installed printers should be listed.
Select each printer and ensure that at least the IPP protocol is selected. It may also be useful to enable LPR and expose via Bonjour.
Ensure "Enforce Quotas for this queue" is turned off as PaperCut NG manages this.
Click the button or save when prompted.
Restart the Print Service by pressing followed by the . Note: In some cases we've seen issues where server admin changes have not been immediately picked up. If you suspect this, and can afford the downtime, schedule a system restart now.
Once the printers are set up on the server and shared, the next step is to install the printers on the workstations. In the Windows world this is an easy process - the user just double-clicks on the print queue and the drivers are automatically deployed and configured. The process is a little more manual on the Mac, but we'll also discuss a method of automating deployment via the Workgroup Manager. First, we'll address manual setup.
The goal is to add the printer on the workstation so it communicates with the server (its queues) rather than directly to the printer. Protocols include, IPP, LPD, or LPD added via Bonjour. The recommended setup is to use IPP as this is the native protocol.
Log onto a workstation
Open → (or the Printer Setup Utility if using Mac OS 10.4).
Click the add new printer button (or ).
Select as the type and select IPP as the Protocol.
Enter your server name (or the server's IP Address) in the Address field.
Enter the the printer's Queue Name prefixed with
printers/in the Queue field. For example:printers/my_office_printer. Note: if you have selected LPR as the connection method, theprinters/prefix will not be required (see the following section).The queue name of the printer will have been set when the queue was first created on the server, and may be different to the printer name. On Mac OS 10.5, the queue name can be found at: → → → → → . On Mac OS 10.4, the queue name can be found at: → → → → → .
Select the appropriate printer model. If this is not listed, you may need to install the manufacturer's driver, then repeat steps 2 through 6.
Take some time to print from the workstation and confirm that printing succeeds.

If you have problems obtaining a driver for your printer, try the Generic Postscript Driver. This option will work with most printers. If after a test print the printer stops with a connection error, check the printer sharing permissions on the server or try the alternate method discussed below.
Log onto a workstation
Open → or the Printer Setup Utility if using Mac OS 10.4.
Click the add new printer button (or ).
Select as the type and select LPD as the Protocol.
Enter your server name (or the server's IP Address) in the Address field.
Enter the the printer's Queue Name in the Queue field.
The queue name of the printer will have been set when the queue was first created on the server, and may be different to the printer name. On Mac OS 10.5, the queue name can be found at: → → → → → . On Mac OS 10.4, the queue name can be found at: → → → → → .
Select the appropriate printer model. If this is not listed, you may need to install the manufacturer's driver, then repeat steps 2 through 6.
Take some time to print from the workstation and confirm that printing succeeds.
Manually installing the printer on each desktop on a large network may be tedious. Large networks using Open Directory may benefit from automating the process using Workgroup Manager. The key to successfully deploying/publishing printers via the Workgroup Manager is to publish the configuration from a working workstation rather than the server itself. This is counter intuitive as normally administration is conducted by running Workgroup Manager on the server itself. This however would publish the server's printer configuration (the server is configured to print direct to the device and not to the queue hence this is why it's not appropriate to publish its configuration). Instead we need to install the Workgroup Manager software on a configured workstation/client and publish its known configuration. Use the following procedure:
Select one workstation on your network. Follow the manual setup procedure as discussed above.
Test and confirm this workstation is configured and printing correctly. Also choose other settings as appropriate such as tray, duplex and other defaults.
Install the Workgroup Manager on this client workstation (found on the Mac OS X Server install disk).
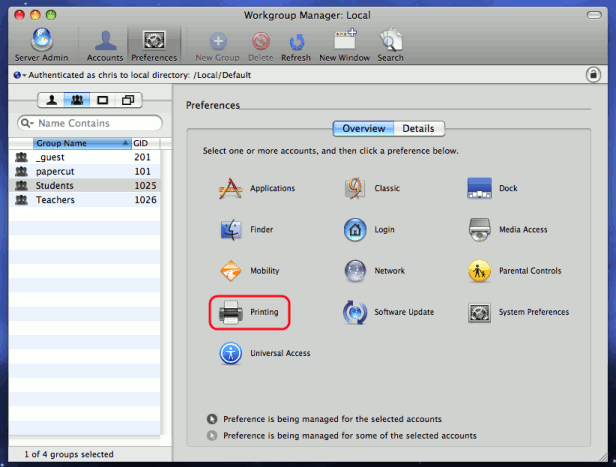
Open the Workgroup Manager, connect to your directory and select an appropriate user group or computer group used to manage client settings.
Enter the area and select Printing.
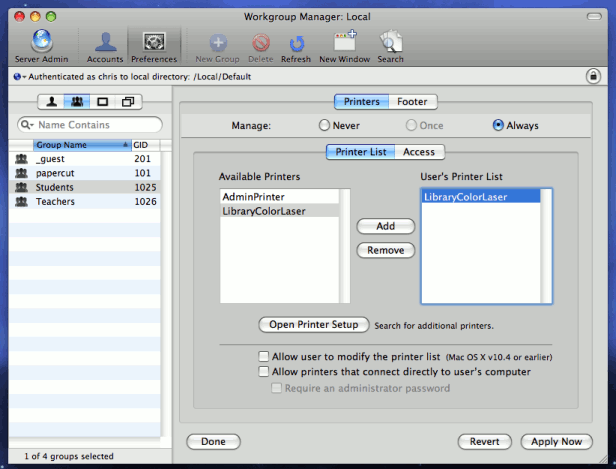
Select Manage Always and add printer(s) set up in step 1.
Save settings and exit (e.g. click ).
Log onto another workstation and confirm that printer settings are being published as expected.
Tip
Only publish the printer configuration after it's been tested.
If you have problems with the manufacturer supplied driver, try the "Generic Postscript Printer"
Always publish the printer config from a tested client workstation and never from server itself.
The print queues in current Mac OS X server releases (up to and including 10.6) are unfortunately unauthenticated (editor's note: CUPS supports authentication, however Apple have decided not to expose/support this feature). Authentication in an Open Directory environment is instead performed at the time of system login. Unauthenticated systems such as laptops however fall outside this check. The introduction of unauthenticated systems on your network mandates the need for an extra layer of authentication. PaperCut NG offers two options:
Popup authentication via the client software, or
authentication via a release station or the web based release interface (end-user login -> Jobs pending release).
Network administrators must decide if the authentication policy/procedure is to be applied to all network systems, or just "untrusted" laptops.
This is the simplest solution and provides a consistent procedure/policy across all your users irrespective of their access method (workstation or their own laptop). Select your authentication method such as popup authentication or hold/release queue and enable this option on ALL print queues. The setup procedure for both methods is summarized as follows:
Using Popup Authentication:
Select the Unauthenticated printer option on all printers
Ensure that all workstations have the client software installed. This includes both authenticated lab systems and laptops. The client must be running to have printer access.
Instruct users that they will need to enter their username/password in the client when requested.
Using Hold/Release Queue Authentication:
Check the Enable the hold/release queue option on all print queues. Jobs will not print until a user has authenticated and released the job.
Set up release stations, or ensure the Jobs pending release option is enabled in the end-user web interface.
Instruct users on how to release their jobs. This procedure must be followed by all users.
One problem with the network-wide policy discussed above is that it the authentication method (e.g. client popup or hold/release queue) also applies to authenticated systems. In some ways this is a positive (i.e. provides a consistent policy), while in other ways it can be viewed as an unnecessary on trusted authenticated systems. This section discusses a solution appropriate for larger sites.
The solution is to set up two servers. One server hosts a set of queues for authenticated systems, while the other server provides queues for unauthenticated systems. Network router or firewall rules are used to ensure that only authenticated systems have access to the authenticated queues. Laptops systems must use the other queues. This is best done with partitioned IP address ranges and/or subnets. An experienced network administrator will be able to assist with restricted server access by IP address.
The Laptop Only Policy is best described as a "hack" and is only suitable for larger sites with good network administrators. In the current release this is a supported solution. The developers do however have some ideas to streamline the setup. These include:
An ability to "endorse" the authenticated systems so the username is trusted by default. For example, a special file can be copied to these systems (readable only by the root user).
An IP address range filter restricting systems that can use a given priter.
If you are using this method please take the time to write to the developer team to share your thoughts and ideas.