Important
This guide assumes that you are installing on Mac OS X (either server or workstation) hosting and sharing printers. This guide will refer to this system as the 'server'. This represents the role of the system rather than the 'edition' of the operating system. PaperCut NG equally supports both the server and workstation versions of Mac OS. If you're upgrading from a previous PaperCut NG version please refer to the directions outlined in Appendix F, Upgrading From a Previous Version.
The following section assumes the reader has knowledge of general Mac OS X server management. Although the installation process is graphical, it would be an advantage to have knowledge of the command-line, creating users, editing configuration files and an understanding file permissions.
Before proceeding with the installation the system administrator should take a few moments to verify system requirements. Is the operating system version supported and are patches up-to-date? Take a few minutes to verify the system is current and supported (see the section called “System Requirements”). A system prerequisite is Java version 5.0 or higher. If you are running a fully patched Leopard (10.5), or Snow Leopard (10.6) machine this requirement will be satisfied. If you are running Lion (10.7) or Mountain Lion (10.8) you will need to install Java from Apple. This simplest way to install Java is to run /Applications/Utilities/Java Preferences, and you will be prompted to complete the installation.
Most small to medium Mac networks will have their workstations configured to print directly to the physical printers. This method of printing is not supported by PaperCut NG and instead administrators will need to set up global server hosted print queues. Some administrators will be familiar with server queues, while others will need to invest some time into understanding Mac printing in more detail. The topic of Mac printing is complex and is hence deserves its own chapter! Please read the first section of Chapter 27, Mac Printing in Detail and ensure your organization's printers are set up as required.
Administrators should ensure that the server based print queues are set up and working as expected before attempting to install PaperCut NG.
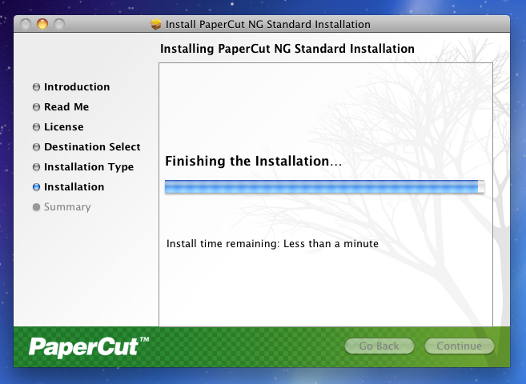
PaperCut NG is supplied as a standard disk image containing the installer. Log on as an
admin level account. Download and double-click Mac installer. Double-click on the installer
package named PaperCut NG Standard Installation.pkg. Follow the directions on the screen. The
installation process will take between two and five minutes depending on the speed of the system. A system restart
is not required but administrators are advised to perform installation on live production systems
during periods of low activity - for example, not during backup operations or other administration activities.
The default install location is /Applications/PaperCut NG
Important
Make sure you're installing the correct package. The similarly named
PaperCut NG Secondary Server Installation.pkg only installs part of the application
and is designed for more advanced networks.
After installation, the install will open a web browser window. The configuration stages are explained below:
This is the master password for the main in-built admin account, and is independent of the operating system or domain passwords. The password will need to meet minimum strength requirements, and must be at least six characters. Ensure that knowledge of this password is kept secure. This screen also sets the system's physical location and language; ensure that these are correct before proceeding.
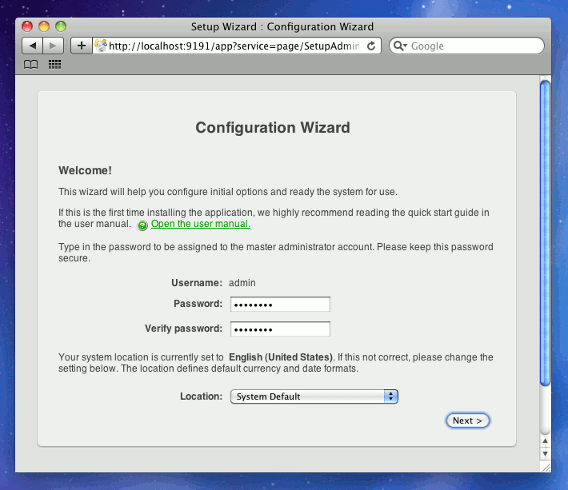
Tip
Treat this password like your router/modem management passwords. It is independent of your domain accounts and needs to be kept secure.
This is the organization type which matches the organizational environment where PaperCut NG will be used. Choosing the appropriate organization type will determine which system defaults are used on setup. For example, in a Professional (Client Billing) organization, where it is useful to charge-back printing to customers, an advanced client popup is provided with additional features useful for dealing with large numbers of client (shared) accounts. These default settings chosen for an organization type can be changed after installation.
This is the default cost-per-page assigned to the printers. This setting can be changed on a per printer basis after installation. Choosing a sensible cost now will help minimize future setup. For example in the USA, a value of $0.05 would be appropriate for many standard black & white printers.
When the organization type has been set to Education, users can be assigned an initial starting credit. This ensures they have funds in their account as soon as the system is enabled. An option also exists to control what happens when users run out of credit/quota. If you are evaluating PaperCut NG it might be appropriate not to disable printing when a users funds run out. This way you can be assured that user printing is not disrupted during the evaluation. These settings may be changed after setup.
PaperCut NG extracts user information out of the System or Domain. The options presented here will vary depending on the Operating System and its environment. During evaluation, most sites will opt to import all users from the system/domain into PaperCut NG. An option also exists to import a subset of users from a given group. This option is pertinent when it is known that only a subset of users will only ever use the printers.
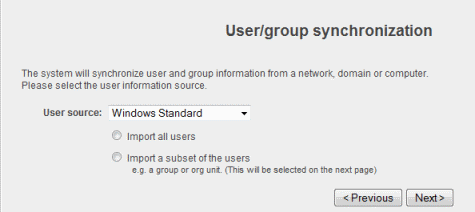
Options include Mac Standard (PAM, Local NetInfo, etc.), LDAP (Open Directory), or Samba. Select Mac Standard if the user accounts are setup and defined on the local system. This option will work with most Mac networks.
The LDAP option is appropriate for large networks with existing Open Directory domains. This includes networks running Mac OS X Server with Open Directory, and Windows domains running Active Directory. PaperCut NG will do it's best to auto discover LDAP settings, but some knowledge of LDAP and/or Open Directory will be required. More information on LDAP is available in the section called “Using LDAP for user synchronization”.
Use the to test and confirm your settings before continuing.
In a Professional (Client Billing) environment, the main focus is on allowing users to allocate print jobs to client (shared) accounts. The process works by:
Pausing all jobs that enter the print queues.
Displaying a popup on the user's workstation asking them to allocate the print job to an account. This is done by selecting the account from a list.
After the user has responded to the popup, the job is released to the printer.
You can read more about the account selection process and shared accounts at Chapter 8, Shared Accounts.
The account selection popup option is enabled at the user level. Once the option is enabled, the user must run the client software. If the client software is not running, the popup cannot display, and the job will remain paused in the print queue. This option is hence considered high impact. You are presented with two strategies that allow you to choose the implementation approach that best suits your needs:
In this strategy the account popup is only initially enabled on a single user for testing. You need to nominate the testing account; this may be an existing system/domain account used for testing purposes or even your own user account. The username should be in the format used to log into the domain/system (usually the short form).
The minimal impact strategy will allow you to test the popup with the nominated test system/domain user account, after which the Advanced Account Selection Popup option can be enabled for other users as appropriate.
This strategy enables the account selection popup on all users, and is often preferred for smaller networks as it minimizes the required post-install configuration. Once the client has been deployed, the system will be operational. If this option is selected, you should be prepared for installation of the client software to user desktops (see Step 7) immediately to prevent disruption of user printing services.
If in doubt, select the minimal impact strategy. This will ensure the impact is isolated to only the nominated test account.
Prior to enabling the configuration options that you have selected, you will have the chance to verify setup options. At this stage you are still able to return to any of the prior configuration screens to alter options before clicking .
After completing the configuration wizard you will be presented with a user synchronization status screen, showing the progress and results of the system completing its initial setup. Once you have closed that, click to access the interface and begin familiarising yourself with the options and features available. Take some time to explore, and refer back to the relevant sections of this manual as required.
The printers should be automatically detected, and listed under the Printers section. If the printers do not display, try printing a document as the first job will trigger registration.
The PaperCut NG client software is located in the directory /Applications/PaperCut NG/client.
It may be useful to share this directory over the network so workstations can access/install the client application.
If you're running Mac OS X Server, use Server Admin to add a read-only file share
called PCClient. Sharing with Protocols AFP for Mac clients, and SMB for Windows clients
is recommended.
Users can have the client software start automatically using the OS X "Open at Login" feature. Manually start the PaperCut NG client software, command Click on the dock icon, select "options" and the Open at Login" from the small pop up menu.
Following a fresh installation, it is highly recommended to test core features of the system. For further details please see the section called “Testing the Installation”.
NOTE: This step is a requirement for a Professional (Client Billing) installation.
Now that the system is tested and working, it is time to deploy the client software and enable the account popup for their use. It is important to deploy the client software before enabling the popup, otherwise users' printing will be stopped/paused.
As discussed earlier in the chapter the client can be run directly from a network share (which is automatically configured on Windows). There is also the option to install the software locally on each workstation, however this is not usually recommended because it makes the process of updating the client software more complicated.
Client deployment options and instruction are discussed in detail in the section called “User Client Deployment”. Follow those instructions to deploy the client software, and then enable the popup as described below.
Once the client software is deployed on user workstations, the Account Selection can be set. In a Professional (Client Billing) configuration, all users that print jobs for clients are often given the Advanced account selection popup, however, other Account Selection options may be better suited for some users based on their job function. The popup can be enabled on one user at a time or can be updated for all users in bulk. The user details page can be used to enable the popup for a single user. To enable the popup for all users in bulk:
Log into the admin interface.
Under the Users section, select the Bulk user actions... action from the menu at the top left of the Users tab.
Select the target group. To enable for all users select the
[All Users]group.In the Change account selection setting section, enable the Change account selection option.
Select the Show the advanced account selection popup option from the list.
If you do not want to allow users to charge printing to their personal account, then disable the Allow user to charge to their personal account option.
Press the OK button, and confirm the operation. Once completed, the selected users will have the account popup enabled.
Once the popup has been enabled on all users some testing should be performed from users' desktops. To test, login to the user workstation, perform a print, and check that the account popup appears and the job is logged as expected.
This concludes the Install Guide. You may like to take some time to explore the features of PaperCut NG before continuing reading at Chapter 3, Implementation by Example or Chapter 4, Quick Tour. Business users may be particularly interested in trying the popup client software as covered in the section called “Client Software”. If desired, the client software should also be deployed to other workstations. This procedure is detailed in the section called “User Client”.
To set up the optional Internet Control module, see the instructions in Chapter 15, Net Control in Detail.