After the Internet proxy is setup and logging usernames correctly, then the PaperCut NG Internet Control service must be configured to monitor the proxy log files. The Internet Control service is a PaperCut NG program that is responsible for analyzing log files and reporting the usage back to the PaperCut NG Application Server. Once install, the Internet Control service must be configured with the following settings:
Log directory - The directory where proxy log files are stored.
Log file mask - The file mask used to identify the proxy log files to monitor. e.g.
*.logLog file format - The proxy log file format which depends which proxy software is used.
Once these settings are configured, PaperCut NG can find the most recent log file, parse the contents and send usage information to the application server.
Where you install the PaperCut NG Internet Control service will depend on the layout of your network. Many networks will have a dedicated proxy server, which may or may not be a suitable candidate for a PaperCut NG application server installation. For this reason, the Internet Control service may either be deployed separately to the primary server, or access the proxy server logs remotely via a network share. Some reasons for separate deployment may include:
A primary server already exists, and it runs a different operating system to the proxy server.
Networks spanning multiple physical sites or subnets may have multiple proxy servers to minimize cross-site network traffic.
Suitable systems already exist on the network, and it makes sense to utilize them.
The following are some common network layout examples involving the Internet Control service. Check which option suits your network configuration, and follow the suggested setup instructions.
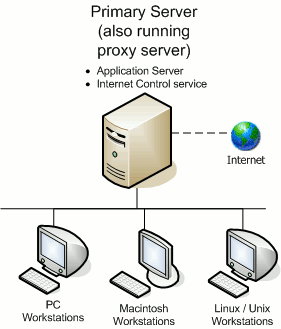
Single server system (with local access to proxy logs)
This setup may be useful if you are only using the PaperCut NG Internet Control module (e.g. not the Print Control module), to keep all components on the one system. It may be also be used as a second (parallel) application server installation, for example to keep print and internet quotas separate.
For instructions to install the Internet Control service using this method, see the section called “Single/primary server installation”.
Single server system (with remote access to proxy logs)
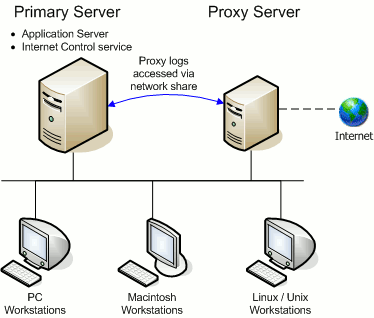
Figure 15.3. Application Server installed with Internet Control module, accessing proxy logs remotely
In this scenario, the Internet Control service runs on the primary server, and accesses the proxy log files on a remote machine using file sharing.
This is the simplest way to separate the application server and Internet Control service, as there is no requirement for additional software to be installed on the proxy server system.
For instructions to install the Internet Control service using this method, see the section called “Single/primary server installation”.
Secondary internet server
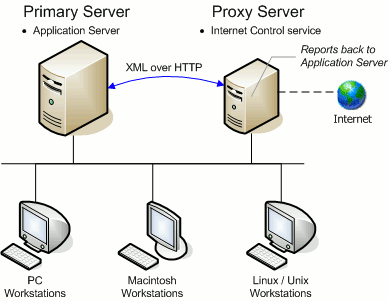
Figure 15.4. Internet Control service installed on proxy server, Application Server on separate system
If there is an existing proxy server that is suitable for additional software to be installed, this method may be the best solution. It is also required for some advanced configurations, such as where the application server and proxy server are on different platforms, and the Internet Control service is required to make use of platform specific functionality.
For instructions to install the Internet Control service using this method, see the section called “Secondary server installation”.
This section described how to install the Internet Control service on the primary PaperCut NG application server as outlined in the section called “Internet Control service setup”. Follow the installation instructions for your server platform:
The setup wizard for the Internet Control service is included with the PaperCut NG application server. To start it, as an administrator level user run: → → → → , or the file located at
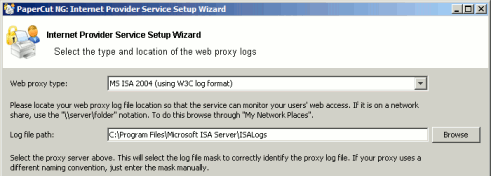
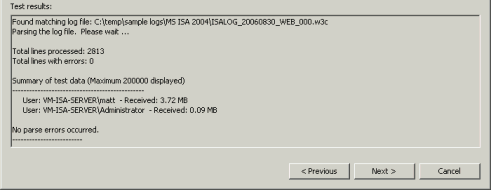
[app-path]\providers\net\bin\win\setup-net-service.exeSelect the type of proxy server you have under Web proxy type, and the location of your log files under Log file path. The Log mask will be set for automatically based on the selected proxy type. If you have changed the naming format of your log files, enter a custom file mask here.
Press . The Test results area should now show some data reflecting the information found in the proxy log files. If the data looks correct (i.e. you recognize the user names and the data received looks correct), press . Otherwise, check that the information entered is correct, and that the log file path contains the correct log files.
A few
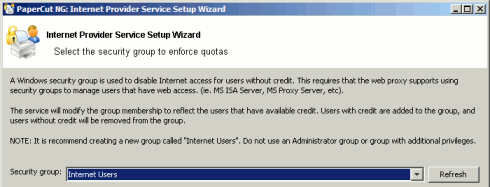
parse errorsmay be encountered if a log file has been corrupted in some way, but if there are too many this may indicate an incorrect log format. Check that the Web proxy type you have selected is correct for your system.Select an appropriate Security group for users with internet access. The Internet Control service will modify group membership to reflect the users who have available credit (i.e. when users run out of credit, they will be removed from this group). If you have not already created a group for this purpose when configuring your proxy server, it is recommended to create a new group with a name such as
Internet Users.Tip
By default, PaperCut NG adds users that have available credit to the selected security group. Depending on how your other proxy access rules are defined, it is sometimes more convenient to use a "Deny Group" that only contains the users without Internet access. To do this follow the instructions in the section called “Using a deny group for Internet access control”, after the wizard is complete.
Once an appropriate group is selected, press .
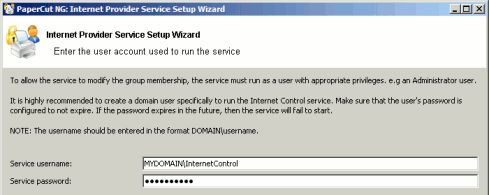
To allow the Internet Control service to modify group membership it must have the appropriate privileges. It is recommended to create a new domain user with appropriate privileges for this purpose. The password for the service account should be set to not expire.
Press to continue.
The Internet Control service will now be configured. Press to complete the setup wizard.
To confirm that the installation was successful and that the PaperCut NG application server is now monitoring internet usage, continue reading at the section called “Verifying the Net Control service setup”.
By default, PaperCut NG adds users that have available credit to the selected security group. Depending on how your other proxy access rules are defined, it is sometimes more convenient to use a "Deny Group" that only contains the users without Internet access.
To reconfigure PaperCut NG to use a deny group:
Stop the Internet Control service using Control Panel->Admin Tools->Services.
Using a text editor, open the Internet Control config file:
[app-path]\providers\net\config.properties.Change the
security-group-is-deny-groupentry in the config file toY. i.e.:security-group-is-deny-group=YSave the config file, and close the text editor.
Restart the Internet Control service using Control Panel->Admin Tools->Services.
Wait for a few minutes, and then check the contents of the selected security group. It should now only contain users that do not have credit available. NOTE: If you have many users it may take longer to complete the group updates.
PaperCut NG includes a command-line utility to assist with this configuration. To perform this configuration:
Log into the Linux server running PaperCut NG as the
papercutuser.Run the command:
[app-path]/providers/net/bin/linux-i686/setup-net-providerFollow the prompts, answering the questions as required.
The utility will perform a test parse of the log file. Check that the results are as expected.
When prompted, restart the Application server. This will restart the application server and the will also start the Internet Control service which will start parsing the log files.
To confirm that the installation was successful and that the PaperCut NG application server is now monitoring internet usage, continue reading at the section called “Verifying the Net Control service setup”.
PaperCut NG includes a command-line utility to assist with this configuration. To perform this configuration:
Log into the Mac server running PaperCut NG.
Start the service installation by double-clicking on the file:
/Applications/PaperCut NG/providers/net/bin/mac/setup-net-provider.command
Follow the prompts, answering the questions as required.
The utility will perform a test parse of the log file. Check that the results are as expected.
When prompted, restart the Application server. This will restart the application server and the will also start the Internet Control service which will start parsing the log files.
To confirm that the installation was successful and that the PaperCut NG application server is now monitoring internet usage, continue reading at the section called “Verifying the Net Control service setup”.
This section described how to install the Internet Control service on the a secondary server that is separate to your primary PaperCut NG application server. The secondary server can run a different operating system to your primary server.
The process for installing the Internet Control service involves the following steps:
Copying/installing the service files to the secondary server
Running the setup process to install and configure the service
Verify that the service is working correctly.
Prior to installing on a secondary server it is important to check the following:
Ensure the primary server is set up correctly.
Before installing the Internet Control service you should take some time to ensure the primary server (central application server) is set up and running correctly. If it is not running fine now adding an extra server will only "add an extra variable to the equation" and complicate troubleshooting. For example, verify that:
Users are allowed to login to user pages from their workstations.
Administrators can access the system.
Ensure firewall software is set to allow access to port 9191.
The Internet Control service needs to communicate (initiate a TCP connection) on port 9191 to the primary server. Administrators should ensure that any firewall software on the primary Application Server is not set to block any incoming local network traffic on this port. A quick way to check this is to ensure that you can access the administration pages from the secondary server using a web browser.
To complete the service installation, follow the instructions below for your secondary server platform:
Install the Internet Control service
Install the Internet Control service software onto the secondary server. On a Windows server, this is done by selecting the "Secondary Internet Server installation" option in the setup wizard.
Configure the Internet Control service
Continue with the steps found at the section called “Windows single/primary server installation”. In this setup wizard there is one additional step to configure the primary server connection details. The Internet Control service needs this so that it can connect to the primary server to report Internet usage.
To confirm that the installation was successful and that the PaperCut NG application server is now monitoring internet usage, continue reading at the section called “Verifying the Net Control service setup”.
The Internet Control service runs as the papercut user. This account
must be created on the secondary server before proceeding. To create this user follow the steps described in
the section called “Step 2 - Create the host user account and firewall settings”.
Confirm that the account is created successfully, by logging on to the system as the
papercut user.
The instructions differ depending on the operating system running on the primary server. Select the instructions appropriate to your configuration.
If the primary server is running Linux then:
Login to the primary server as the
papercutuser.Run the script:
~/providers/net/bin/linux-i686/create-secondary-server-archive. This will create the file~/net-secondary-server.tgzthat contains all the files required on the secondary server.Copy the
~/net-secondary-server.tgzfile to the secondary server, into the home directory of thepapercutuser.Login to the secondary server as
papercut.Extract the files by running the following:
    shell> cd ~
    shell> tar xzf net-secondary-server.tgz
Proceed to install and configure the service as described in the section called “Step 3: Install and configure the service”.
If the primary server is running Windows or Mac then:
Log on the the primary application server.
Copy all the files in in the
[app-path]/providers/net/directory, into the home directory of thepapercutuser on the secondary server. i.e.~papercut/providers/net/. Make sure that all the files are owned by thepapercutuser.Login to the secondary server as the
papercutuser.On the secondary server, ensure that Sun Java 5.0 (or later) is installed. You can check the version installed by running
java -version. This is available from http://java.sun.com.Change the permissions on
~papercut/providers/net/bin/linux-i686/setup-net-providerto make it executable.Proceed to install and configure the service as described in the section called “Step 3: Install and configure the service”.
To install and configure the service:
Log on to the secondary server as the
papercutuser.Start the service setup process by running the following:
shell> ./providers/net/bin/linux-i686/setup-net-providerFollow the prompts, answering the questions as required.
The program will perform a test parse of the log file. Check that the results are as expected.
Once completed, confirm that the installation was successful and that the PaperCut NG application server is now monitoring internet usage, continue reading at the section called “Verifying the Net Control service setup”.
The instructions differ depending on the operating system running on the primary server. Select the instructions appropriate to your configuration.
If the primary server is running on Mac then:
Login to the primary server.
Double click the file:
/Applications/PaperCut NG/providers/net/bin/mac/create-secondary-server-archive.command. This will create the filenet-secondary-server.tgzin your home directory. It contains all the files required to run the Internet service on the secondary server.On the secondary server, create a directory for the application. e.g.
/Applications/PaperCut NGCopy the file
net-secondary-server.tgzfile from the primary to the/Applications/PaperCut NGdirectory on the secondary server.On the secondary server open the Terminal application (e.g. a command prompt).
Extract the files by entering the following in the Terminal application:
    $ cd "/Applications/PaperCut NG"
    $ tar xzf net-secondary-server.tgz
Proceed to install and configure the service as described in the section called “Step 2: Install and configure the service”.
If the primary server is running Windows or Linux then:
On the secondary server, create a directory for the application. e.g.
/Applications/PaperCut NGLog on the the primary application server.
Copy all the files in in the
[app-path]/providers/net/directory, into the/Applications/PaperCut NGon the secondary server.On the secondary server, change the permissions on
/Applications/PaperCut NG/providers/net/bin/mac/setup-net-provider.commandto make it executable.Proceed to install and configure the service as described in the section called “Step 2: Install and configure the service”.
To install and configure the service:
The secondary server requires that Java version 5.0 or higher is installed. If Java 5 is not already installed, the installer is available from the Apple website at: http://www.apple.com/support/downloads/java2se50release3.html.
On the secondary server, start the setup process by double-clicking on the file
/Application/PaperCut NG/providers/net/bin/mac/setup-net-provider.commandFollow the prompts, answering the questions as required.
The program will perform a test parse of the log file. Check that the results are as expected.
Once completed, confirm that the installation was successful and that the PaperCut NG application server is now monitoring internet usage, continue reading at the section called “Verifying the Net Control service setup”.
First verify that the Net Control service is running. To do this:
Login to the admin pages of PaperCut NG
Navigate to the Internet section.
Look at the bottom of the page in the Internet Control Service Status section. This show the last status message from the service and the time the status was last updated.
If the status text is
The Internet Control service has never been started, then the service has not started properly. If this is the case, recheck the settings as described above and try restarting the application server and internet services as required. See Figure 15.9, “Example of Internet Control service status when service is running.”.If the service is not running, then the log files can be useful in diagnosing problems. The log file location depends on the platform and whether the Internet Control service is running on the primary server or a separate secondary server.
Primary server (Windows) -
[app-path]\providers\net\logs\net-provider.logPrimary server (Linux/Mac) -
[app-path]/server/logs/server.logSecondary server (Windows) -
[app-path]\providers\net\logs\net-provider.logSecondary server (Linux/Mac) -
[app-path]/providers/net/logs/net-provider.log
If the service is running correctly then access the Internet using the proxy server and verify that the status indicates that the service is reading the logs. This should be apparent because the current line number should be increasing, and the status update time will update.
By default the service reports Internet usage to the Application server once a minute. Once this time has elapsed the Internet Usage Log can be viewed and should include the recent internet usage. If this is the case then the Internet Charging service is correctly monitoring the proxy logs.
