Table of Contents
This chapter covers the initial installation and configuration of PaperCut NG in your network environment. Initial installation takes only a few minutes on a currently configured server. This guide will walk you through installation and configuration step-by-step. The process is summarized below:
System requirements check
Downloading and installing PaperCut NG
Completing the configuration wizard
Testing client software
Testing printing and remote access
PaperCut NG is a cross-platform solution and the installation procedure will vary depending on the target operating system(s). Please jump to the appropriate section below:
For additional information on setting up the optional Internet Control module see Chapter 15, Net Control in Detail.
Important
This guide assumes that you are using Windows Server 2003. The process is similar for other Windows operating systems such as XP, Server 2008 or Vista.
If you're upgrading from a previous PaperCut NG version, please refer to the directions outlined in Appendix F, Upgrading From a Previous Version.
Before installing PaperCut NG for either evaluation or production use, the system administrator should take a few minutes to verify system requirements.
Is the operating system version supported and patches up-to-date? Take a few minutes to verify the system is current and supported (see the section called “System Requirements”).
In workgroup environments (i.e. where no domain is present), some additional configuration may be required. For more details see Chapter 24, Running in a Workgroup Environment.
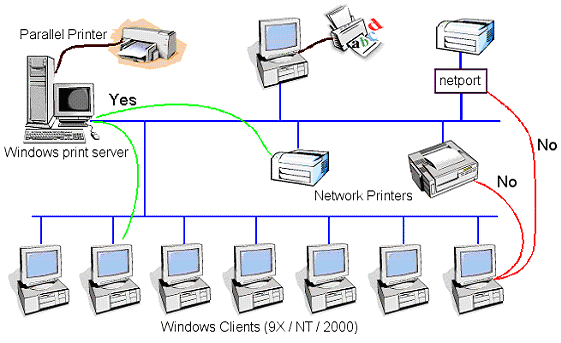
Are printer(s) installed and hosted on this system? PaperCut NG needs to be installed on the system directly hosting the printer(s). The printer should be installed as a "Local Printer" with a connection method such as TCP/IP Port, LPR, or JetDirect or directly connected to the system via USB or LPT Port.
In a multi-user environment, printers are often shared with other network users. Other workstations should connect to these printers as "Network Printers". Ensure workstations are configured to print to the shared print queues. For example a Windows workstation may connect to a printer via a path like:
\\[samba_server]\[printer].Ensure that printers are configured correctly and work before installing PaperCut NG.
Important
If you are running the PaperCut NG server on Windows XP (Professional) you must disable "Simple file sharing". For more information please see Appendix B, Troubleshooting & Technical FAQ's.
If you are running a Windows workgroup network or using Windows XP/Vista Home workstations, please see Chapter 24, Running in a Workgroup Environment.
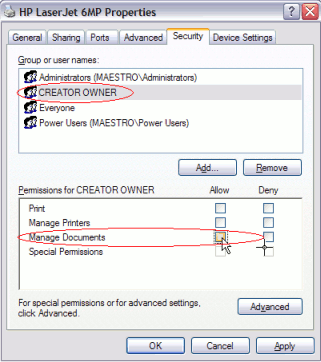
When using release stations or account selection popups it is recommended to secure the print queue so that users do not have permission to pause/resume documents in the queue. This allows PaperCut NG to have full control of documents without interference from users. To do this:
Log onto the server hosting the printers as an Administrator.
Open the printer configuration screen: →
Right-click a printer and select Properties.
Select the Security tab.
Select the CREATOR OWNER user and uncheck the Manage Documents permission. See Figure 2.2, “Configuring Windows print queue permissions”
Press the OK button.
Perform these steps for each of the monitored printers.
PaperCut NG is supplied as a standard Windows setup.exe install program.
The latest version may be downloaded from http://www.papercut.com/. After the download is complete,
run the setup wizard as an administrator level user. A system restart is usually not required but
administrators are advised to perform installation on live production systems during periods
of low activity - for example, not during backup operations or other administration activities.
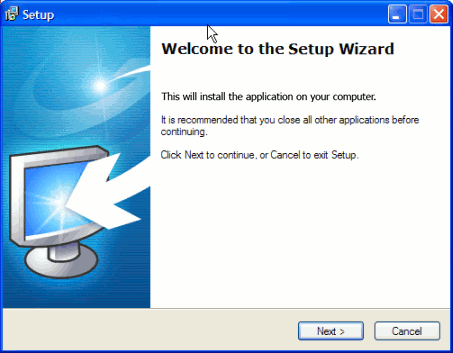
Select the "standard install" option and install PaperCut NG onto a hard drive with adequate free disk space. The default options will suffice for most systems.
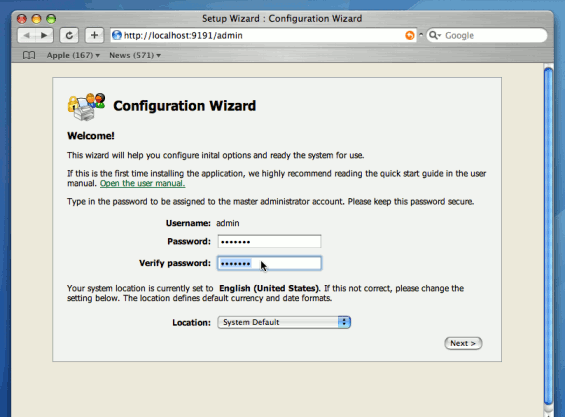
After installation, the install will open a web browser window. The configuration stages are explained below:
This is the master password for the main in-built admin account. This password is independent of the operating system or domain passwords. Keep knowledge of this password secure! This screen also sets the system's physical location. Ensure the location and language setting is correct.
Tip
Treat this password like your router/modem management passwords. It is independent of your domain accounts and needs to be kept secure.
PaperCut NG contains modules for both printing and Internet usage control. Both of these modules are optional and licensed separately. Select the modules to enable on this system.
NOTE: The Internet control module requires an authenticating web proxy server like Microsoft ISA Server or Squid Proxy. For more information, see Chapter 15, Net Control in Detail.
This is the default cost-per-page assigned to the printers. This setting can be changed on a per printer basis after installation. Choosing a sensible cost now will help minimize future setup. For example in the USA, a value of $0.05 would be appropriate for many standard black & white printers.
Users can be assigned an initial starting credit. This ensures they have funds in their account as soon as the system is enabled. An option also exists to control what happens when users run out of credit/quota. If you are evaluating PaperCut NG it might be appropriate not to disable printing when a users funds run out. This way you can be assured that user printing is not disrupted during the evaluation. These settings may be changed after setup.
PaperCut NG extracts user information out of the System or Domain. The options presented here will vary depending on the Operating System and its environment. During evaluation, most sites will opt to import all users from the system/domain into PaperCut NG. An option also exists to import a subset of users from a given group. This option is pertinent when it is known that only a subset of users will only ever use the printers.
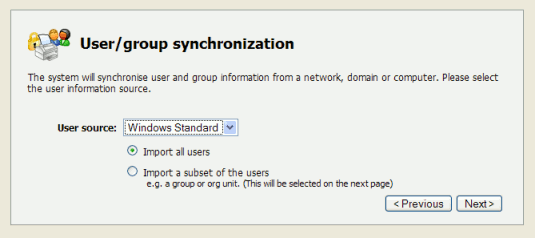
Options on Microsoft Windows include Windows Standard, Active Directory, or LDAP. In a domain enviroment, Active Directory is the default option as this offers access to Organization Units, Nested Groups and other AD features.
Use the to test and confirm your settings before continuing.
After completing the configuration wizard you will be presented with a user synchronization status screen and an option to . Take some time to log in and browse the interface. There are many options and now is a good time to have a look at some of the key areas of the application. Take some time to explore!
The printers should be automatically detected, and listed under the Printers section. If the printers do not display, try printing a document as the first job will trigger registration.
The PaperCut NG client software is located in the directory [app-path]/client. This
software needs to be shared over the network so workstations can access/install the client application.
The directory is automatically shared in read-only form as PCClient
as part of the install process. Confirm that you can access the client software via the network
by browsing to \\server\PCClient.
It is now time to test the system.
Print a test document such as a web page or basic document.
Navigate to the printer section and select the Print Log tab.
Navigate to the → tab.
Your print job should now be listed in the log.
Your user account should also be charged an appropriate amount.
This concludes the Install Guide. You may like to take some time to explore the features of PaperCut NG before continuing reading at Chapter 3, Implementation by Example or Chapter 4, Quick Tour. Business users may be particularly interested in trying the popup client software as covered in the section called “Client Software”. If desired, the client software should also be deployed to other workstations. This procedure is detailed in the section called “User Client”.
To setup the optional Internet Control module, see the instructions in Chapter 15, Net Control in Detail.