Important
The following section assumes the reader has knowledge of general Novell OES Linux system management including using the command-line, creating users, editing configuration files and understanding file permissions.
Before proceeding with the installation the system administrator should take a few moments to verify system requirements. Is the operating system version supported and are patches up-to-date? Take a few minutes to verify the system is current and supported (see the section called “System Requirements”). PaperCut NG is designed to integrate with iPrint on Novell OES Linux. If your printers are currently hosted on iPrint on a Netware server or even under legacy NDPS, you will first need to migrate your queues over to a OES Linux based server. Ensure your printing is correctly working under iPrint on OES Linux before continuing to the next step.
Important: iPrint and the print queues must be configured and confirmed to work before progressing to step 2.
PaperCut NG runs and installs under a non-privileged user account called "papercut". The
papercut user's home directory location denotes the application install location.
/home/papercut is recommended, however Administrators may consider alternate
install locations depending on personal preference. Alternatives may include:
/usr/local/papercut/opt/papercut
The host user account is not an eDirectory account but a local system account. One way to create the "papercut" account on OES Linux is:
Open YaST Control Panel and select User Management under Security and Users.
Click to create a new user.
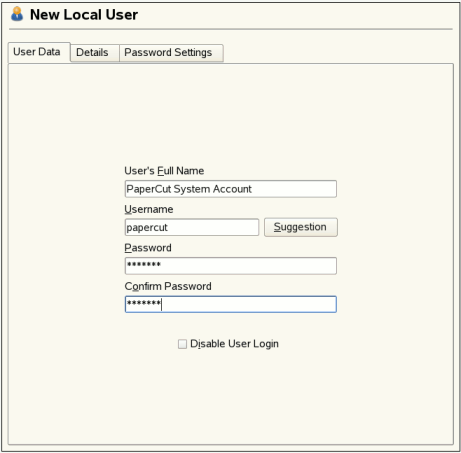
On the User Data tab, enter a username of
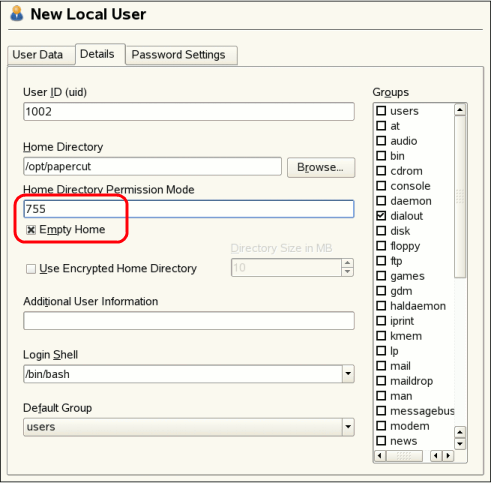
papercutand assign a secret password.On the Details tab, select
Empty Homewith permissions755and change theHome Directorypath to define an alternate install location.Create the account by clicking the button.
Important
This quick start guide assumes the install location is /home/papercut.
If an alternate home location is defined, some of the paths listed in subsequent sections
will require modification.
A default OES Linux installation imposes strict resource usage limits on user accounts (ulimit).
The papercut account is a special account used for hosting an application and
hence should be granted satisfactory resource limits such as the ability to open many files.
Larger sites should consider adding the following line to /etc/security/limits.conf:
papercut - nofile 65535
Novell OES Linux has a strict default firewall policy. PaperCut NG uses ports 9191 (for HTTP) and ports 9192 (for HTTPS/SSL) and these ports must be open. To open these ports:
Open YaST Control Panel and select Firewall under Security and Users.
Select Allowed Services, then click the button.
Add ports
9191and9192to the TCP Ports list (separated by spaces).Click , , then to apply the changes.
Important: Please make sure you download the correct architecture for your distribution.
i686 is for 32-bit operating systems. x64 is for 64-bit systems (also
known as x86_64 or amd64).
PaperCut NG is supplied as a self-extracting and self-installing archive. The installation is
performed under the rights of the newly created papercut account and temporary
root access will be required. Please have the root password handy. (Administrators
who are after a detailed explanation of the install process should also consult the background
information in Chapter 21, PaperCut NG on Linux).
Log on as the newly created papercut user and download and execute the installer from
the command prompt. Here is an example using wget to fetch the installer:
    shell> su - papercut
    shell> wget [download url from PaperCut Software website]
    shell> sh ./pcng-setup-novell-oes-linux.sh
Follow the installation instructions and enter the root password when requested.
Important
Ensure you login as the user papercut so that the
user's environment is sourced and the home directory (install location) is correctly defined.
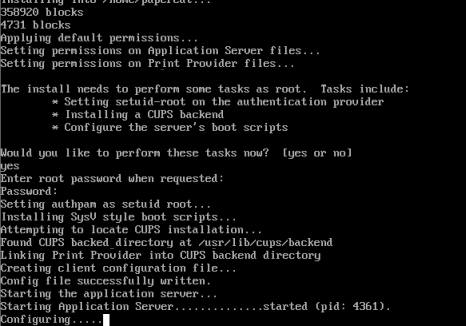
The installation process will take between two and five minutes depending on the speed of the system. A system restart is not required but administrators are advised to perform installation on live production systems during periods of low activity - for example, not during backup operations or other administration activities.
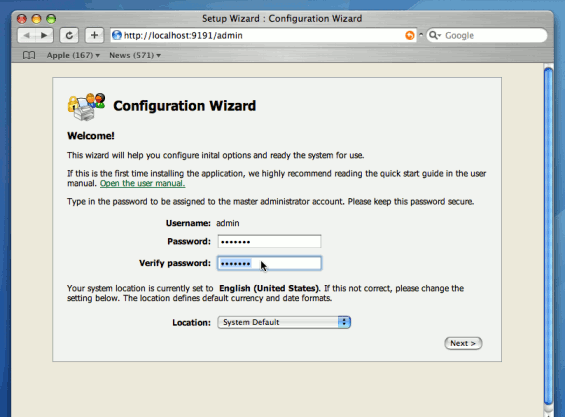
After installation, you will be prompted to open a web browser at http://[server-name]:9191/admin
to complete configuration. The configuration stages are explained below:
This is the master password for the main in-built admin account. This password is independent of the operating system or domain passwords. Keep knowledge of this password secure! This screen also sets the system's physical location. Ensure the location and language setting is correct.
Tip
Treat this password like your router/modem management passwords. It is independent of your domain accounts and needs to be kept secure.
PaperCut NG contains modules for both printing and Internet usage control. Both of these modules are optional and licensed separately. Select the modules to enable on this system.
NOTE: The Internet control module requires an authenticating web proxy server like Microsoft ISA Server or Squid Proxy. For more information, see Chapter 15, Net Control in Detail.
This is the default cost-per-page assigned to the printers. This setting can be changed on a per printer basis after installation. Choosing a sensible cost now will help minimize future setup. For example in the USA, a value of $0.05 would be appropriate for many standard black & white printers.
Users can be assigned an initial starting credit. This ensures they have funds in their account as soon as the system is enabled. An option also exists to control what happens when users run out of credit/quota. If you are evaluating PaperCut NG it might be appropriate not to disable printing when a users funds run out. This way you can be assured that user printing is not disrupted during the evaluation. These settings may be changed after setup.
PaperCut NG extracts user information out of the System or Domain. The options presented here will vary depending on the Operating System and its environment. During evaluation, most sites will opt to import all users from the system/domain into PaperCut NG. An option also exists to import a subset of users from a given group. This option is pertinent when it is known that only a subset of users will only ever use the printers.
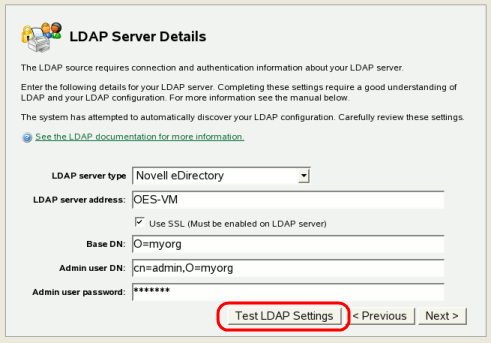
PaperCut NG has native support for eDirectory LDAP schemas. This will be the default user import option for most sites. PaperCut NG will do it's best to auto-discover LDAP settings, but some knowledge of eDirectory and/or LDAP will be required. More information on LDAP is available in the section called “Using LDAP for user synchronization”.
After completing the configuration wizard you will be presented with a user synchronization status screen and an option to . Take some time to log in and browse the interface. There are many options and now is a good time to have a look at some of the key areas of the application. Take some time to explore!
PaperCut NG works by directly integrating with the Novell iPrint Print Manager. iPrint must however be configured to use PaperCut NG as an accounting control source. In the current release, this configuration is done manually at the individual print queue level:
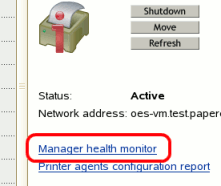
Log into iManager, expand iPrint, and select Manage Printer Manager
Select the Printer Manager associated with one of your print queues.
Click the Manage health monitor link. A list of all your printers should appear.
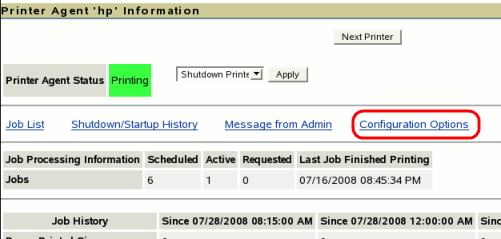
Select a Printer Agent from the list.
Click Configuration Options.
Enter
papercutunder the Accounting Autoload Command. Take care to write this all in lower case with no spaces.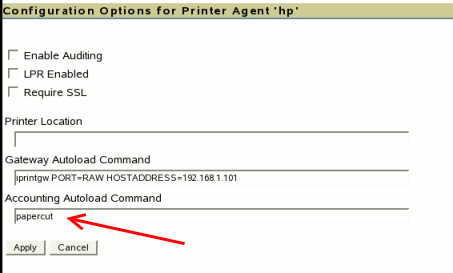
Click .
Click , then and repeat steps 4 through 7 for all printers that should be monitored/controlled by PaperCut NG
Finally restart the Printer Manager in iManager by pressing then . After this, all jobs on the queues should be tracked.
The PaperCut NG client software is located in the local directory:
/home/papercut/client
This software needs to be shared over the network so workstations can access/install the client
application. Novell iManager provides a number of file sharing options. One simple solution is to add
a read-only NCP or Samba share called PCClient pointing to
/home/papercut/client. Established networks will benefit from ensuring the client
files are available in their Distributed Files Services. The deployment of the client software
(e.g. zero-install deployment) is covered in the section called “User Client”.
It is now time to test the system.
Print a test document such as a web page or basic document.
Navigate to the printer section and select the Print Log tab.
Navigate to the → tab.
Your print job should now be listed in the log.
Your user account should also be charged an appropriate amount.
This concludes the Install Guide. You may like to take some time to explore the features of PaperCut NG before continuing reading at Chapter 3, Implementation by Example or Chapter 4, Quick Tour. Business users may be particularly interested in trying the popup client software as covered in the section called “Client Software”. If desired, the client software should also be deployed to other workstations. This procedure is detailed in the section called “User Client”.
To setup the optional Internet Control module, see the instructions in Chapter 15, Net Control in Detail.