This section describes various aspects to configuring release stations.
Some additional installation notes can also be found in the release station README file located here:
[appdir]\release\README.txt
By default, print jobs will be sent directly to the printer and will not be held by the release station. To turn on release station support for a printer:
Log on to the administration section.
Navigate to the Printers section.
Select the printer to enable release station support on.
Select the option to Enable release station.
Choose the appropriate release station mode for your needs.
The two release modes available are:
User Release - this is the standard mode that allows users to release their own jobs from the release station.
Admin/Manager only release - in this mode, jobs can only be released by administrators or release station managers.
Tip
To configure multiple printers for release station support, the Copy settings to other printers function can be used. To use this, configure one printer as required, press the Copy settings to other printers and select the printers to copy the settings to.
A release station manager is a user that has additional privileges to manage release stations and jobs held by a release station. Release station managers can:
Log on to the "manager mode" release stations (both the software and web-based release station).
Release jobs that can only be released by managers or administrators.
Can close the Standard Release Station.
To make a user a release station manager:
Log on to the administration pages.
Navigate to the Options section.
Find the Release Station security section.
Enter user's username in Release station managers field. To enter multiple users, separate usernames with a comma (
,).
Important
PaperCut NG administrators can automatically perform all operations that release station managers are allowed to.
The Standard Release Station is configured using a configuration file located in the directory where the release station executables are located. The default configuration file is:
[appdir]\release\config.properties
This configuration file allows you to configure the behavior and look of the release station in a number of ways. Each of the configuration items are described in the table below:
| Config name | Description |
|---|---|
mode | The mode changes the behavior of the release station depending on the need. The available modes are described in the section called “Release Station Modes”. |
printers | Filters the list of jobs to only those printers listed. This is a comma separated list of full printer names (i.e. server\printer). This is useful when there are multiple release stations, each managing the queues of a different set of printers. |
display-columns | Used to customize the columns displayed and the order they appear in the list of print jobs. The default value is: date,user,printer,document,machine,pages,cost |
display-column-widths |
Used to customize the width of columns displayed. The setting can only be used if the
|
hide-printer-server-names | (Y/N) - Used to hide the printer server names from the list of print jobs. Default: N (No) |
show-release-all | (Y/N) - Indicates whether the "Release All" button should be displayed. Default: Y (Yes) |
show-cancel-all | (Y/N) - Indicates whether the "Cancel All" button should be displayed. Default: Y (Yes) |
max-idle-secs | The number of seconds without user input, before the user is logged out of the release station. The default is 30 seconds. |
background-color | Allows for customizing the background color of the release station to match the organization's colors. The color format is the hexadecimal color code used in HTML - #RRGGBB (where RR is the red component, GG is the green component and BB is the blue component). |
font-color | Allows for customizing the font/foreground color used in the release station. The color format is the hexadecimal color code used in HTML. |
title | The title that appears at the top of the release station screen. |
instructions |
The instructions to display at the login page. A |
logo-image | Allows a custom logo image to be displayed. For best results the image should be between 50 and 80 pixels in height. PNG, JPG or GIF images are allowed. |
Table 9.1. Standard Release Station config settings
Tip
When running release stations from the \\server\PCRelease share,
each workstation can have its own configuration file. The "config.properties" is
used for default settings for all release stations, but settings can be overridden
by defining another configuration file for each release station. These files
should be put in the same directory and be named using the following convention:
config.[machine-name].properties
where [machine-name] is the name of the machine running the release station.
A custom configuration file can also be specified on the command-line using the following syntax:
pc-release.exe --config "[config file path]"
The release station modes available are described below. The release station mode is changed in the configuration file as described in the section called “Standard Release Station Configuration”.
| Mode | Description |
|---|---|
ReleaseAny | This is the default mode. It allows a user who logs onto the release station to release any held jobs. Any jobs released will be charged to the logged in user. |
Manager | Manager mode allows only administrators or release station managers to log in to the release station. In release station mode, all jobs are listed and users are not automatically logged out due to inactivity. |
Secure | Secure mode allows users to only see and release print jobs that they have printed. |
NoPassword | This works similar to the secure mode, however users don't need to enter the password to view jobs. |
Table 9.2. Standard Release Station modes
In all modes except Manager mode, users are logged out automatically after a period of inactivity defined in the configuration file, the default being 30 seconds.
In some environments, users are issued with identity cards that can be used for authentication. The cards might be used to gain entry to buildings, or borrow from a library. The cards can also be used to authenticate users at the standard release station. Using a card is often much more convenient and less error-prone than entering a username and password.
To use card-based authentication an appropriate hardware card-reader is required. The card reader must be connected to the machine running the release station and act like a keyboard. i.e. when the user swipes/scans their card, the card reader outputs the digits just as if someone entered them using the keyboard. There are card readers that can do this for all commonly used card types (e.g. magneetic stripe, barcode, etc). An easy way to test a card reader is to open a text editor and place the cursor in a new text document. Then when a card is swiped the card number will appear in the text file.
The card numbers entered at the release station are validated against the Card/Id number field for the user. This can be found at the bottom of the user details screen in the admin interface. Before card authentication can be used, the users' card numbers must be associated with the user record in PaperCut NG. This can be done manually or in bulk using the Batch User Import file (see the section called “Batch User Import and Update”).
Once card numbers are associated with users, the card-based authentication can be enabled in the release station
by setting the use-card-authentication to Y in the release station's
config.properties file. Once the release station is restarted it will be in card-authentication
mode, and can be tested by swiping a card through the card-reader.
The config.properties file has some other settings to change how the card-number is read
from the reader. For example, you can change the header and trailer characters used by some card readers to indicate
the start and end of the card number. See the config file for details.
In some environments (for example public libraries), it can be important for users to identify print jobs by the client machine they were printed from. By default, the release station will list the either the IP address or the machine's unique network name Neither of these are helpful to release station users. To avoid this problem the administrator can define a list of aliases, that map the unfriendly names to a more user-friendly name.
For example, print jobs might appear in the release station as 192.168.1.100
or winpc0076, but would be more meaningful for the user to appear as
Public PC 1.
These aliases are defined in the [app-path]/release/client-machine-aliases.properties
file. The entries are in the format:
[machine]=[alias]
It is also valid to have multiple entries that map to the same alias. So to add aliases for the
example above the following lines would be added to the
client-machine-aliases.properties file:
        192.168.1.100=Public PC 1
        winpc0076=Public PC 1
If a user does not release their held job after a defined time, their job will be automatically
deleted. This is to prevent a buildup of old/abandoned jobs in the release station queue. The
default timeout is 30 minutes, and can be changed as follows:
Navigate to the Options tab
In the section Release Station Security, find the option Delete held jobs if not released after...
Enter the number of minutes to wait for users to release their job before it is deleted.
Press
Configuration options for the end-user web based release station can be found in the administrative interface at → → . The available options are:
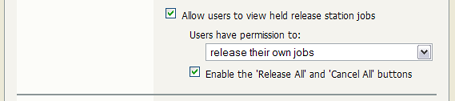
Allow users to view held release station jobs - this option enables the Jobs Pending Release screen in the user web tools. When this option is disabled, no release station functionality is available from the user web tools interface.
Users have permission to: - this option changes which type of jobs users can see and/or release. The available options are:
view their own jobs only - users may see their own jobs that are held in the release station. Jobs printed by other users are not displayed. They may cancel their own jobs, but cannot release them. This is useful if users are required to be physically at the printer to release a job, where a standard release station is running.
release their own jobs - users may release or cancel their own jobs. Jobs printed by other users are not displayed.
release any jobs (charged to their account) - users may release or cancel any job that is being held, including jobs from other users. If a user releases a job that was sent by a different user, the releasing user is charged for the job.
Enable the 'Release All' and 'Cancel All' buttons - enabling this option allows users to release or cancel all held jobs by clicking one button. When this option is disabled, users must release or cancel jobs individually.
This option is purely for the convenience of the users. It can save a user a few clicks when they want to release all their jobs at once. However if the user is able to release jobs other than their own, a user might accidentally release (and be charged for) many other users' jobs.