Web Print may be configured in one of two possible modes: simple mode or sandbox mode.
Simple mode involves running the Web Print software on the same system as the PaperCut NG primary server. It is the fastest and easiest way to get Web Print working.
Setting up Web Print in sandbox mode involves a sandboxed or virtualized system, isolated and dedicated to the task of processing Web Print jobs. Sandbox Mode takes a little more time to configure but offers several advantages, including improved security and more supported formats.
| Primary Server Type | Simple Mode | Sandbox Mode |
|---|---|---|
Microsoft Windows | Yes (PDF only) | Yes. All formats supported |
Apple Mac | Yes (PDF only) | Yes. All formats supported |
Linux running CUPS | Yes (PDF only) | Yes. All formats supported |
Novell OES Linux | No. Simple Mode not supported | Yes. All formats supported |
Table 20.2. Web Print Setup Options (by platform)
Simple mode involves running the Web Print software on the same system as the PaperCut NG primary server. It is the fastest and easiest way to get Web Print working. It is suitable for testing Web Print functionality or where only PDF support is required.
In simple mode the Web Print software runs as a service (background process or daemon) that is responsible for watching a directory for documents (e.g. PDFs) submitted by users. When a new document is detected the background process opens the document and prints it. The service runs as a user that has rights to open the application and access print queues.
This section describes how to configure Web Print on the same Windows system as the PaperCut primary server. This is the fastest and easiest way to get Web Print up and running on a Windows system. Due to the inability of Microsoft Office or XPS Viewer applications to run as a system service, these file formats are only available on Windows when Web Print is configured in sandbox mode. See the section called “Sandbox Mode Setup” for more information.
Install the latest version of Adobe Reader on the system running PaperCut NG.
The PaperCut NG Web Print server needs to run under a user account so that it has permission to access printers and use the locally installed Adobe Reader.
Create a new user account called
webprint(or equivalent). If it is not possible to create a domain user or the system is not a member of a domain then create a local user account instead. The password for this account should be set to never expire. At a minimum this account needs access to the printers and the ability to run local programs.Test Adobe Reader as the
webprintuser: Log into the PaperCut primary server as the newly created account. Open a number of different PDF files in Adobe Reader and print to several different printers, ensuring that all works as expected. IMPORTANT Make sure you permanently acknowledge any license agreement and customer experience program dialogs during this process.Important
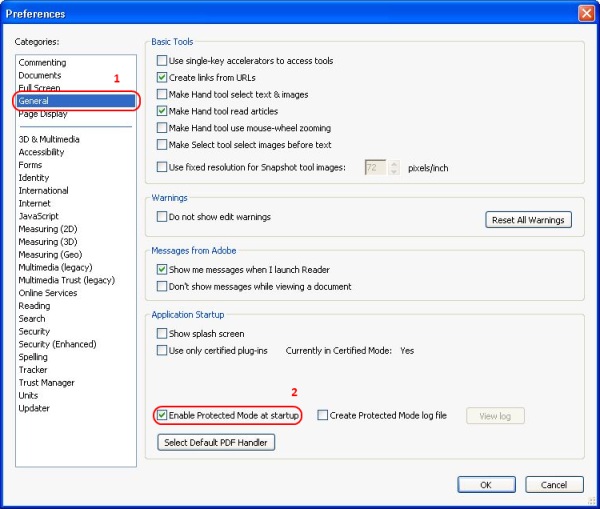
If using Acrobat Reader X, you must disable the Reader's Protected Mode feature, see the section called “Disabling Adobe Reader X protected mode”.
Test that the user has write access to
[app-path]/server/data/web-print-hot-folder/, e.g. by creating a new empty text file in that folder.Log in as an administrator level user again.
Open the Windows Services dialog ( → → → ).
Right-click the service named PaperCut Web Print Server and select .
From the Log On tab select This account: and enter the credentials for the newly created
webprintservice account.From the General tab change the Startup type to Automatic.
Press .
Press to start the service.
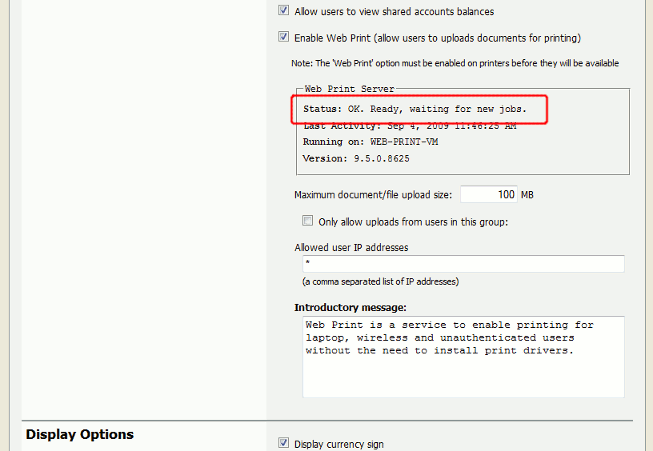
Log into the PaperCut NG admin interface and navigate to → → .
In the section titled Web Print Server ensure that the Status is OK. If the status indicates an error see the section called “Troubleshooting Web Print Problems” for assistance.
The Web Print setup is now complete and ready for testing. Continue at the section called “Web Print Testing and Feature Tour” to test printing and functionality.
When using Adobe Reader X (version 10) you will need to ensure that Adobe Reader X's Protected Mode is disabled. This feature prevents PaperCut from printing PDF documents.
Disabling Adobe Reader X's Protected Mode is done by navigating to → → and then unchecking Enable Protected Mode at startup as shown below.
Web Print Simple Mode supporting PDF documents is enabled and configured by default on
Mac and Linux systems (running CUPS). No additional configuration should be required. To confirm that everything
is configured correctly, check the Web Print Status section under
→ → . The status should be listed as OK. The Web Print option will also need to
be enabled on at least one printer. If there are any status issues, or if basic Web Print testing produces
some errors, please consider these limitations/requirements:
The printers targeted for use in via Web Print must be configured as print queues on the Primary PaperCut Server.
The printers (as setup on the server) must have working compatible drivers.
Linux: The Primary Server must be running CUPS version 1.2 or higher.
Administrators may find the following log file useful in diagnosing issues:
[app-path]/providers/web-print/[platform]/logs/web-print.log
Simple mode for Novell OES Linux and iPrint is not available. Novell OES users should implement the Sandbox Mode (following section).
Sandbox mode is different to simple mode in that the Web Print software runs as a standard GUI application on a dedicated Windows system (often a virtual machine). The dedicated system is configured to be always logged on and running the Web Print software. This software watches a mapped network share hosted on the PaperCut primary server for the arrival of new documents submitted by users. These documents are then opened in the appropriate application and printed.
Sandbox mode takes a little more time to configure but offers several advantages, such as support for Microsoft Office formats and improved security. Improved security is gained by opening and printing documents on an isolated system, separate from the PaperCut primary server, with the only connection between the two being via a simple file share / mapped drive.
Prerequisites:
A dedicated, standalone, cleanly installed system or virtual machine.
Windows operating system (suggested: 7, Vista or XP).
Adobe Reader 9, Adobe Reader X (10)
Microsoft Office 2007, 2010 (to support Office formats)
Microsoft Standalone XPS Viewer / XPS Essentials Pack (to support Microsoft XPS) - download here
To set up Web Print in Sandbox Mode:
Important
First before setting up Web Print in Sandbox Mode ensure Web Print in Simple Mode is disabled as follows:
On Windows, stop and disable the
PaperCut Web Print ServerSystem Service (set its Startup type to Disabled).On Mac and Linux, use a text editor to edit the file
[app-path]/providers/web-print/[platform]/web-print.confand change settingenabledtoenabled=off.Remove the Web Print status files (named
web-print-server.activityandweb-print-server.status) located in the hot-folder/Applications/PaperCut NG/server/data/web-print-hot-folder.Restart the server (or services) to ensure the change is applied.
Make sure Simple Mode is disabled (see Important box above).
Set up a new virtual machine (e.g. using VMware Server, Microsoft Virtual Server or VirtualBox) or a standalone system (e.g. a dedicated desktop PC). This system will house the Web Print server software and any required printing applications, and will be termed the Web Print server.
This system does not need access to all network resources, but will need access to printer shares and the hot folder share (created later in step 7).
Important
Ensure that the system clocks on the primary server and the web print sandbox are synchronized to a common clock. Time differences between these systems may cause problems with the web print system.
Create a new user account called
webprint(or equivalent). The password for this account should be set to never expire. At a minimum this account needs access to the printers, the ability to run local programs and the ability to access the hot folder share (created in step 7).Log in as the
webprintuser. Add print queues for the printers that should be made available to users via Web Print. The print queues should be added in the same way that they would be added to a workstation. They should point to the print queues hosted on the print server, i.e. a Network Printer mapped to\\server\printer-share. It is important that the jobs pass via the queue on the server - do not add a Local Printer. You should also use add the printers using the print server's machine name and not an IP address.Install one or more of the applications listed in Table 20.1, “Web Print Supported Applications and File Formats”. The applications installed will determine which file formats are available to users for upload and printing.
As the
webprintuser, open a file in each of the installed applications and print to several different printers, ensuring that all works as expected. IMPORTANT Make sure you permanently acknowledge any license agreement screen, initial-run wizard, or customer experience program dialog during this process.Tip
When installing Microsoft Office applications choose all optional components for installation. This will prevent printing issues occurring due to missing components.
Important
If using Acrobat Reader X, you must disable the Reader's Protected Mode feature, see the section called “Disabling Adobe Reader X protected mode”.
Configure the Web Print server to automatically log in as the
webprintuser on startup. This system will permanently stay running and logged in as this user.The primary server and the software on the sandboxed Web Print server communicate via a standard network file share. On the PaperCut primary server, share the folder
web-print-hot-folderlocated at[app-path]\server\data\web-print-hot-folder\and name the sharePCWebPrint. The hot folder facilitates communication between the primary server and the Web Print server.Adjust both the Sharing and Security (NTFS/file) permissions of the
PCWebPrintshare to allow thewebprintuser read and write access.Tip
By default Web Print will use this folder, not a sub-folder. You do not need to create a sub-folder in this folder.
If you are using a Linux PaperCut primary server then the following Samba configuration settings may be useful.
	[PCWebPrint]
        comment = PaperCut Web Print Hot Folder
        path = /home/papercut/server/data/web-print-hot-folder/
        public = no
        writeble = yes
        read only = no
        valid users = webprint
You will also need to add the webprint username to Samba via the
smbpasswd -a [username]and you should consider disabling the[home]shares in your smb.conf.Log in to the Web Print server as the
webprintuser. Map theW:drive to thePCWebPrintshare. Ensure that the option Reconnect at logon is selected when mapping the drive.Test that the file share can be accessed and written to from the Web Print server (e.g. by creating a new text file on
W:). It is also recommend to test in the other direction as well and confirm that files created on the primary server in the folderweb-print-hot-folderbe opened/seen from the Web Print server.Run the main PaperCut NG installer on the Web Print server and select the Web Print server installation (sandbox mode) install option.
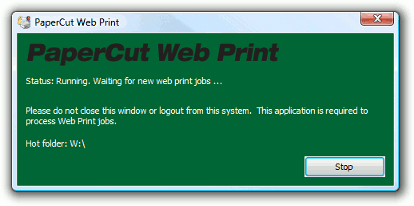
Configure the
webprintuser to run[app-path]\providers\web-print\win\pc-web-print.exeat login (e.g. by adding a shortcut to the user'sStartupfolder).Reboot the system. Ensure that the system automatically logs in as the
webprintuser when it starts up, and that the PaperCut Web Print dialog is displayed shortly afterwards.See the section called “Troubleshooting Web Print Problems” for assistance if the dialog indicates an error.
Log into the PaperCut NG admin interface and navigate to → → .
In the section titled Web Print Server ensure that the Status is OK. If the status indicates an error see the section called “Troubleshooting Web Print Problems” for assistance.
The Web Print setup is now complete and ready for testing. Continue at the section called “Web Print Testing and Feature Tour” to submit a test print job and test functionality.