Table of Contents
This chapter covers two advanced concepts: printer load balancing and "find me" printing.
Find Me Printing - solves the problem of finding the closest printer from a long list of available printers. It is a roaming print service that allows print jobs to find users based on their physical location. It's sometimes referred to as "Pull Printing", "Push Printing" or "Follow Me" printing.
Printer Load Balancing - covers the act of automatically distributing print load between multiple physical printers.
These are two advanced features pertinent to large sites with a large number of printers. These topics are addressed together in this chapter as they both involve the concept of print job redirection, where a job is taken from one queue and transferred to another.
The topics covered in this chapter are advanced in nature and targeted towards the administrator who is already comfortable with PaperCut NG and print queue configuration. If implementing PaperCut NG for the first time it is recommended to plan a simple configuration in the first phase, then return to implement find me printing or load balancing in a later phase once users and administrators are comfortable with the basic features.
Find Me Printing is best described not by what it does but by the problem it solves. Consider a large organization with hundreds of printers. The task of selecting the "best" printer from the list at the time of print can be daunting. Organizations tend to mitigate this concern using a number of methods:
Naming Conventions - network administrators will adopt a printer naming convention that helps users locate the best printer. A common convention is to use the room name or floor number. This is usually complemented by a sign on the printer itself.
Location Adaptive Login Scripts - in many respects a location adaptive login scripts is a most elegant solution. The login script automatically adds the printers to the workstation based on the workstation's physical location (denoted by the computer name). For example, any workstation containing "lvl2" in the name will have the two printers on Level-2 by default. Users will only need to consult the full list of printers in the rare occasion that they wish to print to a printer outside their physical level/room.
Global Profile - administrators map the "best" printer based on location globally on the workstation (e.g. using
rundll32 printui.dll,PrintUIEntry /ga /n\\server\printeron Windows). Any user that logs on to the workstation will have the most appropriate printer selected by default.
All these methods have their drawbacks and require careful planning on the part of administrators, and the need for end-users to understand conventions/processes. Find Me Printing solves the problem by "asking the job to find the user, rather than having the user find the printer". It works as follows:
The user prints to a single site-wide global queue.
The user then walks up to a Release Station logs in, locates their job and releases it.
The job will then proceed to automatically print to the closest physical printer.
Find Me Printing is referred to by users as other terms such as Follow-me printing (because print jobs follow you to a printer), Pull Printing (because the job is pulled from the global queue) or Push Printing (because the release station pushes the job to the nearest printer).
Before implementing a Find Me Printing scenario, the administrator should be familiar with release stations (see Chapter 10, Hold/Release Queues & Print Release Stations). Administrators will also need to consider and plan hardware and driver compatibility. Find Me Printing works by re-directing a job targeted at one queue to another and hence printer compatibility is important. For example, a job designed to print on an inkjet photo printer will not usually be suitable for printing on a laser printer. The topic of printer/driver compatibility is discussed in detail in the section proceeding the examples below.
Implementing Find Me Printing is best described by way of example. The following sections cover some common scenarios for implementing Find Me Printing.
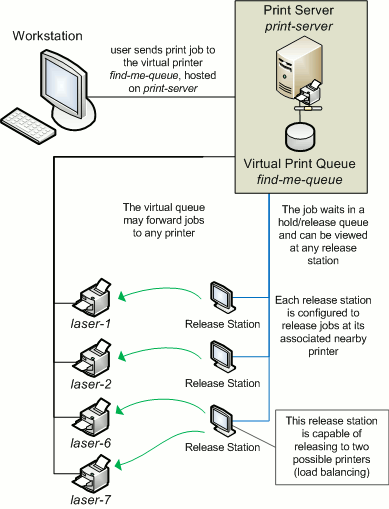
East Beach High School has seven high volume laser printers of the same model at various locations throughout the campus. When sending a print job students must currently select the printer nearest to them before retrieving the document. Students often send jobs to the wrong queue and rather than going to pick it up they re-send the document to a closer queue and leave the original document uncollected.
The current print queues are named laser-1 through laser-7 with the
number corresponding to a label on the printer. All printers are hosted on the print server
called print-server. All printers are the same make and model (using the same driver).
In the library there are two printers, laser-6 and laser-7, side by
side.
The goal is to implement one central queue to receive all print jobs. A release station will be set up next to each printer. Each release station will allow users to have their job printed at the nearby printer.
The first step is to create a new print queue on the print server. This queue will be a virtual queue with hold/release enabled. When students print to the virtual queue their job will be held, and the release station the user releases the job at will determine to which printer the job is sent (the job is pulled from the virtual queue to a printer near the user).
A new queue will be called find-me-queue is created by the administrator on
print-server using the normal methods for the operating system in use. The queue is
created using the same driver that laser-1 through laser-7 use.
The queue points to the IP address of one of the printers - this is not strictly necessary as the
"virtual queue" is just a collecting queue that forwards jobs to real queues,
however some printer drivers "complain" if they do not point to a real printer.
The administrator ensures that the print queue has registered itself with PaperCut NG by checking the Printers tab of the administration interface. Information about adding printers can be found in the section called “Adding and Removing/Deleting/Ignoring Printers”.
After creating of the new virtual queue the administrator performs the following:
Navigates to → → in the PaperCut NG administration interface.
Changes the Queue type option to This is a virtual queue (jobs will be forwarded to a different queue). This reveals the Job Redirection Settings section.
The option Jobs may be forwarded to these queues: determines which queues
find-me-queueis capable of redirecting to. The queuesprint-server\laser-1throughprint-server\laser-7are selected.Enables the option Enable hold/release queue and sets Release mode to User release (the default). This ensures that jobs are held in the virtual queue and not automatically forwarded to one of the targets.
Clicks .
The next step is to configure the release stations:
The administrator first configures each release station as per the section called “Release Station Configuration”. The administrator decides that students should only be able to see and release the jobs they have personally printed, so sets up the release station in Secure mode.
Each release station should be configured to release jobs on the printer it is associated with by setting the
releases-onoption in the release station config file. E.g. for the release station set up near the printerlaser-4, the option should be set to:releases-on=print-server\\laser-4In the library (where there are two printers side by side) the administrator configures a single release station to release to either printer by setting the option to:
releases-on=print-server\\laser-6,print-server\\laser-7In this case when a user releases a job at the library release station PaperCut NG will select either
laser-6orlaser-7based on a load balancing algorithm (see the section called “Example 1: Simple Load Balancing”).
Now when students print from a lab computer to the virtual find-me-queue queue their job will be
held. The student can visit any release station and see their job. When the student releases their job at
a release station the job will be pulled from the virtual queue into the queue or queues associated with the release
station for printing. This setup is illustrated in Figure 11.1, “Single Virtual Queue (High School)”. Administrators
should also ensure that the find-me-queue queue is set as the default queue on all workstations.
The administrator may now optionally un-share all but the virtual queue. This would enforce that users use the "find me" process rather than printing directly to one of the target printers.
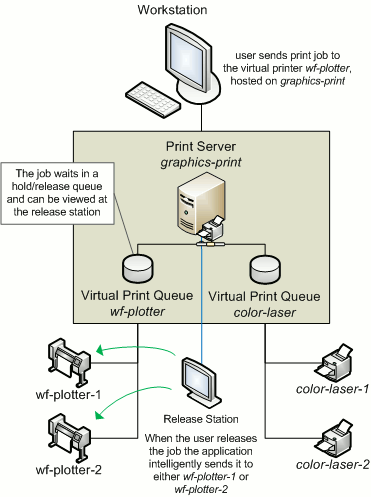
West Face University has a Graphic Design department who use two wide format plotters and seven color laser printers. The two plotters and two of the laser printers are located in the department print room, while the other laser printers are scattered around various locations. The plan is to add more printers next year.
The two wide format plotter queues are named wf-plotter-1 and
wf-plotter-2, and the color laser printers are named color-laser-1
through color-laser-7. Laser 1 and 2 are located in the print room with the plotters.
The goals of the project are:
Implement Find Me Printing so users don't need to remember the names associated with the ever growing list of printers.
Implement release stations. This will ensure the student/staff member is there to collect their work minimizing the chance of one person accidently collecting another's work.
Ensure the procedure is similar for all types of printers, meaning users only have to learn one process.
Automatic load balancing in the print room to ensure all printers receive an equal load and throughput is maximized.
This implementation differs from the previous implementation in that we have two distinct printer types. It is not technically possible to have one "find-me-queue" as jobs rendered by the application for the wide-format printer can't be printed on a laser printer and vice versa. See the section called “Requirements For Job Redirection (Load Balancing or Find Me Printing)” for more discussion on compatibility.
The first step is to create a new print queue for each printer type on the print server. These queues will be virtual queues with hold/release enabled. When a student prints to a virtual queue their job will be held at displayed at the release station. When a student releases their job, PaperCut NG knows which target queues are compatible (based on configuration) and selects one of the available target queues using an intelligent load balancing algorithm.
Two new queues called wf-plotter and color-laser respectively are
created by the administrator on the print server graphics-print.
wf-plotter is created using the same driver as the existing queues
wf-plotter-1 and wf-plotter-2, and likewise
color-laser uses the same driver as its counterparts. Both new queues point to any
physical device of the same type, e.g. wf-plotter to wf-plotter-1.
This last point is not strictly necessary but some printer drivers complain if they do not point to a real
printer.
The administrator ensures that both print queues have registered themselves with PaperCut NG by checking the Printers tab of the administration interface. Information about adding printers can be found in the section called “Adding and Removing/Deleting/Ignoring Printers”.
Following creation of the new queues the administrator performs the following:
Navigates to → → in the PaperCut NG administration interface.
Changes the Queue type option to This is a virtual queue (jobs will be forwarded to a different queue). This reveals the Job Redirection Settings section.
The option Jobs may be forwarded to these queues: determines which queues
wf-plotteris capable of redirecting to. The queuesgraphics-print\wf-plotter-1andgraphics-print\wf-plotter-2are selected.Enables the option Enable hold/release queue and sets Release mode to User release (the default). This ensures that jobs are held in the virtual queue and not automatically forwarded to one of the targets.
Clicks .
Repeats steps 2 through 5 for the
color-laserqueue, except the option Jobs may be forwarded to these queues: in step 4 is instead set tographics-print\color-laser-1throughgraphics-print\color-laser-7.
The next step is to configure the release station:
The administrator first configures a release station as per the section called “Release Station Configuration”. The administrator decides that students should only be able to see and release the jobs they have personally printed, so sets up the release station in Secure mode.
A single release station should be configured to release jobs to the printers it is associated with by setting the
releases-onoption in the release station config file. In the print room the administrator sets the option to the four printers:releases-on=graphics-print\\wf-plotter-1,graphics-print\\wf-plotter-2,\ graphics-print\\color-laser-1,graphics-print\\color-laser-2A separate release station is also set up next to each of the five remaining laser printers in the department. The
releases-onis set to the single adjacent printer in each case.
Now when a student prints from a lab computer to either virtual queue (wf-plotter or
color-laser) their job will be held. The student can visit the release station and see
their job. When the student releases their job in the print room, the system will automatically implement
load balancing and select an available compatible printer. This setup is illustrated in Figure 11.2, “Multiple Virtual Queues (Graphics Department)”.
Important
Load balancing may not be appropriate on the plotters if manual loading of paper media is required, as it is not possible to know beforehand which target printer will be selected. In this case a separate release station may be required for each plotter.
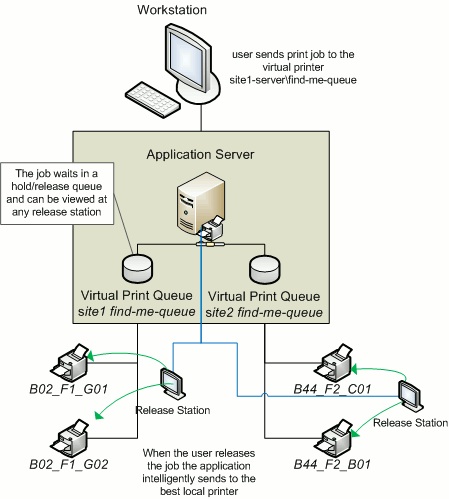
Acme Inc. is a large organization with hundreds of printers located throughout. They maintain a common printer fleet of grayscale devices and a smaller but matching fleet of color devices.
The existing grayscale devices use a naming scheme like site1-server\B02_F12_G04,
where B02 represents "building 2", F12 represents "floor 12",
G04 meaning it is the fourth grayscale printer on that floor. Color devices use the same
naming scheme except the G is replaced with a C.
Each floor of each building has a print room with several grayscale devices and two color devices. The organization also has multiple offices located and separate physical sites. Each sites hosts their local print queues on their own local print server, however all sites exist in a single WAN and shared domain.
Through trial testing, the IT administrators have confirmed that the Postscript drivers supplied with the color devices also work with the lower cost grayscale-only version of the printers. This means that one common driver will work across the full fleet.
The main goals of the project are:
Simplify the printing process for users, so that they do not need to decipher the naming scheme to work out their closest available printer.
Implement a system/procedure common across all sites.
Reduce wasted printing by ensuring the user is physically present in the print room to pick up their job when it prints.
Ensuring high uptime by minimizing single points of failure.
This implementation differences from the previous implementation in that there is a large number of printers and users spread across multiple physical sites. Although it would be possible to implement one global virtual "Find-Me Queue", there are some benefits in implementing multiple virtual queues - one per site:
Minimize network traffic - jobs should only spool on queues on the local server where possible.
No single-point-of-failure - if an issues occurs on the single "find me queue", it would affect printing on all sites.
Implementing multiple virtual queues will offer considerable benefits. One queue per site, or maybe even one queue per floor/department on larger sites should be considered as the benefits will outweigh the small additional overhead in administration/setup.
The first step is to create the new print queues that will become the virtual queues. The administrator installs a separate queue for each site called "find-me-queue" on each of the site's servers. This queue is set up using the common Postscript driver that has been confirmed to work with all models in the printer fleet.
The administrator ensures that all print queues have registered themselves with PaperCut NG by checking the Printers tab of the administration interface. Information about adding printers can be found in the section called “Adding and Removing/Deleting/Ignoring Printers”.
After creation of the new queues the administrator performs the following on each new virtual queue.
(site1 example).
Navigates to → → in the PaperCut NG administration interface.
Changes the Queue type option to This is a virtual queue (jobs will be forwarded to a different queue). This reveals the Job Redirection Settings section.
The option Jobs may be forwarded to these queues: determines which queues are compatible. Because this virtual queue is capable of forwarding to all printers in the organization the Select all printers is clicked.
Enables the option Enable hold/release queue and sets Release mode to User release (the default). This ensures that jobs are held in the virtual queue and not automatically forwarded to one of the targets.
Clicks .
Repeats steps 2 through 5 for all other
find-me-queue's on each site server.
The next step is to configure a release station for each floor's print room:
The administrator first configures a release station as per the section called “Release Station Configuration”. The release station is configured in Secure mode so that staff can only see and release the jobs they have personally printed.
The release station should be configured to release jobs to the printers it is associated with by setting the
releases-onoption in the release station config file. The administrator sets the option to the full name of the printer(s) in each print room:releases-on=site1-server\\B02_F1_G01,\ site1-server\\B02_F1_G02,site1-server\\B02_F1_C01
All workstations should be configured to use the local find-me-queue on each site by
default.
Now when a staff member prints to either virtual queue their job will be held. The staff member can visit the release station and see their job. When the staff member releases their job it will be sent to any of the available and compatible devices in the floor's print room. This setup is illustrated in Figure 11.3, “Multiple Location Specific Virtual Queues (Large Company)”.
Advanced: PaperCut NG can also support redirection between print queues in different
servers. In this example, it may occur when a laptop user that roams between sites prints. Their laptop may
be configured to print to the virtual queue on site1, but they have release their job on
a printer hosted on the server in site2. Directing between different servers is
supported, however some additional configuration may be required. See
the section called “Cross-Server Job Redirection” for further information.
The Find Me printing examples covered above involve setting up a release station so that users can release jobs to the printers at their current location. The web based release interfaces are also supported (via the user web tools, admin interface or full screen web based release interface), although due to the lack of location information the user is asked to select the destination printer.
When a user releases a job held in a virtual queue using one of the web based release interfaces they are presented with a list of target printers and their locations, as shown in Figure 11.4, “Find Me Printing and Web Based Release Interfaces”.
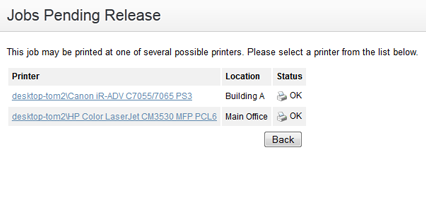
When using web based release interfaces in conjunction with Find Me Printing it is recommended to populate the Location field on printers for the convenience of users.