Email to Print
Overview
Email to PrintEmail to Print allows any device to print documents by sending an email to your network's print devices. allows users to print by emailing their documents to a special address. No client software or drivers are required, providing a simple way for your organization to print from any device that can send an email.
Email to Print is part of a collection of solutions to manage mobile and BYOD printing. For more information see Mobile & BYOD printing.
Email to Print is not available on direct print queues. To offer this service to your users, set up a server queue for this device/printer.
How does it work?
-
Each printer has a unique email address e.g.[email protected]
-
Users compose an email, attach printable document(s), and email to the printer's address.
-
PaperCut receives the email and prints the documents on behalf of the user.

Figure 20: workflow
Solution summary
-
Easy to use, easy to set up.
-
Works with nearly any device (anything that can send an email with an attachment).
-
All print options are locked to the OS print queueA print queue displays information about documents that are waiting to be printed, such as the printing status, document owner, and number of pages to print. You can use the print queue to view, pause, resume, restart, and cancel print jobs. defaults.
-
Various setup options. See the following table for supported formats and platform/mode combinations.
Web PrintWeb Print enables printing from user-owned devices without the need to install printer drivers and manage server authentication. setup options (by platform) Primary server type Default mode Sandbox mode Microsoft Windows Yes (PDF and picture files only) Yes. All formats supported Apple Mac Yes (PDF only) Yes. All formats supported Linux running CUPSCommon User Printing System (CUPS) is a printing system for Unix operating systems that allows a computer to act as a print server. A computer running CUPS is a host that can accept print jobs from client computers, process them, and send them to the appropriate printer. Yes (PDF only) Yes. All formats supported Novell OES Linux No. Default Mode not supported Yes. All formats supported
-
You can set up multiple OS print queues for the one printer with different default settings e.g. one for single-sided, one for double-sided.
-
You can use Email to Print in conjunction with Find-Me printing and printer load balancing. Rather than one email address per printer, you can use a single address for multiple printers. Users could then release their jobs at the printer of their choice.
-
You can use Email to Print in conjunction with PaperCut internal users. This allows users without a domain account to register their own account with an email address. For more information, see Internal users (users managed by PaperCut NG/MF) for details. You can also use Email to Print to create a guest printing solution for visitors and guests with BYOD devices. See Anonymous guest printing for details.
Before you start: aliases
When processing Email to Print jobs, PaperCut connects to a single mailbox on a mail server. The mailbox receives the emails of all printers, where each printer has its own email alias. This is achieved in one of three possible ways:
Dynamic aliases—Many email servers support the dynamic alias "+ syntax" e.g. [email protected] gets delivered to the printing mailbox. This is the simplest option to set up and maintain. However, removing or renaming a dynamic alias doesn't stop emails for the now defunct printer name. Also, the email addresses are arguably not as nice to look at!
Server-side aliases—The email address for each printer is an email alias of the mailbox e.g. [email protected] is an alias of [email protected].
Email forwarding—If options one and two are not possible with your email server, another option is to configure one mailbox per printer. Each mailbox could then forward all mail to the "main" mailbox e.g. [email protected] is a mailbox that forwards to [email protected].
Pick a strategy that suits your environment and you are ready to start.
The Microsoft Exchange email server (including Office 365) does not support "aliasing" in Email to Print because it replaces the alias address with the destination address.For more information, see Email to Print with Microsoft Exchange and Email Aliases.
Prepare the PaperCut server
-
Configure your SMTPSimple Mail Transfer Protocol (SMTP) is the mechanism by which an email client program sends emails to an outgoing mail server (SMTP server) for delivery to the intended email address. server details in PaperCut at Options > Notifications .
This is required so PaperCut can respond to user emails e.g. to let them know their job has been received.
TIPWhen configuring your SMTP settings, use a real, attended From address. Users can reply to this address to ask questions. They will have a better experience if they receive a reply.
-
Configure a user facing server address at Options > Advanced > Server Address > Server address presented to users .
Email to Print sends emails to users that include links to the PaperCut server, so it needs to know the server's network address. If you want to support Email to Print from the internet, this address needs to resolve both internally and externally to your network i.e. a fully qualified public DNS name.
For more details see Change the server address presented to users.
Setting up a mailbox
-
Set up a new mailbox on your email server. Email to Print supports mailboxes with either POP3 or IMAP protocols.
This mailbox receives all emails for Email to Print. Each email is deleted from the email server after it is processed, so the storage requirements should not be large.
TIPIf you are using Gmail to host your mailbox, there are default actions for emails deleted. These actions are based on the protocol being used. POP3 keeps a copy of the email in the Inbox, while IMAP archives it. If you prefer a different behavior, you can log in to the Gmail account and change the following settings: Settings > Forwarding and POP/IMAP > POP Download > When messages are accessed with POP - Delete, Mark or Archive [your org's] copy Settings > Forwarding and POP/IMAP > IMAP Access > When a message is marked as deleted and expunged from the last visible IMAP folder - Archive, Move to the Bin or Delete forever
IMPORTANTDo not use your personal email address for testing, unless you want to print every PDF ever sent to you! One of our developers did this. It wasn't pretty.
-
Select Enable Printing > Mobile & BYOD.
The Mobile & BYOD page is displayed.
-
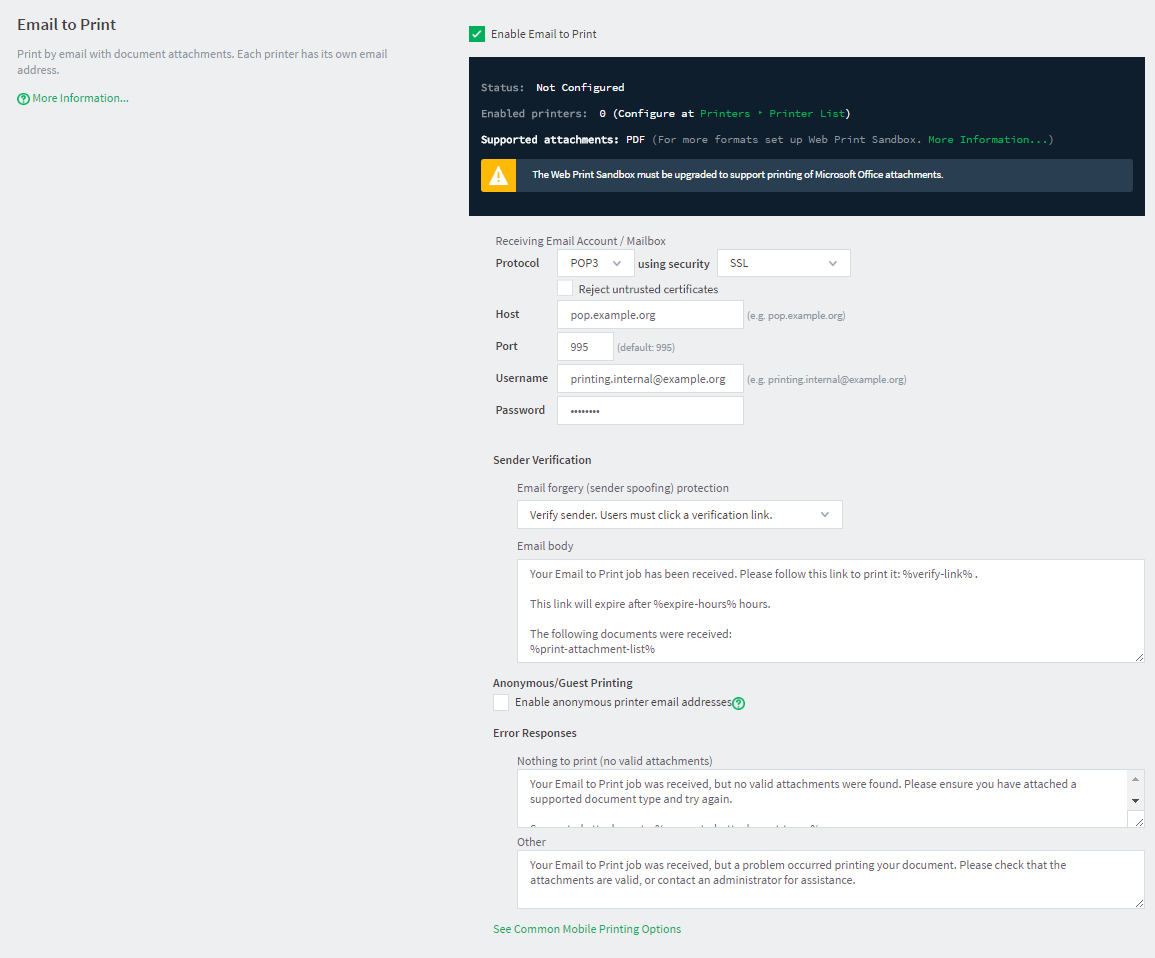
In the Email to Print area, select the Enable Email to Print check box.
-
Configure the Receiving Email Account / Mailbox area according to your mail server and newly created mailbox. Note that with some email servers, the Username might not be in the email address format.
TIPParticularly when using external email services like Gmail, tick the checkbox to reject untrusted certificates. This prevents man-in-the-middle attacks by blocking the connection if the mail server presents a certificate that has not been signed by a trusted certificate authority.
Do not tick the checkbox if you run your own mail server with a self-signed certificate.
-
Select the protocol below that you are using and follow the steps in the drop-down.

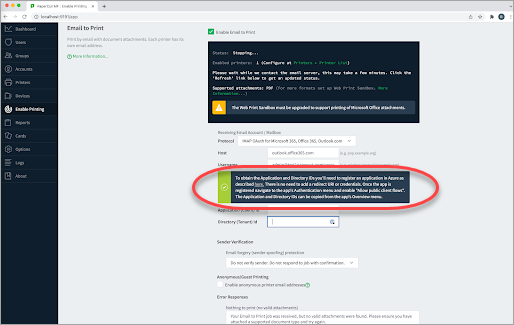
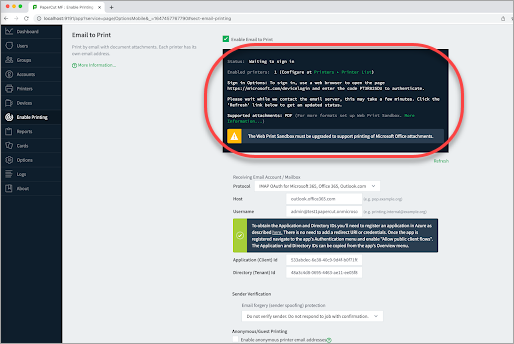
 IMAP OAUTH for Microsoft 365, Office 365, Outlook.com
-
Follow the instructions to obtain the Application and Directory IDs by registering an Application in Azure.

-
If this is the first time you have enabled Email to Print, the Status will be Not Configured.
If the Status is Stopping, refresh the page again to update the status to Not Configured. It can take up to a minute for the status to change.
-
Enter the ClientId and TenantId and click Apply.
-
Follow the instructions in the top box next to Sign in options to enter the deviceCode to authenticate.

-
Refresh the screen again to change the Status to OK. It can take up to a minute for the status to change.
POP3 or IMAP
Leave the default settings. They will suffice for testing.

-

Testing Email to Print
-
Click the Printers tab.
The Printer List page is displayed.
-
Select a printer.
The Printer Details page is displayed showing the Summary tab contents.
-
In the Email to Print area, give the printer a unique and simple email alias.
-
Depending on your chosen alias type, configure the email server to point the new email alias to the Email to Print mailbox (see Before You Start: Aliases).
-
Pick a test user account from the Users tab and ensure it has an associated email address you can send an email from (Primary email or Other emails). If you don't have a test email account, you can temporarily assign your own email address to the test user.
-
From the test user's email address, compose a new email, attach a PDF, and send it to the printer's email address (the alias, not the mailbox).
-
In a short time you should receive a verification email (see Customization). Click the link in this email. Your job should now print!
NOTEJobs can be held pending further action when features, such as Account selection or Secure print release are in effect. You need to address this as per a normal print job. See Interaction with other features for details.
-
Check your job printed successfully, and inspect the print log at Printers > Job Log .
If you want to support Microsoft Office document attachments in addition to PDF and picture files, see Adding support for Microsoft Office Documents.
Continue with Customization below to tweak settings to your site's needs.
Customization
The following customization settings are in Options > Mobile & BYOD > Email to Print.
- Sender verification
This option controls how PaperCut responds when it receives an Email to Print job from a user.
The default setting, Verify sender. Users must click a verification link., sends an email with a link the user must click before their job is printed (or proceeds to the next stage, such as a Secure print release). The purpose of this setting is to verify the sender of the email actually owns the email address. In the Email body for this setting, the special replacement marker %verify-link% is required.
If verification of the sender address is not important, you can use the setting Do not verify sender. Respond to job with confirmation.. When this setting is used, jobs are processed immediately, and the user receives an email to let them know their job was received. In the Email body for this setting, use the special replacement marker %client-url% as a link to the Mobile web client, which shows the job's status.
- Anonymous/guest submission
This item enables the sending of Email to Print jobs from anonymous guest users. These jobs are sent to a special guest printer alias. Jobs are logged to the specified user (default is guest-user.)
See Anonymous setup for more information.
- Error responses
These options allow the customization of response emails sent to users when things go wrong.
-
Nothing to print (no valid attachments)—Used when an email is received but no valid attachments were found. The user might have forgotten to attach their document, or perhaps attached an unsupported document type.
-
Other—Used when any other problem occurs e.g. if the document was corrupt and couldn't be printed, or something went wrong with the print driver attempting to print.
-
The following special replacement markers can be used in each of the customization settings.
| Special replacement marker | Description |
|---|---|
| %printer% | The name of the printer. |
| %printer-server% | The server name component in the printer's name. |
| %printer-queue% | The queue name component in the printer's name. |
| %location% | The printer location/department. |
| %document% | The document name. |
| %print-attachment-list% | A list of email attachments to be printed. |
| %expire-hours% | The number of hours before the email verification link expires. |
| %supported-attachment-types% | Supported email attachment types. |
| %verify-link% | The verification URL that a user must click before their job is printed. |
| %client-url% | The Mobile Client URL. |
See Self association for emails and email verification/validation for additional customization settings that apply to both Email to Print and Google Cloud PrintGoogle Cloud Print is a technology that allows you to print to any printer from any web connected device, such as a phone. Google Cloud Print works on a phone, tablet, Chromebook, PC, and any other web-connected device you want to print from..
Interaction with other features
User interactions (account selection, confirmation, print scripts)
If users are configured with Account Selection options (or you have print scripts) that require user interaction that can ONLY be done via the Mobile web client
However, if users are configured with Account Selection options that require user interaction and this can be done BOTH via Mobile web client AND at the printing device (the ability to assign accounts at the printing device is available), running the Mobile web client is not mandatory. It may be required if it is also being used for other purposes, besides Account Selection (such as, viewing current account balance, cached user comments, "low credit" warning messages, notifications about print policies, etc). For more information, see Mobile web client and Changing attributes of print jobs at the device
Hold/release queues
Hold/release queues allow jobs to be held in a queue and later released by a user. This can be used, for example, to require that users are physically at the device to collect their job ("secure print releaseSecure print release places print jobs in a holding state until the user authenticates and releases the job at the printer. This means sensitive print jobs will not sit uncollected on the printer.").
You can use hold/release queues with Email to Print in the same way as other job types. For more information on hold/release queues, see Secure print release.
Find-Me Printing
Find-Me Printing removes the need for a user to select a printer when printing their job. Instead they print to a "virtual", sometimes called "global", queue. They then release their job at the device of their choosing. PaperCut handles routing of the job to the right printer.
You can use Find-Me Printing with Email to Print in the same way as other job types. For more information see Find-Me printing and printer load balancing.
Internal users
Internal users are users who exist only in the PaperCut database, not in the organization's domain. They allow you to quickly set up users for printing (or have users set up their own account) without having to go through the normal process of creating full domain accounts.
You can combine internal Users with Email to Print, allowing users to register their own account (and email address) to set themselves up for printing. The recommended approach is as follows:
-
Enable internal user self-registration (see Internal users (users managed by PaperCut NG/MF). This adds a link to the login screen for users to create a new username, password and email.
-
Enable email self-association (see Unknown emails and email self-association). This allows jobs from unknown email addresses to be held until the email "becomes known". When the user sends their first job via Email to Print, they will receive a response email asking to verify their email address by logging in. Change this default template to be "If you do not have a username, create one using the Register link on the login screen" or something similar.
After the user has verified their email address, their job continues to print. Future jobs print as per normal.
Adding support for Microsoft Office documents
Email to Print prints PDF and picture file attachments by default (See Supported Applications and File Formats for full details). You can add support for Microsoft Office document attachments by configuring a Web Print Sandbox running Microsoft Office. The Web Print Sandbox functions as a document conversion service. Incoming email attachments are sent to the sandbox, and the associated Microsoft Office program automatically converts the source document to a PDF file, which is then sent to the printer.
See Sandbox Mode Setup for information on how to set up a Web Print Sandbox running Microsoft Office.
Rollout
The following is a list of considerations when moving from a test Email to Print environment that is working as desired, to a wider or organization-wide rollout.
-
Create and publish printer aliases for all printers available via Email to Print. This could involve:
-
Adding the printer's email to a sign on the printer
-
Publishing a web page with email addresses for all printers
-
Adding printer email addresses to a shared address book
-
-
Modify the procedure for creating new printers in PaperCut to optionally include an Email to Print alias.
Advanced configuration
The following Email to Print settings are for advanced users or special cases, and does not normally need to change. They are found in the PaperCut Config EditorThe Config Editor stores information used by PaperCut to configure advanced options and functions. This information is stored in config keys, which are editable by an administrator.. See Using the Advanced Config Editor for more information on advanced configurations.
| Config Name | Description |
|---|---|
| email-printing.attachment-min-image-bytes | Often emails have small images attached as part of the email signature, which users are not likely to want printed. To avoid printing these images, Email to Print ignores image attachments smaller than this value. The default value is 20000 bytes. |
| email-printing.debug | Set this to Y to enable detailed logging of Email to Print emails received, emails sent, and how PaperCut is connecting to the email server. |
| email-printing.service-freq-secs | By default, PaperCut checks (poll) for new emails every 20 seconds. This config item can change the polling frequency. Less than 20 seconds is not recommended so not to burden the email server. If this value is too large, users will find that sometimes jobs will take a long time to print. How long "too long" will vary between sites. |
| email-printing.imap-read-folder | By default, PaperCut looks at the 'Inbox' folder of the mailbox. This is usually the right setting for most mailboxes. When using IMAP as the protocol, emails can be from any folder on the mail server; so if you want to read emails from a specific folder (e.g. setting a rule to forward emails with attachments to a pre-defined 'PrintQueue' folder) you can set the folder name here. |
Print options
As the user communicates with Email to Print through emails, there is little opportunity for setting print options. Instead, PaperCut attempts to use default settings for the printer.
Setting printer defaults
Email to Print printing is performed by the PaperCut Print ProviderA Print Provider is a monitoring service installed on a secondary print server to allow PaperCut to control and track printers. This monitoring component intercepts the local printing and reports the use back to the primary Application Server. running on the print serverA print server is a system responsible for hosting print queues and sharing printer resources to desktops. Users submit print jobs to a print server rather then directly to the printer itself. A print server can be a dedicated server but on many networks this server also performs other tasks, such as file serving for the target printer.
On CUPS print servers, Email to Print uses the default printer settings.
On Windows print servers, default printer settings are configured under: Start > Devices and Printers > your printer > Printing Preferences
However, these printer settings are not available when the Print Provider service is running under the SYSTEM account, which is the default. If you want Email to Print to use the Windows printer defaults (Printing Preferences), run the Print Provider service under a user account that has access to the Windows printer settings.
-
Select Start > Control Panel > Administrative Tools > Services .
-
Find the PaperCut Print Provider service; then select Properties > Log On .
-
Set a user account that has access to the Windows printer settings.
Image print scaling
When printing large image file attachments, Email to Print might need to rotate and/or scale the image to make it fit on the page.
To do this, Email to Print assumes a page size of either A4 or Letter. If an image is too large to fit on an A4 or Letter sized page, Email to Print rotates and/or scales down the image as needed to fit.
FAQ
Yes, all attachments are printed (when the attachment type is supported).
Yes, the job is printed to each printer in the To or CC field of the email.
Probably. Email support to let us know you're interested!
At this time PaperCut NG/MF supports plain emails. If you need support of other features, email support to let us know you're interested!
Probably. One possible solution would be to allocate all jobs from unknown emails to a special user account (e.g. guest). Please email support to let us know you're interested!
Maybe. Please email support to let us know you're interested!
Troubleshooting
-
Ensure you have configured a public DNS name for your PaperCut server and have configured it at Options > Advanced > Server Address > Server address presented to users , so your response emails do not contain (internal) IP addresses.
-
Ensure you are using a valid SMTP 'From' address ( Options > Notifications > Email Options > From address ). For the best user experience, use an attended email address.
Configure the public DNS name for your PaperCut server at Options > Advanced > Server Address > Server address presented to users .
-
Check the App. Log tab for any obvious errors.
-
Check your Email to Print mail server configuration. Ensure the server name, username, password etc. are all correct.
-
If there is no obvious cause, contact support for assistance.
-
Check the Application Log tab for any obvious errors.
-
On the Dashboard tab, check the Realtime Activity area. This contains a lot of information about the state of print jobs. Try sending a new Email to Print job while watching this status area. Look for messages about the job being held in a hold/release queue, etc.
-
Is the job:
-
canceled, because the email address was unknown?
-
canceled due to filtersFilters allow you to control attributes of the print settings by either forcing a particular attribute or denying a a print job that does not meet specific criteria. There are two types of print filters: conversions and restrictions. or not enough credit?
-
awaiting the user to verify their email?
-
awaiting the user to click a job verification link? (is the email in the user's spam folder?)
-
awaiting account selection, job confirmation, or a print script popup? (try opening the Mobile web client)
-
held in a hold/release queue?
-
-
If it's still a mystery, contact support for assistance.
-
On a standard Windows server, open the Registry Editor.
-
Export the following registry:
[HKEY_LOCAL_MACHINE\SOFTWARE\Microsoft\Windows NT\CurrentVersion\Fonts]
-
Copy the fonts registry file to the Print Server
-
On the print server, create the following folder:
C:\Windows\Fonts
-
On the standard Windows server, copy all of the font files in C:\Windows\Fonts to the same location on the print server.
-
On the print server, open the Registry Editor.
-
Import the fonts registry file.
-
Restart the print server.