PaperCut NG normally relies on the underlying operating system and the associated print queues to perform authentication. For example, in normal operation, a user logs into a workstation using a domain/network level authentication method such as a username and password. The print queues also use this authentication and PaperCut NG can trust the supplied identity. However in some network environments, relying on network level authentication may either not be possible, or may not be reliable. Common examples include:
All users log in with a common generic username and password meaning that it's not possible to distinguish between users.
A print queue that does not enforce authentication.
For a detailed explanation of print authentication, please Chapter 22, Print Authentication.
Some real life examples covering these two situations include:
Some student labs are set up so everyone logs in using a generic username and password. For example, username: student, password: student. This is common in Apple Mac labs, where enabling multi-user authentication is complex and can often prevent selected applications from running correctly.
The Line Printer Daemon print protocol, often used in UNIX environments, is a non-authenticated system. The username associated with the print jobs is passed through to the print queue, however the name is not verified and can easily be forged. An extra level of authentication is required.
CUPS, the modern print system often used on Linux, Apple Mac and some Unix systems, is often implemented in a non-authenticated fashion. Although CUPS can support authentication, technical considerations such as the inability to interface with Active Directory domain authentication often prevent its use.
Mac OS X server use the CUPS print system. Current Apple implementations prevent administrators from enabling CUPS authentication. This is not usually a problem in an environment where logins can be controlled at individual workstation level. It does however pose a problem if users have local admin access - for example, individual owned laptops. PaperCut NG popup authentication provides a way to work around the non-authentication issue.
More information, including a discussion of platform specific issues is available in Chapter 22, Print Authentication.
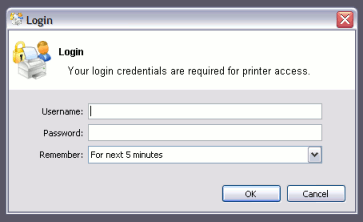
The popup authentication works by authenticating the user via the PaperCut NG client software. The client software pops up a window requesting the user's username and password. The password is sent to the server via an SSL encrypted connection and is validated. On successful validation, a session is formed that associates the user with this workstation. The session is valid for a length of time as selected by the user - the default being 5 minutes - or until the user logs out.
The following sections cover how to enable popup authentication on either the user account level or the print queue level.
The following notes explain how to enable popup authentication when a user logs in under a generic
user account - for example, student.
Add the account to the domain called
student. You may already have such as account set up.Perform a or print a job from this account so the username is listed in PaperCut NG
Select the generic user and set the account to a zero balance and a restricted status. This will ensure that users can't charge against this account.
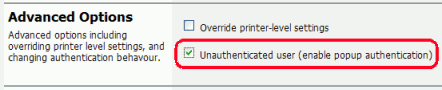
Check the Unauthenticated option and click on the button to save the changes.
Install client software on workstations. See the section called “User Client” for details.
When a user logs in as the generic
student, they will be prompted for their domain level username and password.
The following notes explain how to enable popup authentication when a user attempts to print to a non-authenticated printer such as one hosted via an LPR/LPD queue or a CUPS print queue:
Add the printer to the system and normal. Perform a few test prints to ensure the printer is functioning and tracking as expected.
Log into PaperCut NG and check the Unauthenticated option under the relevant print to enable the popup authentication.
Install the client software on any workstation that will print to this printer. See the section called “User Client” for details.
When a user attempts to print to this printer, they will be prompted for their username and password.
When running in popup authentication mode, the client makes available a number of additional options including:
Logout
Login as another user
The Logout option is available on Windows via either the right-click option on the task try icon, or when running on Mac or Linux, via a right-click popup menu (Option Click) access via the icon on the balance window.
The Login as... option is made available if the client starts as an unauthenticated user. This option allows users to authenticate or quickly switch user identity.
The login box displayed to the user offers the choice of how long their authentication details should remain active. An administrator can control the options presented to the user by modifying the following system configuration keys. These configuration keys are edited under → →
| Config name | Description |
|---|---|
client.config.auth.ttl-values |
A comma separated list of values to display in the popup authentication login box.
Positive numbers represent the number of minutes to remember the authentication for.
The value of
The default is: |
client.config.auth.ttl-default-minutes | The default time-to-live value automatically selected when the login authentication window displays. |
client.config.auth.popup-on-startup-if-unauthenticated |
Determine if the client should request authentication when the
client starts if the operating system user is unauthenticated.
Set to |
Table 7.2. User Client Popup Config Keys
Important
User client tools that are already running will pick up changes made via the config editor the next time they are restarted.
Please see the section called “Using the Config Editor” to find out how to change config keys.