Site Servers are an architectural component of the PaperCut solution. Setup is a straightforward process. Like most architecture projects, the time is best spent planning.
Planning is the most critical step of a successful site server deployment. Taking a few moments prior to installation to run through a checklist of items is a wise first step;
Arrange a license to include the required number of Site Servers.
Consider a signed certificate by a trusted CA for your Application Server
Plan to install/update the Application Server to v15.0.
Discuss and choose the appropriate Offline Policies for your site.
Choose a Site Server location that ensures a reliable connection to the devices and print servers it needs to support.
Plan for minor disruption for any existing embedded or hardware devices you will reconfigure to use the Site Server.
Review the critical functions the Site Server supports to understand offline behaviour.
Your Application Server must be licensed for Site Servers before installing the Site Server software.
Where practical, organizations should consider implementing a signed certificate for SSL communications. This topic is covered in detail in Appendix A of our manual.
Before installing a Site Server you should take some time to ensure the primary server (central application server) is set up and running correctly. If it is not running fine now adding an extra server will only "add an extra variable to the equation" and complicate troubleshooting. Take some time now to verify that the primary server is functioning correctly.
On a Windows server, install the Site Server software by selecting the Site server installation (advanced) option in the installation wizard. If the PaperCut Primary Server software was previously installed on the server it must be uninstalled prior to installing the Site Server software.
Please follow the existing
Installation on Linux
section of the PaperCut manual, with the additional parameter of ––site-server
when executing the installer.
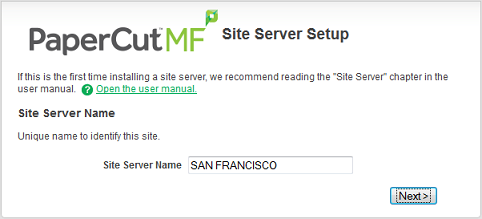
Set a unique name of the Site Server you are configuring.
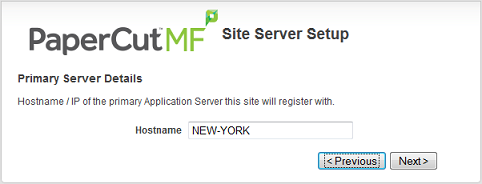
Enter the name or IP of the Application Server this Site Server will connect to.
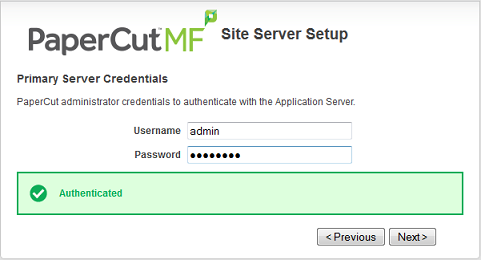
Enter the credentials of a user with administrator access to PaperCut on the Primary Server.
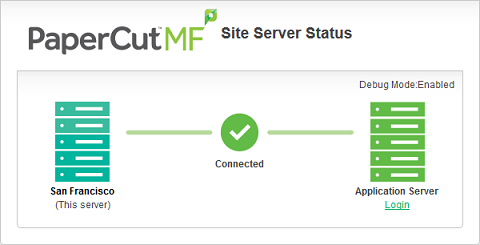
The Site Server is now connected to Application Server and will begin the data synchronization process.
The Site Server requires no additional configuration at the local machine. You can use the Login link under the Application Server image to access the PaperCut admin interface on the Primary Server. In here, you will see a new Sites tab.
Click the → tab to set the Offline Policies for your installation.
Tip
If you have installed the Site Server onto an existing PaperCut Secondary Print Server, the Print Provider will have been automatically configured to work with the new Site Server. Additional Print Providers will need to be upgraded to the same version of the Application Server and configured in the
print-provider.conffile to connect to the Site Server address.
The Standard Release stations and mobile release apps are both supported by the Site Server to allow held jobs to be released in both online and offline operation.
The Standard Release Station is connected to the Site Server by editing the release station's
connection.propertiesfile and changing the server-ip setting to the Site Server address.The Site Server version of the mobile release app is accessed by using the Site server address in the URL, e.g.
http://[site-server]:9191/mr
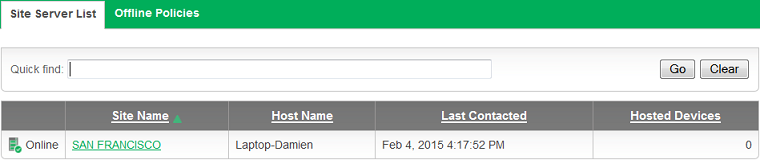
The Sites tab of the admin interface shows at a glance the status of all Site Servers. Whilst the Site Server is connected, your PaperCut installation should be operating as per normal.
To verify that your Site Server is providing resilience - you may take the site offline. This can be achieved by simulating network failure (pulling the plug), or more simply by disabling the site in the Sites tab.
Select the site in the Sites tab
Choose Disable connection (force offline) in the Site Connection section.
Click Apply
The site can be validated as being in offline mode via the Site Server URL
(http://[site server]:9191/admin). Printing and copying should continue according to the
offline policies defined in the installation section. Validating the application of the policies via copy and
print transactions will ensure your settings have been applied correctly.
To complete the test, return the Site to online by selecting Enable connection in the Site record. Validate your transactions have been uploaded to the Application Server by searching either the User, Device, Printer or Job log.
Tip
Jobs performed offline are marked as such in the print log. You can see which jobs are offline by inspecting the job details in the job log. In addition, when creating job log reports, you may now filter by offline jobs, to report only the jobs performed offline in a specified period.
Version upgrades to the Application Server will result in the Site Servers supporting their local site in offline mode until they are also upgraded. Therefore you should also plan to upgrade the Site Servers as part of your upgrade procedure.