During the install process, PaperCut NG generates a self-signed key/certificate issued for the host's machine name. This key is used by default when the system is accessed via HTTPS on port 9192.
The default SSL certificate provides good security, however there are two downsides to using a self-signed certificate:
When users access the HTTPS site using a fully-qualified domain name, the browser will issue a "Domain mismatch warning". To avoid this warning, re-create the self-signed certificate with the machine's fully qualified domain name, see the section called “Re-create the self-signed certificate”.
The browser will also warn the user that the certificate is not signed by a trusted authority. To overcome this you must obtain a certificate signed by a trusted authority, see the section called “Creating and installing a purchased SSL Certificate”, or if you already have one, see the section called “Importing an existing SSL key”.
Eliminating these warnings provides a smoother experience for the end users of PaperCut NG.
In this section we detail how to recreate the self-signed certificate, use your own SSL certificate and further customise the SSL certificates that you want to use. This is a technically complex area and there is an assumed level of experience with SSL certificates in general.
The tool create-ssl-keystore can be used to re-create the key/certificate (stored in a keystore
file) for a different hostname eliminating the browser domain mismatch warning. An example of the command's use:
    cd [app-path]/server/bin/win
    create-ssl-keystore -f "myserver.fullname.com"
More information is available via the --help command line option.
Usage: create-ssl-keystore [-f] [-k FILE] [SYSTEM_NAME]

   -f        Force. Overwrite any existing keystore file.

   -k FILE:  Define a keystore file location. If not set the keystore
             is created in the default location
             (server/data/default-ssl-keystore).

   SYSTEM_NAME: The name of the computer/server used to generate keystore.
                If not defined, the current computer name is used.
Caution
For backwards compatibility with 3rd party systems the default self-signed certificate is generated with a SHA1 algorithm. See the section called “Can I use other algorithms such as SHA2/SHA256?”
Large organizations may wish to use their own SSL key signed by a commercial certificate authority (CA) that is recognized by all popuplar web browsers including Internet Explorer, Mozilla Firefox, Safari and Chrome. A complete list can be found in Windows under Control Panel > Internet Options > Content > Certificates > Trusted Root Certification Authorities.
Some large organizations also operate a certificate authority of their own that is recognized by their users' web browsers by way of a root certificate that has been installed into all users' web browsers in a manual or automated way.
The advantage of a signed certificate is that it eliminates the browser warning, "The security certificate presented by this website was not issued by a trusted certificate authority."
If you are already in posession of a signed SSL key and certificate for the domain name of the PaperCut application server please see the section called “Importing an existing SSL key” below.
The following steps will cover the following high-level steps:
Create the SSL keystore and create the private key
Create the Certificate Signing Request (CSR)
Send the CSR to your Certificate Authority
Receive your signed certificate
Optionally you will receive one or more intermediary certificates that will need to be installed as well
Install any intermediary certificates and then your new certificate
Restart the PaperCut NG Application Server and confirm that everything is working as expected
To create your own SSL key and have it signed by a commercial or intra-organizational certificate
authority you can use the 'keytool' tool supplied in the directory [app-path]/runtime/jre/bin.
Open a command prompt window and change to the directory
[app-path]/runtime/jre/bin. Any existing files called 'my-ssl-keystore' in this directory are likely leftovers from previous attempts and need to be renamed or deleted at this point.Enter this command to produce the SSL key:
keytool -keystore [app-path]\server\custom\my-ssl-keystore -alias jetty -genkeypair
    -keyalg RSA
Caution
This process creates a 'my-ssl-keystore' file. Don't lose this file! You will need it when adding the public key later.
We recommend making a copy of this 'my-ssl-keystore' and keeping it in a safe place. If it is lost or changed, your certificate will need to be re-issued, often resulting in costs from your Certificate Authority.
If you are renewing your SSL certificate, please review the section called “Renewing your SSL certificate”
As keystore password choose 'password' or another simple password as it is not very important. Enter the same password again later when asked for a key password.
Note: Some organizations require larger key sizes than the default 1024 bit. In this case add the "-keysize 2048" or "-keysize 4096" parameter to the end of the above command line.
You will be asked a series of questions. Enter the exact fully-qualified domain name of the PaperCut NG Application Server where it asks you for "first and last name". The server name must be the exact one that users will enter into their browsers to access PaperCut NG's web interface, e.g. 'printing.myschool.edu'. Depending on the certification authority's requirements you may also need to fill in some of the other fields.
Enter keystore password:  password
What is your first and last name?
  [Unknown]:  printing.myschool.edu
What is the name of your organizational unit?
  [Unknown]:
What is the name of your organization?
  [Unknown]:
What is the name of your City or Locality?
  [Unknown]:
What is the name of your State or Province?
  [Unknown]:
What is the two-letter country code for this unit?
  [Unknown]:
Is CN=printing.myschool.edu, OU=Unknown, O=Unknown,
L=Unknown, ST=Unknown, C=Unknown correct?
  [no]:  yes

Enter key password for <jetty>
        (RETURN if same as keystore password):  password
Prepare your new SSL key for certification by the certificate autority:
keytool -certreq -alias jetty -keystore [app-path]\server\custom\my-ssl-keystore
    -file [app-path]\server\custom\jetty.csr
The contents of the resulting
jetty.csrcan be pasted into the online order forms of abovementioned commercial certificate authorities or passed to your organization's own certificate authority.When the certification process has completed, the authority will provide you with a certificate file that can be downloaded from the autority's web site. The filename will usually end in
.crt,.ceror.cert. The contents of the file should look something like this:-----BEGIN CERTIFICATE----- MIIDLTCCApagAwIBAgIQJc/MOTjAW0HrPI/4rGtDCDANBgkqhkiG9w0BAQUFADCB hzELMAkGA1UEBhMCWkExIjAgBgNVBAgTGUZPUiBURVNUSU5HIFBVUlBPU0VTIE9O ... more here ... Awjhfz9EfxN2l1UYP15xZZyNO4DO3X/LliCG9pdFf4hUHl8tRnhQBvRR1F0v9UHB PC6L9jNjMbQUoQ9NG/S8Nn7ZcSHNy+P53ntIBaEfTv7+qvXNWvSb5wj4pd05wGF1 Bw== -----END CERTIFICATE-----Save the file as
jetty.crt.Caution
If you have not already, take the opportunity now to backup your
my-ssl-keystoreat this time.Before you can make use of your newly obtained certificate, you may have to import the certificate authorities "root certificate". PaperCut comes with a number of root certificates pre-installed that you can list using this command (still from the directory
[app-path]/runtime/jre/binas above):keytool -keystore ../lib/security/cacerts -storepass changeit -list
Add the option "-v" at the end to obtain the same list with more details, such as expiration dates.
If your certificate authority is not listed there, or you have been notified that they have recently started using new root certificates, then you need to first import the certificate authority's root certificate into your keystore before importing your newly obtained own certificate. The CA's root certificate will usually be available for download on the CA's web site as a file ending on
.pemor.crt. Save the file using a filename indicative of the CA's name, e.g.globaltrust.pem. Import the root certificate using this command, specifying analiasthat is indicative of the CA's name (type this all in one line):keytool -keystore [app-path]\server\custom\my-ssl-keystore -importcert -alias globaltrustroot -file globaltrustroot.pemWhen asked whether to trust this certificate, answer yes:
Trust this certificate? [no]: yes
Some certificate authorities also provide additional "intermediate certificates" that will have to be imported the same way as the root certificate. You should use a different
aliaseach time. For example:keytool -keystore [app-path]\server\custom\my-ssl-keystore -importcert -alias globaltrustinter -file globaltrustinter.pemNow you can import your own certificate previously saved as
jetty.crt(type this all in one line):keytool -keystore [app-path]\server\custom\my-ssl-keystore -import -alias jetty -file jetty.crt -trustcacertsCaution
The 'my-ssl-keystore' in the above command is the original my-ssl-keystore you created in step 2.
Your new keystore file
my-ssl-keystoreis now ready and should be moved to the location[app-path]/server/custom.
Now that you have your keystore file, follow the instructions in the section called “Configuring PaperCut to use the new certificate” to install it and start serving up your new SSL certificate.
If you have an existing SSL key with certificate you can import it into the PaperCut NG keystore. Reasons for having an existing signed key include:
You have obtained an SSL key specifically for use with your PaperCut NG Application Server using a method other than using 'keytool' as described above. As a result you have – on Windows – a certificate with an attached private key either stored in the Windows certificate store or in a so-called PCKS#12 file (
*.p12/*.pfx), or, – on Linux – separate 'PEM encoded' key and certificate files.Your organization's intranet as served by Internet Information Server (Windows), Apache (Linux) or another web server uses a certificate that can be re-used for PaperCut NG. NOTE: Unless your intranet server and PaperCut NG run on the same server (i.e. on different ports), the server name of your intranet server will be different from your PaperCut NG Application Server. E.g. the intranet address might be
internal.myschool.eduwhile the PaperCut NG Application Server can be reached atprinting.myschool.edu. In this case the certificate can only be re-used if it is a so-called wild-card certificate that allows arbitrary subdomains under themyschool.edudomain name that it was issued for.
On Windows, if the certificate with key exist in the Windows certificate store only, export it:
Open the Windows Control Panel and open Internet Options.
On the "Content" tab click "Certificates".
On the Personal tab select the certificate and click "Export ..." and click "Next" at the initial screen
Select 'Yes, export the private key' and click Next
If you selected the last option correctly, you will only be able to export as a .PFX file
TICK 'Include all the certificates in the certification path if possible'
UNTICK 'Enable strong protection'
UNTICK 'Delete the private key if the export is successful'
Type in a password for the PFX file. This is only used temporarily.
Save the PFX file to with the extension
.pfx. (This is just temporary, you MUST delete this file later on.)Finish the wizard to export the certificate.
On Windows, if the certificate with key exists in the IIS Server Certificates store, export it:
Open the Windows management console, select your IIS server and open "Server Certificates".
Right-click the certificate and click "Export ...".
Choose a filename with the extension
.pfx. (This is just temporary, you MUST delete this file later on.)Type in a password for the PFX file. This is only used temporarily.
Click OK.
On Linux, if the key and certificate are in separate 'PEM encoded' files:
Use the 'OpenSSL' tool that is part of many Linux distributions to combine both files to a PKCS#12 file with the following command (type this all in one line):
openssl pkcs12 -export -inkey <key file> -in <certificate file>
    -out <pfx file>
<pfx file> is the target PKCS#12 file for which you should choose a filename with the extension
.pfx. (This is just temporary, you MUST delete this file later on.)
Then import the certificate into your own PaperCut NG keystore:
Open a command prompt and change to the installation directory. E.g. on Windows:
cd "c:\Program Files\PaperCut NG\"Enter the following command (type this all in one line):
"runtime/jre/bin/java" -classpath server/lib/jetty-6.1.22.jar
    org.mortbay.jetty.security.PKCS12Import "<pfx file>"
    server/custom/my-ssl-keystore
Substitute
<pfx file>with the.pfxor.p12file containing your certificate and key.The Jetty version number (
6.1.22) changes from time to time. If you receive aNoClassDefFoundErrormessage look for ajetty-*.jarfile in the[app-path]/server/lib/directory and update the command as appropriate.You will be asked to enter the 'input keystore passphrase'. Enter the password that you used when you saved the file.
You will be asked to enter the 'output keystore passphrase'. Enter a new password such as 'password'. Once this command completes a new file should be created at
[app-path]/server/custom/my-ssl-keystore. This file is your keystore and contains your certificate and key.Now that you have your keystore file, follow the instructions in the section called “Configuring PaperCut to use the new certificate” to install it and start serving up your new SSL certificate.
The previous sections described how to create a keystore file - the section called “Creating and installing a purchased SSL Certificate” for putting a new certificate from a certificate authority into a keystore, and the section called “Importing an existing SSL key” for generating and putting your own "self-signed" certificate in a keystore. This section describes how to install your keystore so that PaperCut can start serving up your new certificate.
Important
Changes are not applied until the PaperCut NG Application Server has been restarted.
To configure the PaperCut Application Server to use the new key/certificate:
Copy your signed keystore onto the server running the PaperCut NG Application Server. The suggested location is
[app-path]/server/custom/my-ssl-keystoreOpen the file
[app-path]/server/server.propertieswith a text editor (e.g. Notepad).Locate the section titled
SSL Key/Certificate.Remove the
#(hash) comment marker from all lines starting with "server.ssl".Define the location of your keystore, keystore password and key password as chosen previously. The file should look something like this:
    server.ssl.keystore=custom/my-ssl-keystore
    server.ssl.keystore-password=password
    server.ssl.key-password=password
NOTE: On Mac OS please specify the FULL path to your keystore, e.g.
/Applications/PaperCut NG/server/custom/my-ssl-keystoreRestart the PaperCut NG Application Server and verify all is working. If the server fails to start, error messages will be recorded in logs located in the server's
logsdirectory.
Important
Now that you have a working SSL certificate for your PaperCut NG server, it's time to set a reminder in your calendar (or similar) to ensure that your SSL certificate is renewed before it expires! Go do that now!
To ensure that the trust mechanisms in SSL are adhered to, SSL certificates are designed to expire so that your environment is kept up-to-date. To renew your SSL certificate you will essentially need to retrace your steps when originally creating a new SSL certificate. See: the section called “Creating and installing a purchased SSL Certificate”. However the exact steps will depend on your Certificate Authority as some may require you to submit a brand new CSR, some allow you to just request a new SSL certificate.
The easiest way to do this is to use a new keystore, e.g. you substitute my-ssl-keystore with
my-ssl-keystore-20151127.
The new my-ssl-keystore-20151127
will only be put into production once you've modified the server.properties as per the the section called “Configuring PaperCut to use the new certificate”.
and have restarted the PaperCut NG Application Server. This means you have time to create the private key,
complete the CSR and receive the signed certificate before using the new keystore. If there is
an issue with the new certificate or setup, you can quickly revert back to the original my-ssl-keystore.
For example, the SSL key generation command originally was
    keytool -keystore [app-path]\server\custom\my-ssl-keystore -alias jetty -genkeypair
    -keyalg RSA
and it becomes
    keytool -keystore [app-path]\server\custom\my-ssl-keystore-20151127 -alias jetty -genkeypair
    -keyalg RSA
In this documentation we have provided the more common scenarios around keytool.exe usage. If you require further customisation please review the documentation available from Oracle:
PaperCut NG version 15.2 and newer: Java 8 (1.8) keytool Documentation
PaperCut NG version 14.0 and newer: Java 7 (1.7) keytool Documentation
PaperCut NG version 13.5 and older: Java 6 (1.6) keytool Documentation
One of the benefits of using a SSL certificate is making sure that the URL matches the certificate, preventing a 3rd party from masquerading as you. If you have more than one URL or Fully Qualified Domain Name (FQDN) that PaperCut NG is available from then you will have two main options:
Obtain a "wildcard" certificate from your Certificate Authority. Please contact your Certificate Authority for further details as to this service.
Use a "Subject Alternative Name" or "SAN" when creating the SSL certificate. This should require no special action from your Certificate Authority as this is done as part of the certificate generation process with keytool.exe. Note: You will require keytool.exe from PaperCut NG version 14.0 and newer.
An example is:
keytool.exe -keystore "my-ssl-keystore" -alias jetty -genkeypair -keyal RSA -ext san=dns:external.company.comThen, when asked for your "first and last name", enter the other FQDN:
    What is your first and last name?
    [Unknown]:  internal.company.lan
Before completing you will then need to confirm the information is correct, you will see similar to:
Is CN=internal.company.lan, OU=Unknown, O=Unknown, L=Unknown, ST=Unknown, C=Unknown correct?Once you have received your certificate from your Certificate Authority you can confirm your "Subject" and "Subject Alternative Name" are valid. Please make sure that you test the new certificate with multiple operating systems, browsers and hardware environments including laptops, mobile devices and printers/copiers.
In a word, yes. As we use keytool.exe, you can use the documentation above in the section called “Extended keytool.exe usage”.
For example, generating the private SSL key:
keytool -genkey -alias server -keyalg rsa -sigalg sha256withrsa -keysize 2048 -keystore sha256and generating the CSR:
keytool -certreq -alias server -keystore sha256 -file 256.csr -sigalg sha256withrsa
If you are getting errors with your new SSL certificate one of the first things to check is that the intermediary certificates have been loaded correctly. You can do this via Internet Explorer, and every other modern web browser, the steps differ slightly.
Load Internet Explorer and visit the HTTPs URL for your PaperCut NG server then click on the padlock near the URL bar as below.
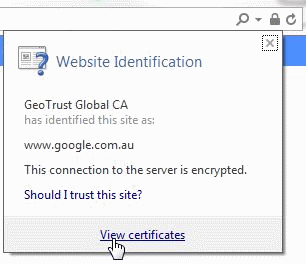
Then click View Certificates and navigate to the Certificate Path and verify it is correct.

If the path is invalid, you may need to confirm that you have correctly inserted the required intermediary certificates. See the section called “Creating and installing a purchased SSL Certificate”
A quick way to easily validate the chain output by the server. This requires either Linux or Cygwin with openssl’s packages installed:
openssl s_client -connect [server]:[port] -crlfOnce the text has been output, type in:
QUIT
For example, a self-signed certificate will likely look like this:
    openssl s_client -connect localhost:9192 -crlf
    CONNECTED(00000003)
    depth=0 C = Unknown, ST = Unknown, L = Unknown, O = Unknown, OU = Unknown, CN = print-server
    verify error:num=18:self signed certificate
    verify return:1
    depth=0 C = Unknown, ST = Unknown, L = Unknown, O = Unknown, OU = Unknown, CN = print-server
    verify return:1
    ---
    Certificate chain
     0 s:/C=Unknown/ST=Unknown/L=Unknown/O=Unknown/OU=Unknown/CN=print-server
       i:/C=Unknown/ST=Unknown/L=Unknown/O=Unknown/OU=Unknown/CN=print-server
    ---
An example of a certificate that uses a chain, note the 0, 1, 2 and how the i: (issuer) matches with the s:(subject): of the next certificate.
    $ openssl s_client -connect www.google.com:443 -crlf
    CONNECTED(00000003)
    depth=2 C = US, O = GeoTrust Inc., CN = GeoTrust Global CA
    verify error:num=20:unable to get local issuer certificate
    ---
    Certificate chain
     0 s:/C=US/ST=California/L=Mountain View/O=Google Inc/CN=www.google.com
       i:/C=US/O=Google Inc/CN=Google Internet Authority G2
     1 s:/C=US/O=Google Inc/CN=Google Internet Authority G2
       i:/C=US/O=GeoTrust Inc./CN=GeoTrust Global CA
     2 s:/C=US/O=GeoTrust Inc./CN=GeoTrust Global CA
       i:/C=US/O=Equifax/OU=Equifax Secure Certificate Authority
    ---
If you receive an error message of ERR_SSL_VERSION_OR_CIPHER_MISMATCH in your web browser
or notice SSLHandshakeException: no cipher suites in common in the [app-path]\server\logs\server.log it is
likely that the certificate chain is not complete or the SSL certificate is in the wrong alias in the key-store.
See the section called “Check that the correct Alias has been used in the keystore” to confirm the correct alias is in use.
PaperCut NG is configured to use the alias "jetty". If your SSL certificate is installed into another alias it will not be loaded correct. To confirm run the following command:
    keytool -list -v -keystore my-ssl-keystore-20151127
    Enter keystore password:  [password]

    Keystore type: JKS
    Keystore provider: SUN

    Your keystore contains 1 entry

    Alias name: jetty
    Creation date: 27/11/2015
    Entry type: PrivateKeyEntry
The PrivateKeyEntry needs to be present in the jetty Alias. If it has
been imported into another alias, you can use keytool.exe to rename it. See the section called “Extended keytool.exe usage”