Table of Contents
Administrators building a print network to support cross platform printing have long relied on the Windows LPD Service as a convenient way to get print jobs onto a Windows Print Server from a variety of applications and varying operating systems.
PaperCut now ships with its own LPD Service, to continue support for this printing protocol, and to provide end-to-end support for customers that use PaperCut and LPD.
The PaperCut LPD Service allows print administrators to connect disparate systems to a Windows Print Server, allowing the server to accept jobs from
Mac Clients/Servers
Linux Clients/Servers
AS400 Servers
Mainframes
…any other client or server that supports LPR printing.
The PaperCut LPD Service will also allow administrators to continue to support methods which bypass any authentication requirements to print to a Windows Server.
After installing the Microsoft Windows version of PaperCut’s Primary, Secondary or Site Server software, the PaperCut LPD Service wizard style installer is available under [appath]\providers\lpd\win\pc-lpd-installer.exe
LPD Servers listen on port 515 by default, so Administrators will need to ensure that this port is open to requests from clients (check that the port is not blocked by your firewall). The installation wizard will also check for previous versions of the Windows LPD Server, and disable these to ensure there is no port conflict.
It’s important at this point to consider how the print jobs are being tracked. The print jobs will be sent with the username from the client system; e.g. the Unix, Linux or Mac, etc username associated with the print job. If the username isn’t consistent with the Windows username you wish to associate with the job, you may need to consider additional PaperCut features like;
Unauthenticated printing. See the section called “Handling Unauthenticated (non-domain) Laptops”
Enable the ‘Override user-level settings’ at a given queue and charge all jobs to a given Shared Account if this queue services a single account.
Notes:
The PaperCut LPD Service requires that you share the printer before being able to connect to it via LPR. This is different from Microsoft’s implementation, but provides an extra level of control over which queues can be printed to via LPR.
The PaperCut LPD Service accepts inbound print data over TCP/IP v4. The PaperCut LPD service does not support data over TCP/IP v6.
The PaperCut LPD service will record routed print jobs in the Windows Application Event log.
PaperCut LPD responds to LPQ commands with "OK". No pending print job information is revealed.
For customers currently using the Windows LPD Service, installations of the PaperCut LPD Service should not require any changes to the client.
Most operating systems, including Windows, support connecting to an LPD Service via the LPR printing protocol. The information you will need is;
The address of the server running the PaperCut LPD Service.
The name of the queue. Either share name or queue name will work.
Note: Some print systems (e.g. CUPS) won’t allow spaces in queue names, so a share or queue name that does not include spaces will improve likelihood of connection.
Select System Preferences...
Select Printers & Scanners
Click on the button to add a new printer
Click the tab at the top toolbar
From the Protocol dropdown, select Line Printer Daemon - LPD
Enter the IP address of the server hosting the printers in the Address field.
Enter the printer's share name in the Queue field.
Define a user friendly name in the Name field and select the printer type.
Select the driver or printer model from the list and press
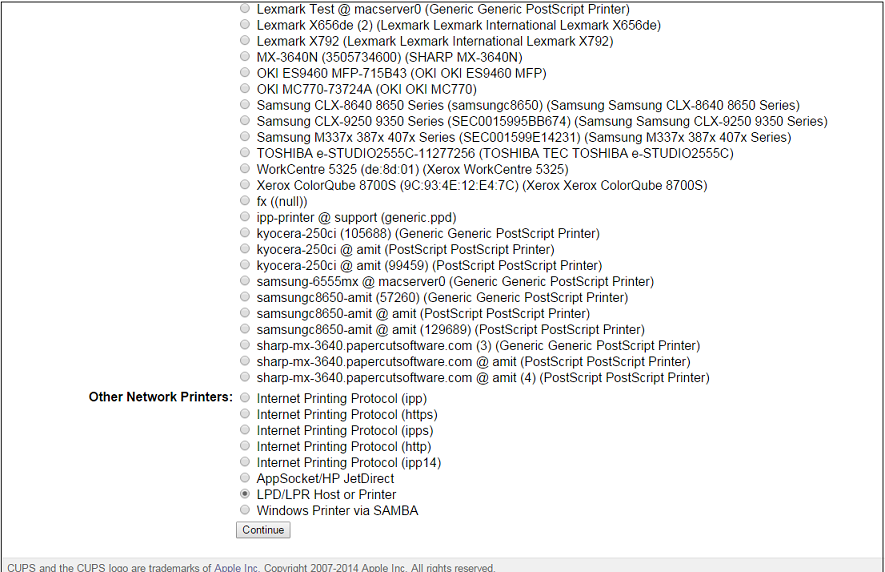
This example assumes you are using the CUPS web based admin interface. Other methods are also available (e.g. GNOME printer manager in GNU/Linux)
Log into the CUPS Administration UI
Click Administration >> Add Printer
Scroll to Other Network Printers and choose LPD/LPR Host or Printer
Enter in the Connection string using the example format on the page. i.e.
lpd://hostname/queue
lpd://10.100.65.38/Global
Queue Name can be either the share name or print queue name on the Print Server. In the case of CUPS the queue name cannot contain spaces.
Create the CUPS queue entering in the rest of the required information, such as Name, Description, Location etc.
Choose the driver and finish the install with

Print jobs will be accepted via LPD into the Windows printing system.