Early Access Program
Google Cloud Print integration is currently offered under an Early Access Program.
The Google Cloud Print integration has been extensively tested pre-release and there is a high level of confidence in its quality. However, there are many combinations of printers, printer drivers and servers that cannot all be tested. In addition, the Google Cloud Print interfaces continue to rapidly change and evolve.
We seek the assistance of our customers and partners to help ensure that any problems or feature gaps encountered are reported and addressed. We ask that customers:
Be aware that some issues may exist with Google Cloud Print
Work with PaperCut Software to quickly address issues if they occur
During the early access period you should check the following PaperCut knowledge base article discussing any known issues: http://support.apposite.com.hk/Knowledgebase/Article/View/635/0/known-issues-with-google-cloud-print-integration
Google Cloud Print (GCP) is a cloud based printing service from Google that lets people print anywhere from any device. Users are increasingly bringing their own mobile devices (BYOD) to the workplace and need a printing solution. Google Cloud Print provides a way to print from any mobile phone or tablet, running Android or iOS. Whilst almost any device, including mobile and desktop computers can print to Google Cloud Print, for some devices, such as the Google Chromebook, Google Cloud Print is the only printing solution available.
On its own, Google Cloud Print provides untracked printing only to Google Cloud Print enabled printers. Coupled with PaperCut, Google Cloud Print becomes a powerful mobile and BYOD printing solution for organizations of any size:
PaperCut tracks and controls Google Cloud Print jobs just like any other PaperCut print job.
Google Cloud Print deployment is managed centrally, using the PaperCut admin console to publish and deploy Google Cloud Print on selected printers.
Rich enterprise PaperCut features such as Find Me Printing (see Chapter 12, Find Me Printing and Printer Load Balancing) work alongside Google Cloud Print.
Use Google Cloud Print with your existing printers. With PaperCut you do not need to have “Google Cloud Print Aware” printers.

Users may print to Google Cloud Print in many ways:
From a Chrome browser (mobile or desktop) or Chromebook device
From an iOS or Android device with a Google Cloud Print enabling app installed
From Google applications, such as Drive, Gmail on all platforms
From a Windows or Mac desktop using the Cloud Printer app
A current list of compatible printing applications is available at http://www.google.com/cloudprint/learn/apps.html.
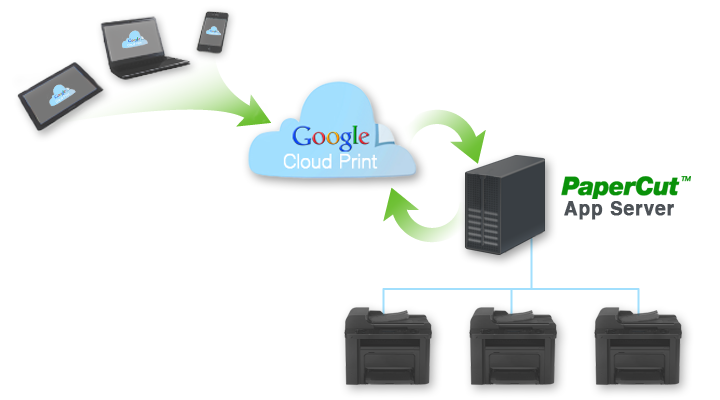
The diagram shows PaperCut as the bridge between an organization's printers and the Google Cloud Print service.
PaperCut publishes selected printers to Google Cloud Print, making them available to Google Cloud Print user applications.
A mobile or desktop user prints a document or email using Google Cloud Print and selects a published printer.
PaperCut is notified and downloads the print job from the cloud.
PaperCut authenticates the user sending the job, then renders and spools the job to the specified printer.
PaperCut tracks and manages the print job in the same way as any normal print job.
PaperCut informs Google that the job is complete.
PaperCut takes care of publishing printers with Google, downloading jobs from the Google cloud, and managing the print work-flow. This makes it very easy to integrate Google Cloud Print into your existing print service.
Printers must be published to Google Cloud Print to make them available for users to print. Once Google Cloud Print is enabled, a single button click is all that is needed to publish a printer. PaperCut will manage any Google Cloud Print print jobs on behalf of the printer and jobs will be processed by the normal PaperCut work-flow.
Tip
Some internet printers are marketed as “Cloud Print Ready” and may be connected directly to Google Cloud Print. However if you directly connect a printer to Google Cloud Print, you will not be able to track and control print jobs from Google.
We recommend you use PaperCut to connect your printers with Google Cloud Print. “Cloud Print Ready” printers are not required.
The following requirements must be met for a successful Google Cloud Print integration:
Google Cloud Print is supported by PaperCut Print Providers running on Windows, Linux or Mac OS. Printers managed by a Novell print server can not yet be published to Google Cloud Print.
The Print Provider software must be running a version of PaperCut that supports Google Cloud Print. Google Cloud Print support was first introduced with PaperCut release 13.5. Printers managed by an older version of the Print Provider may not be published to Google Cloud Print.
Some printers and printer drivers may not respect all printer settings such as color or grayscale, single sided or duplex as specified by the user in the Google Cloud Print user client. If you observe issues in this area, please try upgrading to the latest drivers, as Google is working with the printer manufacturers to resolve any such issues.
The Mobile Client must be used to perform Account Selection for Google Cloud Print jobs (see the section called “Mobile Client”).
The PaperCut Application Server must be able to connect to the internet to communicate with Google Cloud Print servers. Ports or exceptions may need to be made in firewalls or proxy servers. The full details are: TCP (HTTPS) port 443 connections to
https://www.googleapis.com/*,https://accounts.google.com/*andhttps://www.google.com/cloudprint/*, as well as a TCP port 5222 (XMPP with STARTTLS) persistent connection totalk.google.com.
Google Cloud Print uses Google's OAuth based system for identifying users and printers. These must be reconciled with the users and printers managed by PaperCut so that Google Cloud Print jobs can be tracked as normal PaperCut jobs and allocated to the correct PaperCut user.
This integration between Google Cloud Print and PaperCut domains is managed as follows:
A Google account is set up for Google Cloud Print administration. PaperCut uses this account to publish printers and communicate with Google Cloud Print over the internet.
User's Google accounts are added to the PaperCut user database as secondary email addresses. This can be done either manually or via an automated email verification process.
Printers are published using PaperCut then shared with users using Google's sharing tools.
Each of these topics are covered in detail in the sections below:
You need a Google administrator account
When Google Cloud Print is enabled in the PaperCut administrator interface, you are asked to authenticate with Google credentials. All printers will be published by PaperCut using these credentials. The use of one set of credentials to register all printers is in line with Google's best practice recommendations.
You can use any Google account for this purpose, but we recommend that you set up a dedicated account for Google Cloud Print administration. A personal account is not recommended as it may be deleted if an employee changes role or leaves your organization.
When you first enable Google Cloud Print, you will be asked to login to your Google administrator account and authorize PaperCut to have access to the Google services needed to manage Cloud Print. After accepting this request, PaperCut will permanently store an access token, avoiding the need to authenticate each time.
Each Google Cloud Print user must have a Google account associated with their PaperCut account.
Each Google Cloud Print user requires a Google account. This account may be self-registered, or provided to the user under a Google Apps managed environment.
PaperCut must map each user's Google account used for cloud printing to a PaperCut user. For example, Google may know a user as “[email protected]” whereas the same user in PaperCut may be “adamsj” with an email “[email protected]”.
As with this scenario, PaperCut allows multiple email addresses to be associated with a user. Each user may have one primary email address and multiple secondary email addresses. All addresses must be unique across the system.
PaperCut provides two ways to populate the secondary emails on behalf of each user. You should select which method is best for your organization:
Manual configuration. An administrator may add and remove secondary email addresses on behalf of a user in the Users tab of the PaperCut Admin interface.
Self registration through automatic email verification.
When a print job arrives from Google, PaperCut finds the user with a primary or secondary email address matching the address of the sender. The matching user is then associated with the incoming print job.
If no matching user is found, you may choose to have PaperCut cancel the job, or hold the job and perform automatic email verification. Cancelling the job is the appropriate response if you are choosing to manually configure the secondary email addresses.
Automatic email verification works as follows:
When a job arrives from an unknown user, the job is held and an email is sent to the originating Google email address asking for the user to click a link to validate their account.
The link takes the user to the login screen for the PaperCut web interface.
The user logs into their PaperCut account and the Google address is automatically associated with this account.
The job proceeds to print as the verified PaperCut user.
Each printer must be published and “Shared” with end users.
Printers are published to Google Cloud Print in order to make them available for Cloud printing. By default, printers managed by PaperCut are not published to Google Cloud Print. Publishing is performed by a single button click in the Printer Details page. A printer may be published by clicking on button at any time after enabling Google Cloud Print.

Printers are published by PaperCut using your chosen Google administrator account. By default only that account will have access to the printers for printing. To make printers available to your Google Cloud Print users, you must share your printers.
Printer sharing is a Google feature and is administered in Google's Cloud Print web interface (https://www.google.com/cloudprint#printers), not in PaperCut.
You may share printers with individual users by specifying a list of Google email addresses. You may also share printers with a Google Group. For example, you could set up a Google Group for Students and another group for Teachers and share printers to those groups. Users may self-register with the appropriate Google Groups, but you may need to moderate these registrations. Google provides mechanisms for people to request membership to a Google Group and for a moderator to accept or reject those requests.
Tip
When a printer is shared with a user, the user must accept the sharing “invitation” before they are able to use the printer for printing. This action is performed within Google's web interface and at the time of writing is not available on some mobile devices. We recommend you test the sharing of printers at your site and provide users with any guidance needed to ensure they are able to successfully accept printers shared with them. It may be necessary to request people use a desktop browser to accept the sharing invitation.
Setting up Google Cloud Print in PaperCut is straightforward. First you must create an administrator Google account (see the section called “Administrator Authentication”). Then:
Enable Google Cloud Print in → → .
Publish printers to Google Cloud Print and share with your users.
Test your major user printer scenarios on a range of devices and printers.
These steps are covered in detail below:
Google Cloud Print is enabled in → → . On checking "Enable" a wizard dialog appears to lead you through the process.
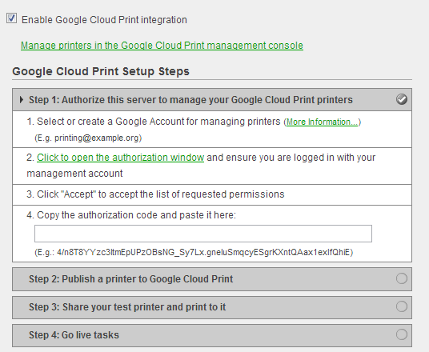
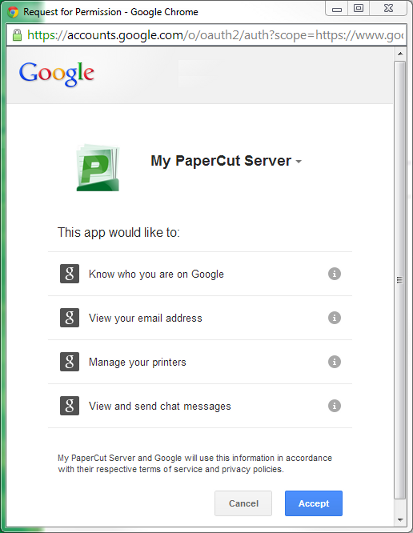
The first step in the process is to authorize PaperCut to use your administrator Google account. (See the section called “Administrator Authentication”.) In this process, you will be asked to give PaperCut permission to use your Google account to obtain an authorization code. The authorization code is needed for PaperCut to use your administrator account to manage your printers with Google Cloud Print on your behalf.
Note
You must grant permission for your PaperCut Application Server to use your administrator Google account to work with Google Cloud Print on your behalf.
You are not granting permission for any third party, including PaperCut Software, to access your account. Your authorization only applies to your PaperCut Application Server instance.
Once your Google Cloud Print administrator account is authorized, you may publish a printer to Google Cloud Print and test. Printers are published using a button on the Printer Details page. See the section called “Publishing Printers to Google Cloud Print via PaperCut” for more information.
There are several choices to make on how PaperCut process Google Cloud Print jobs with respect to user authentication and client popup reminders.
Configure what PaperCut should do when a job arrives from an unknown email address.
PaperCut searches the user database for the originating email address of each job. If the email address is not found, you may choose to have PaperCut cancel the job or hold the job and email the user with instructions for verifying their Google email address. (See the section called “User Authentication”.)
You may wish to cancel the job if you have decided to manually configure the user Google email addresses in the page.
Choose whether to send a reminder email for jobs requiring a popup response. (See the section called “Mobile Client”.)
Before a printer can be used with Google Cloud Print it must be published to Google and shared with users. Publishing a printer to Google Cloud Print will make the printer known to Google and enable access from Google's Google Cloud Print user interfaces.
Printers are published to Google Cloud Print on the printer details page for a selected printer in the tab. Click the button to publish a printer. The printer will remain published indefinitely.
If you do not see a Google Cloud Print section on the printer details page, check that Google Cloud Print is enabled under → → .
Once published, you must share your printer with users, using your Google administrator account to login to the Google Cloud Print printer management page: https://www.google.com/cloudprint#printers
Printer can be unpublished by clicking on .
Sharing a printer will send a sharing invitation to each invited user. Each user must respond by accepting the invitation by logging in with their own Google account to the Google Cloud Print printer management page: https://www.google.com/cloudprint#printers
The printer sharing process is provided by Google as their solution for printer security and access control. We don't document the process in detail as Google's interfaces for sharing printers are likely to change. For example, at the time of writing, the sharing interfaces require a desktop or Chromebook browser.
You should test sending and accepting printer sharing invitations at your site, using your targeted mobile devices, and document any required steps for your users.

Tip
You can list only those printers published or not published to Google Cloud Print using a filter:
Go to the tab to see a list of printers.
Click [edit] to edit the filter.
From “Published to Google Cloud Print” select Yes or No and click Apply Filter.
You should test the operation of Google Cloud Print before rolling out the system to your users. Your test plan should factor in the following items:
Sharing and accepting printer sharing invitations. Share your printers and test using your targeted mobile devices and applications.
Printing to a range of printers, page sizes, duplex and color settings.
Automatic email verification (if used). Send a print job from an unknown Google account and check that a verification email is sent. Follow the steps in the email to associate the account with a PaperCut user and print the job.
Tracking and control of Google Cloud Print jobs. Verify that print jobs from Google Cloud Print are associated with the correct user and are being tracked in the print log.
You should take into account the requirements listed in the section called “Requirements” when creating your test plan.
Some printers may not be able to successfully publish to Google Cloud Print. There are several possible causes:
The PaperCut Secondary Print Server is running on Novell
For various technical reasons, PaperCut does not currently support Google Cloud Print on Novell print servers.
The Secondary Print Server is a Windows desktop machine
When running the Print Provider on a Windows desktop, PaperCut disables by default the server events needed for Google Cloud Print operation. This is done for performance reasons for sites running many desktop Print Providers.
You may enable server events on a desktop Print Provider machine by adding the following line to the print-provider.conf file and restarting the Print Provider service:
ServerEventsEnableOnDesktops=onThere may be performance implications if this change is made on a large number of desktops.
The Secondary Print Server is running an older version of PaperCut
The Print Provider must be running a version of PaperCut that supports Google Cloud Print. Google Cloud Print support was first introduced in PaperCut release 13.5.
A connection from the Application Server to the Internet is unavailable
The Application Server must be connected to the Internet to publish printers and process Google Cloud Print jobs.
Google access has been revoked
This may occur if the Google administrator account used to publish printers has been deleted or PaperCut's access to this account has been revoked. To recover from this scenario, you will need to disable and re-enable Google Cloud Print in → → and re-publish and share your printers.
Print jobs printed to Google Cloud Print may not appear or print correctly. If this occurs, please check the for any error or warning messages that may lead you to the cause. The user should also check Google's print job page https://www.google.com/cloudprint#jobs for job status information. If the job was submitted, but has not printed, some causes are listed below:
The job is from an unknown user
PaperCut must map the Google email originating the job with a PaperCut user. If no user can be matched, the job may be cancelled. See the section called “Enabling and Configuring Google Cloud Print”. To resolve, you may manually add the Google email as a user's secondary email address in the User Details page. Or you can enable automatic email verification.
The job requires a popup response and no response received
If a job requires popup response, for example to select an account to charge, and no response is received, PaperCut will wait up to 10 minutes before cancelling the job. Users must respond using the Mobile Client - see the section called “Mobile Client”. PaperCut may send a reminder email to use the Mobile Client. If a user has not received this email, check that the reminder setting is on, and that the email is not being diverted to the user's spam/junk folder.
The print driver is not capable of rendering the job
When printing using CUPS (Linux and Mac print providers), the print driver is responsible for rendering the PDF document from Google Cloud Print. Some drivers, such as a generic Postscript driver, may not be able to render a PDF document. If you are using a generic Postscript driver as pass-through, you may need to setup a separate queue for Google Cloud Print using the proper printer driver for your printer.
The print driver does not perform as expected
Some print drivers may not fully comply with the print ticket from Google Cloud Print. This can result in the printed output not respecting the requested paper size, color or duplex setting. Google is working with printer manufacturers to resolve such problems. The first course of action should be to update the printer driver to the latest version to see if the problem has been resolved. Otherwise, you may report the issue to our support team.
If the PaperCut page counts or color page counts are incorrect, please contact our support team.
The PaperCut Application Server has lost connection with the Internet
The Application Server must be connected to the Internet to publish printers and process Google Cloud Print jobs.
The Printer or Secondary Print Server is down
A printer may still appear available in Google Cloud Print even if the printer is currently down or the Print Provider managing the printer is unavailable. The job will print when the Print Provider is brought back up.