This section describes in detail how to set up PaperCut for the most common uses for multiple personal accounts.
In environments where users have both freely allocated quotas and the option for users to pay for printing it's useful to separate quotas from cash. For a description of this scenario see the section called “Separating Quota and Cash”.
To configure multiple accounts for this situation:
Navigate to → → .
Enable the Enable multiple personal accounts option.
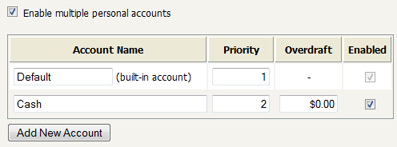
The "Default" (built-in) account is used for quotas. Rename it to something appropriates (e.g. "Quotas").
Press the Add Account button to add a new account. This account will be used for user payments. Name it appropriately, and set the priority to a value higher than the default/built-in account. i.e. like the screenshot below.
It is important that the accounts are given this priority order. This way any freely allocated quotas will be used before using the cash payments. This allows a user to add credit to their account and know that it will only be used when they run out of allocated quota.
Press the Set Up Accounts button to start applying the change.
When the account setup is complete, select the "Cash" account as the account for user payments. To do this choose this account under the User payment accounts option.
Press the Apply button.
At this point the system is ready to use. Any cash payments from TopUp/Pre-Paid Cards or Payment Gateways are added to the selected cash account. The quotas will be added to the default/built-in account. (Note: Site running a Payment Gateway module released prior to version 10.5 may need to upgrade the gateway to leverage this setting.)
A much more advanced configuration is required when different departments/faculties/areas want to each have their own quotas that are only available for use by their users on their printers. Department quotas are also often combined with user cash payments which can be used anywhere on site. For a description of this scenario see the section called “Independently Managed Work Areas”.
One prominent PaperCut customer, Cambridge University in the UK uses this configuration. At Cambridge each of the independent schools/colleges want to allocate quotas to their students at enrollment. These quotas may only be used on the printers owned by the school. Cambridge also offers user-paid printing, and where the cash can be used on any printer across the campus. The multiple personal account feature in PaperCut has been designed to meet the demanding requirements at The University of Cambridge and other leading colleges.
This configuration requires the use of many advanced PaperCut features. This section gives a brief outline of how this is configured.
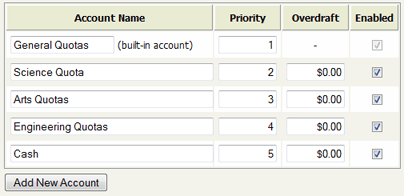
Enable multiple personal accounts and create the accounts for each of the work-areas or departments required. If users can also pay for printing, also create a cash account. The priority/order of the quota accounts is not important, as long as the "Cash" account appears last. The screenshot below shows a possible configuration.
Press the Set Up Accounts button to start applying the change.
When the account setup is complete, select the "Cash" account as the account for user payments. To do this choose this account under the User payment accounts option. Then press the Apply button.
At this point all the accounts are enabled and can be used on any printers. To restrict the accounts that can be used on different printers, the Advanced Printer Scripting feature can be used (see Chapter 17, Advanced Scripting (Print Scripting)). The advanced scripting provides a method (
actions.job.changePersonalAccountChargePriority) that allows for changing both the accounts available and their order/priority. The method is documented in detail in the section called “Script Actions”.For example, the following script snippet, shows how to limit the available accounts to only "Science Quotas" and "Cash" (in that order).
actions.job.changePersonalAccountChargePriority(["Science Quotas", "Cash"]);Departments can allocate initial quotas at enrollment or periodically throughout the year using the web-service APIs or
server-commandto adjust user balances. All the balances affecting APIs/commands have a parameter to specify which of the accounts to adjust/set. For example, to useserver-commandto set the balance of the "Science Quotas" account to $10.00 for all members of the "Science Students" group:server-command set-user-account-balance-by-group "Science Students" 10.0 \ "Enrollment quota" "Science Quotas"This technique can be integrated with existing student management systems to automate the allocation of free print quota at the time of enrollment.
For more information on web-service APIs or
server-commandsee the section called “The XML Web Services API” and the section called “Server Commands (server-command)”.
With the power of Advanced Print Scripting and Multiple Personal Accounts much can be achieved. Large universities and colleges needing this level of flexibility also tend to have very competent IT staff. Take some time to bounce around some ideas. Here are a few:
Use advanced print scripting to tune on/off access to accounts based on conditions such as group membership, time of day, device, etc.
Automate account management tasks such as free quota assignment on course enrollment using scripts.
Complex rules on which accounts are used and under which conditions, need to be clearly explained to users. Take some time to document this and communicate policy with staff/students/members.