This section describes system notifications and how they can be configured for your organization. PaperCut NG includes built-in notifications to alert users of a important pieces of information. Examples of these notifications include:
The user's account balance drops below a given balance.
Printing is denied due to a variety of reasons (e.g. not enough credit; the printer is disabled; the print job contains too many pages).
A print job was successfully printed.
The message that is delivered to the user can be customized to suit your organization. For example, if the user is denied printing for some reason, you may wish to direct the user to the intranet page that discusses printing policies and guidelines.
Important
System notifications are important to your users because they let them know why their print jobs were denied. If notifications are not enabled, users print jobs might be deleted without them knowing and they will not understand what happened. They might then contact the Administrator or Help Desk for assistance. If they received a notification, then this situation is avoided.
System notifications can be delivered to the user in a number of ways, and the administrator can decide the preferred option. The delivery options available include:
Winpopup (or "net send") - this is useful in a Windows network but workstations running other operating systems may not receive these messages.
User Client - messages are sent to users running the PaperCut NG User Client tool. This option is guaranteed to work in all environments where the user runs the user client.
Email - messages are delivered by email, to the email address defined in the system. This is a good alternative for "low balance warning" messages but is not recommended for real-time messages like when printing is denied.
Custom - this allows you to develop your own message delivery mechanism. This might be useful if your organization has an instant messaging infrastructure.
PaperCut NG provides flexible options for configuring the various notifications. The administrator can choose to:
Enable/disable each of the notification types.
Change the notification message to suit your organization.
Choose the delivery method for each notification type.
To change the notification options:
Navigate to → .
To change print notifications, select the Print Notifications link at the top.
To change the low balance notification, scroll down to the "Low Balance Notification section.
Using the notification options (shown above), the notification can be enabled; the notification text; and the delivery type can be modified.
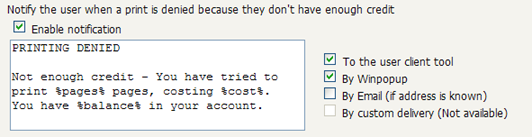
Notification text can be modified to suit your organization's requirements. The notification text is a
template that can include some special fields that are replaced by the system when the message is sent.
They can be used to provide more detailed information to the user.
These fields are surrounded by percent characters (%).
| Field | Description |
|---|---|
%user% | The username of the user delivered the message. |
%date% | The date/time that the message was sent. |
%balance% | The user's current credit balance. |
Table 10.1. Fields available in all notifications
| Field | Description |
|---|---|
%cost% | The cost of the print job. |
%printer% | The printer the job was printed to. |
%document% | The name of the document printed. |
%pages% | The number of pages in the document. |
%paper-size% | The size of the paper used to print the document. |
Table 10.2. Fields available in print notifications
The default notification text in the application shows a variety of examples using these fields.
Before sending notifications via email, the system needs to know the SMTP server to deliver emails to. The SMTP server can be internal or external to your organization however it must allow forwarding of emails to your users. The SMTP server will typically be the same server that users set in their email application to send emails.
To set the SMTP server:
Navigate to → .
Find the Email Options section.
Enter the SMTP server in the field provided.
It is also recommended that the subject and from address are changed to be applicable for your environment.
Press the button.
Tip
If your email server requires authentication, the username and password can be configured using the advanced configuration editor. For further details, please contact PaperCut Software support.
To send notification messages to users via email, an email address needs to be defined for the user.
User email addresses can be entered in the User Details screen. However, if all email
addresses match the pattern [username]@yourdomain.com, then the email addresses can be
defined globally using the global email suffix. An example of how this works is as follows:
An email notification needs to be sent to user
brian.No email address has been defined in Brian's user details, but a global email suffix of
@myschool.comis defined in the Email Options section.To generate Brian's email address, the username (
brian) and suffix (@myschool.com) are combined to form the email address[email protected].
To define the global email suffix:
Navigate to → .
Find the Email Options section.
Enable the Use email suffix to build user email addresses option.
Enter the Email Address Suffix.
Press the button.
To confirm that the email suffix is working as expected:
Navigate to the section.
Select a user from the list.
The Use global email suffix option should be enabled, and the email field should contain the address constructed from the username and suffix.
Once the system notifications are configured, it is useful to test that messages can be delivered. PaperCut NG provides a function to send test messages to users. This allows you to verify that notifications are working without having to try to produce notifications artificially. To send a test notification:
Navigate to the → .
Scroll to the bottom of the page to the Test Notifications section.
Enter the username of the user to send the message to.
Select the delivery method to use.
Enter the notification message to send.
Press the button
Verify that the notification was received.