This section discusses printer setup where print queues are hosted on Mac OS 10.7. Please refer to the section called “Windows hosted print queues” if your print queues are hosted on Windows, or the section called “Mac hosted print queues for OS 10.8 and 10.9” if you have Mac OS 10.8 or 10.9 hosted print queues.
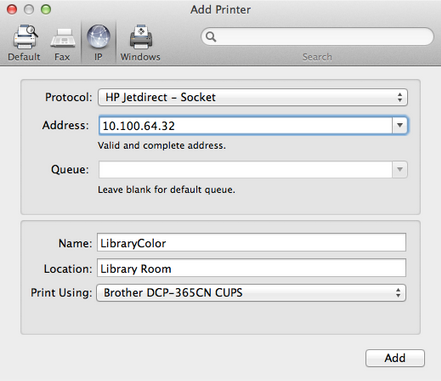
Install the printer on the system running PaperCut using a compatible driver. For example, a driver supplied by Apple or the manufacturer. If there is a choice of driver, we recommend using a Postscript or PPD based driver. It is recommended you follow the manufacturer's suggested setup procedure for this part of the implementation. If the manufacturer supports various connection methods, we recommend using ‘HP JetDirect/Socket’ if possible. Here is an example of a procedure that will set up a standard printer using a plain HP JetDirect/Socket connection:
Select System Preferences...
Select Print & Scan
Click on the + button to add a new printer
Click the IP tab
Select HP Jetdirect - Socket in the Protocol list
Enter the printer's IP address
Give the printer a simple name without spaces
Select the driver or printer model from the list and press Add
Now this has been done, print some test pages to the newly configured printer, such as printing a web page from Safari. Confirm that printing works as expected before continuing. Be sure to test multiple options such as Duplex and Grayscale. If printing is not working as expected, see our troubleshooting section below.
Please note, if you are adding new printers, it is necessary to configure PaperCut to monitor the new print queues. This is discussed in the section called Adding and Removing/Deleting/Ignoring Printers.
Always try HP Jetdirect/Socket first, and use proprietary connection methods as a last resort
If your printer does not support HP JetDirect/Socket, consider using IPP as an alternative
If you are not able to install or find a driver for your printer, try the Generic Postscript Driver/Printer
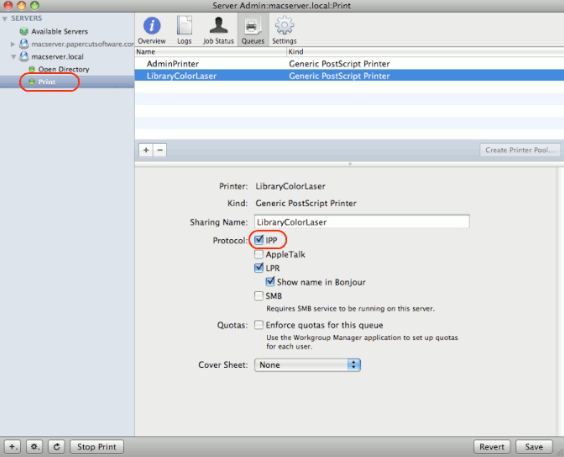
By default, locally installed printers are not shared as public print queues. Printer sharing needs to be manually enabled. For Mac OS 10.7, you should share your printers using the Server Admin app by using the following procedure:
Open Server Admin, and select your server.
Select Settings, then Services and enable the Print service.
Save the change.
In the server list on the left, select your server, expand, and highlight the newly created Print service.
Select Queues from the toolbar. Your newly installed printers should be listed.
Select each printer and ensure that at least the IPP protocol is selected. It may also be useful to enable LPR and expose via Bonjour.
Ensure Enforce Quotas for this queue is turned off as PaperCut manages this.
Click the Save button or save when prompted.
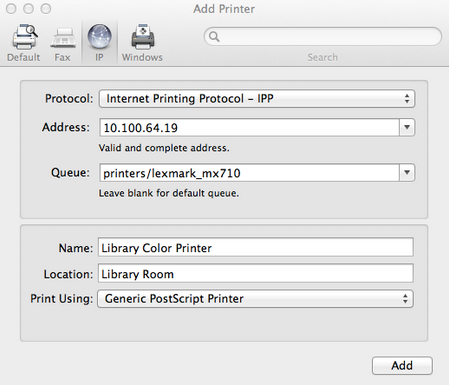
Once the printers are set up on the server and shared, the next step is to install the printers on the workstations. In this section we go over manual setup of print queues to workstations, as well as discussing a method of automating deployment via the Workgroup Manager. The goal is to add the printer on the workstation so it communicates with the server’s print queues rather than directly to the printer. Protocols include IPP, LPD, or LPD added via Bonjour. The recommended setup is to use IPP, as this is the native protocol.
Open System Preferences → Print & Scan on the workstation
Click the + button
Select IP as the type and select Internet Printing Protocol - IPP as the Protocol. If IPP is not compatible with this device, choose Line Printer Daemon - LPD as the Protocol)
Enter your server name (or IP Address) in the Address field.
Enter the the printer's Queue Name prefixed with printers/ in the Queue field. For example: printers/my_office_printer.
Select the appropriate driver under Print Using → Select Printer Software. If your model is not listed here, you may need to install the manufacturer's driver and repeat these steps again
Take some time to test printing from the workstation, and confirm that all functions of the printer are working.
Note: If you have trouble connecting, ensure the queue name you are entering is correct. The queue name of the printer will have been set when the print queue was first created on the Mac server, and may be different to the visible printer name. The queue name can be found on the print server under System Preferences → Print & Scan → [select printer] → Options & Supplies → General → Device Name.
If you have problems obtaining a driver for your printer, try the Generic Postscript Driver. This option will work with most printers. If after a test print the printer stops with a connection error, check the printer sharing permissions on the server or try the alternate method discussed below.
Manually installing the printer on each desktop on a large network can be tedious. Large networks using Open Directory may benefit from automating the process with Workgroup Manager. The key to successfully deploying/publishing printers via the Workgroup Manager is to publish the configuration from a working workstation rather than the server itself. The reason behind this is that it would publish the server's printer configuration. Since the server is configured to print direct to the device and not to the queue, this would be the incorrect configuration for user workstations. Instead we need to install the Workgroup Manager software on a configured workstation/client and publish its known configuration. We recommend having a workstation setup that is for Workgroup Manager administration and deployment only.
Select one workstation on your network. Follow the manual setup procedure as discussed above.
Test and confirm this workstation is configured and printing correctly. Also choose other settings as appropriate such as tray, duplex and other defaults. It is important to test this step before continuing. If printing is not working, this needs to be fixed before Workgroup Manager is used to publish your print queues.
Install the Workgroup Manager on this client workstation found on the Mac OS X Server install disk).
Open the Workgroup Manager, connect to your directory and select an appropriate user group or computer group used to manage client settings.
Enter the Settings/Preferences area and select Printing.
Select Manage Always and add printer(s) set up in step 1.
Save settings and exit (e.g. click Done).
Log onto another workstation and confirm that printer settings are being published as expected.
