Print Archiving is an optional feature disabled by default. Before enabling the system administrator should
consider:
Step 1: Install print spool file viewer technology
To get the full benefit of Print Archiving we recommended installing additional software that assists with the
conversion of selected printer language files, such as PostScript, into images. This software should be
installed on the primary PaperCut server. PaperCut will detect the software and
automatically start using it.
The recommended software:
Install Ghost Trap - a security-hardened PostScript and PDF-to-image converter.
Download:
 .
.
Ghost Trap is a security hardened version of Ghostscript. It's open source software
It's open source software supported by PaperCut Software.
if
It brings best-of-breed security to the popular PostScript and PDF conversion
software by utilizing the same sandbox security technology used by the Google Chrome Browser. You can read
more about this project here:
The Ghost Trap Project Page.
Install the PostScript viewing software Ghostscript version 9.06. Richard Koch from the
University of Oregon maintains a Mac version of Ghostscript. This can be downloaded
here.
Note
If you're using the Homebrew package manager,
there is a ghostscript package available for install.
Linux and Novell OES servers
All major Linux distributions either come with Ghostscript automatically installed, or an option to install
via the standard package manager. See your distribution's documentation for further details. You should ensure
that the gs command is on the PATH (for the papercut user).
Ghostscript version 9.07 is recommended. We also recommend installing,
GhostPLC
and GhostXPS.
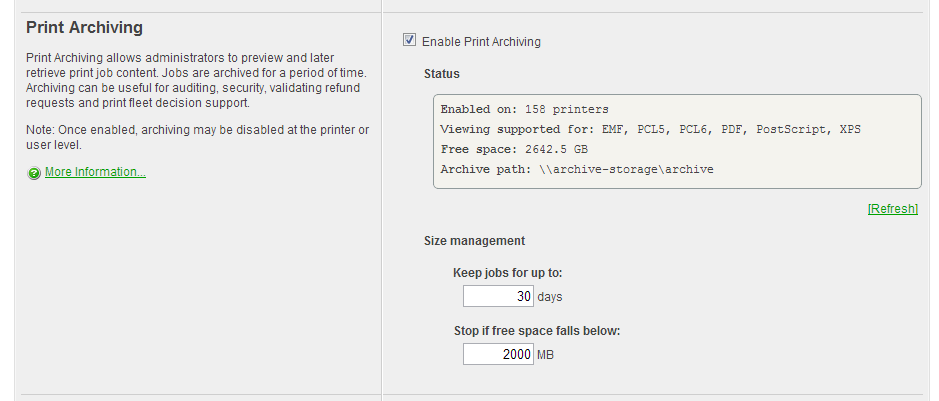
Step 2: Enable Print Archiving
Print Archiving can be enabled by an administrator as follows:
Log in as admin.
Navigate to the Options tab.
Enable the Print Archiving option.
Click Apply at the bottom of the page.
Once enabled you should perform some testing across your printer fleet.
Step 3: Review Configuration Options
System Administrators should first familiarize themselves with the archive disk management options.
These are found under
→ →
The important options are:
Keep jobs for up to: X days
This option determines the number of days a job will be kept in the archive. The default value is 30 days, with
a minimum value of 1. If you are planning on setting a high value make sure you consider consumption of drive
storage. It is advisable to monitor disk space growth during the first full week of usage and use this as a
basis to extrapolate your storage requirements. For reference the default archive path is
[app-path]/server/data/archive on the primary PaperCut server.
Note
Any change to the Keep up to: X days option will be applied when archive maintenance is
performed overnight.
Stop if free space falls below:
This is an emergency stop option. If free disk space falls below the set value all archiving is immediately
suspended. This ensures a growing archive will not take down a production server. The default value is 2GB. If
the server runs other production software it may be advisable to increase this value. If email notifications
are configured (see the section called “Configuring Email Notifications”), administrators will also
automatically receive an error email alert when disk space drops to this limit.
Tip
It is recommended that you proactively monitor disk space usage as a matter of course during your regular
service maintenance and assessment procedures.
Turning off archiving on selected printers, users or groups:
Once enabled, Print Archiving will occur on all queues for all users. In some situations it may be necessary to
selectively disable archiving. Examples include:
Tuning off archiving on selected users, such as human resources managers who routinely print sensitive
information.
Turning off archiving on printers that don't support interactive viewing - for example a printer that only
supports GDI drivers. Without imaging support, archiving may be of reduced benefit as the only option to
review the document is to reprint it.
To disable archiving on a specific printer:
As an administrator, log in and select the Printers tab.
Select the printer you wish to disable.
Deselect Enable Print Archiving.
Click OK.
To disable archiving for a specific user:
As an administrator, log in and select the Userstab.
Select the user you wish to disable archiving for.
Enable Override printer-level settings.
Enable Don't archive this user's jobs.
Click OK.
To disable archiving on a group of users:
As an administrator, log in and select the Groups tab.
Select Bulk user actions... from the menu.
Select the group to perform the change on
Enable Change advanced user settings.
Enable Override printer-level settings.
Enable Don't archive this user's jobs.
Click OK.