This section documents the setup for Microsoft Failover Cluster Manager as introduced in Windows 2008 Server R2. Sites using Microsoft Cluster Services, Veritas Cluster Server or Novell Cluster Services should jump to their respective sections.
This section assumes that you have an already installed and working clustered printing environment.
Mode 1 is the simplest configuration and is suitable for most organizations. It implements clustering in the “front line”, that is, the printer and print monitoring layer. The cluster print server is configured as a secondary print server reporting back to a primary PaperCut server hosted on another system outside the cluster.
Mode 2 implements clustering on all levels of the application for maximum fault tolerance - In addition to the print queues, the PaperCut Application Server is also hosted in the cluster. Mode 2 is somewhat more demanding to configure and should only be attempted by organizations with staff experienced with advanced cluster and database management.
Please refer to the subsequent sections for an explanation on how to set up Mode 1 or Mode 2 in your environment.
Important
Windows Server 2008 R2 installations may experience a bug where print jobs are not removed from the print queue when completed. For more information please see the section called “Windows Server 2008 R2 only”. This work around will need to be performed on the clustered print server, not the nodes.
Install the Application Server component (Standard Install option) on your nominated system. This system will be responsible for providing PaperCut NG's web based interface and storing data. In most cases this system will not host any printers and is dedicated to the roll of hosting the PaperCut Application Server. It may be one of the nodes in the cluster; however a separate system outside the cluster is generally recommended. An existing domain controller, member server or file server will suffice.
The Print Provider component needs to be separately installed on each node involved in the print spooler cluster. This is done by selecting the Secondary Print Server option in the installer. Follow the secondary server set up notes as detailed in Chapter 14, Configuring Secondary Print Servers and Locally Attached Printers . Take care to define the correct name or IP address of the nominated application server set up in step 1.
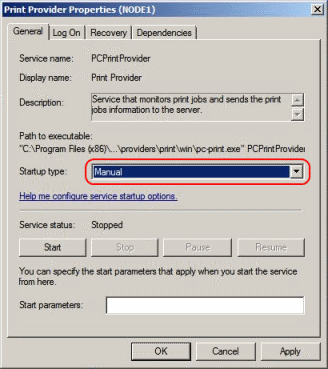
By default the Print Provider component is installed under the management of the node.
To hand over management to the cluster, the service start-up type needs to be set to manual. On
each node navigate to → , locate the
PaperCut Print Provider service. Stop the service
and set the start-up type to Manual. Repeat for each node in the cluster.
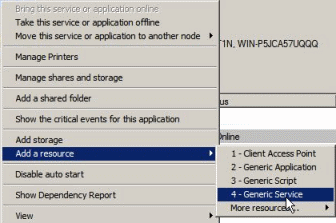
Open the Failover Cluster Manager.
Right-click on the cluster group hosting the spooler service and select → .
In the new resource wizard, select the name
PaperCut Print Providerand click .Click at Confirmation.
Click at Summary.
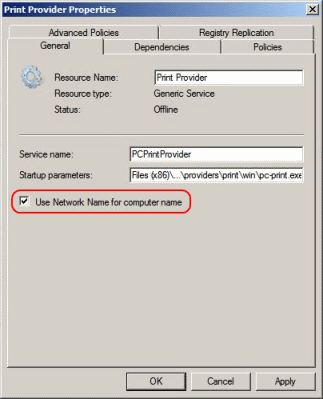
Right click on the
PaperCut Print Providerand click Properties. On the PaperCut Print Provider Properties page ensure the Use Network Name for computer name option is checked.Next, click the Dependencies tab and ensure the Print Spooler is added as a resource. Click .
Right click on the
PaperCut Print Providerand click Bring this resource online.
To ensure the state of jobs currently active (e.g. held in a hold/release queue) are not lost during a failover event, PaperCut NG is able to save job state in a shared drive/directory. If a shared disk resource is available and can be added to the cluster resource, PaperCut can use this to host a shared spool directory to ensure no active job state is lost.
Add a shared drive to the cluster resource. e.g. (Q: drive). It is advisable to use the same drive as used for the shared print spool directory.
Create a directory in this drive called
PaperCutSpoolOn each node, edit the file:
[app-path]/providers/print/win/print-provider.confand add a line pointing to the shared active job spool directory:SpoolDir=Q:\PaperCut\SpoolChange the drive letter as appropriate.
Important
If running an "Active-Active" print cluster you must use a separate active job spool directory for each node. To configure this use the
%service-name%value in theSpoolDirsetting. The%service-name%value is replaced by the service name of the running PaperCut Print Provider instance. e.g.SpoolDir=Q:\PaperCutSpool\%service-name%See below for details on "Active-Active".
Restart the cluster resource to ensure the change is picked up.
Perform operations to verify that:
Print jobs are logged as expected.
No error message appear in the Print Providers text log located at:
C:\Program Files\PaperCut NG\providers\print\win\print-provider.logon each node.
On large networks it is common to distribute load by hosting print spooler services under two or more virtual servers. For example, two virtual servers may each host half of the organization's printers and hence sharing the load. This is sometimes referred to as Active/Active clustering - albeit not an entirely correct term, as the print spooler is still running in Active/Passive.
Virtual servers cannot share the same service on any given
node. For this reason if the virtual servers share nodes, you'll need to manually install
the PaperCut Print Provider service a second time under a different name.
This can be done via the command line as follows:
   cd \Program Files\PaperCut NG\providers\print\win
   pc-print.exe PCPrintProvider2 /install
The argument proceeding /install is the unique name to assign to the service.
The recommended procedure is to suffix the standard service name with a sequential number. You'll
need to repeat this on each physical node. You'll use a unique service name for each "active"
virtual server hosted in the cluster group.
You will also need to make sure that you have unique SpoolDir settings for each
node of your cluster. Ensure that the SpoolDir setting in the print-provider.conf
file has a %service-name% expansion variable as explained above. This will ensure each service has
it's own spool directory.
Mode 2 implements failover clustering at all of PaperCut NG's Service Oriented Architecture software layers, including:
Clustering at the Print monitoring layer
Clustering at the Application Server layer
Optional clustering at the database layer
Mode 2 builds upon Mode 1 by introducing failover (Active/Passive) clustering in the Application Server layer. This involves having an instance of the application server on each of the cluster nodes. When one node fails, the other automatically takes over the operation. Both instances use a share data source in the form of an external database (see Chapter 19, Deployment on an External Database (RDBMS)). Large sites should consider using a clustered database such as Microsoft SQL Server.
This section assumes that you have an already installed and working Service and Application group hosting a clustered printing environment.
On one of the cluster's nodes, install the PaperCut Application Server component by selecting the Standard Install option in the installer. Follow the setup wizard and complete the process of importing all users into the system.
The system needs to be configured to use an external database as this database will be
shared between both instances of the Application Server. Convert the system over
to the required external database by following the procedure detailed in Chapter 19, Deployment on an External Database (RDBMS).
The database may be hosted on another system, or inside a cluster. As per the
external database setup notes, reference the database server by IP address by
entering the appropriate connection string in the server.properties file.
Your licence will need to be installed on your 2nd node and any subsequent cluster nodes. To do this Log into the administration console by browsing to http://[IP-Address-Of-Your-Node]:9191/admin Navigate to the About section, scroll down to the Register section and click the Browse... button. Locate the license file, click the Install license button, verify license information is correctly listed in the About page.
By default the PaperCut Application Server component is installed
under the management of the node. It needs to be managed inside the cluster, so the service's
start-up type should be set to manual. On each node navigate to
→
locate the PaperCut Application Server.
Stop the service and set its start-up type to Manual.
Repeat this on all nodes.
Create a new Services and Applications group containing the two nodes. Make note of the
IP Address that you assign as it will be used later. Add the Generic
Service PaperCut Application Server. Give the Client Access Point an
appropriate title such as PaperCutAppCluster.
This Services and Applications group is separate to the existing clustered printing environment. It is recommended to set up two Services and Application groups where you can later set the node affinity to better distribute the application load across nodes.
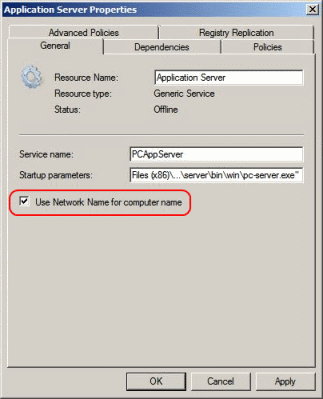
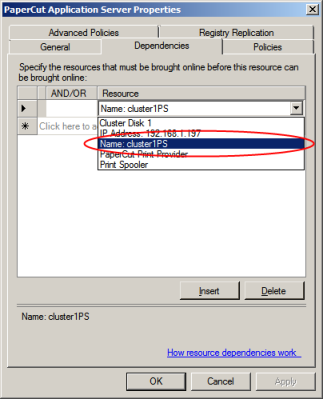
Right click on the PaperCut Application Server and click Properties.
On the PaperCut Application Server Properties page ensure the
Use Network Name for computer name
option is checked. On the Dependencies tab make sure the Service and Application
group is added as a Resource. Click .
Right-click on the Service and Applications group and select Bring online. Wait until the application server has started, then verify that you can access the system by pointing a web browser to:
http://[Virtual Server Name]:9191/admin
Login, and perform some tasks such as basic user management and User/Group Synchronization to verify the system works as expected.
Interface the PaperCut Print Provider layer with the clustered spooler service by following the same setup notes as described for Mode 1. The exception being that the IP address of the application server will be the IP address assigned to the Virtual Server assigned in step 6.
The client and release station programs are located in the directories:
[app-path]/client/[app-path]/release/
These directories contain configuration files that instruct the client to the whereabouts of the server. The IP address and the server name in the following set of files will need to be updated to the Virtual Server's details (Name and IP address):
[app-path]/client/win/config.properties[app-path]/client/linux/config.properties[app-path]/client/mac/PCClient.app/Contents/Resources/config.properties[app-path]/release/connection.properties
Edit the files using Notepad or equivalent and repeat this for each node. Also see the section called “Client/Workstation Configuration”.
Mode 2 setup is about as complex as it gets! Take some time to verify all is working and that PaperCut NG is tracking printing on all printers and all virtual servers.
Separating these resources into to groups, running on different IP addresses allows you to set up different node affinities so the two groups usually run on separate physical nodes during normal operation. This ensures the load is spread across multiple nodes.
To make this change after setting up the single group Mode 2 configuration:
Set the Preferred owners of each Services and Applications group to different physical nodes.
Restart or bring on line each group, and independently test operation and operation after fail-over.
Tip
Take some time to simulate node failure. Monitoring may stop for a few seconds while the passive server takes over the role. Simulating node failure is the best way to ensure both sides of the Active/Passive setup is configured correctly.
It is important that the version of PaperCut NG running on each node is identical. Ensure that any version updates are applied to all nodes so versions are kept in sync.
The PaperCut NG installation sets up a read-only share exposing client software to network users. If your organization is using the zero-install deployment method, the files in this share will be accessed each time a user logs onto the network. Your network may benefit from exposing the contents of this share via a clustered file share resource.
By default the Application Server will look in [app-path]\server\data\web-print-hot-folder for Web Print files.
This location is generally only available on one node in the cluster. To support Web Print in a cluster you will need to add
a Shared Folder on the Shared Storage in your cluster. This can be
done on the same disk that the spool files reside and the Print Provider point to.
To change this location you will need to use the Config Editor and modify the web-print.hot-folder key.
Add a Shared Folder on the Shared Storage, an example would be
E:\web-print-hot-folderand share it as\\clustername\web-print-hot-folder\.Log in to the PaperCut NG administration console, naviate to →
Modify
web-print.hot-foldertoE:\web-print-hot-folderMap your selected network drive on the Web Print Sandbox machine to
\\clustername\web-print-hot-folder\Add all relevant printer queues from
\\clustername\web-print-hot-folder\to the Web Print Sandbox server.