Synchronize user and group details with LDAP
LDAPThe Lightweight Directory Access Protocol (LDAP) is a directory service protocol that runs on a layer above the TCP/IP stack. It provides a mechanism used to connect to, search, and modify Internet directories. The LDAP directory service is based on a client-server model. (Lightweight Directory Access Protocol) directories usually store information about user and groups in an organization. One of the most common uses of LDAP is to provide single sign-on on a network that comprises multiple platforms and applications. When a network consists of only Windows computers, then you can use an Active Directory domain. But when there is a mix of Windows, Apple and Linux machines then LDAP can provided the single source of user, group and authentication information. (It is worth noting that both Active Directory and Novell eDirectoryAlso called Netware Directory Services, Novell eDirectory is directory service software that is used to centrally managing access to resources on multiple servers and computers within a network. The eDirectory software is part of the Novell Compliance Management Platform. implement the LDAP protocol).
PaperCut NG/MF can use an LDAP directory for user authentication and as a source of user and group information. LDAP can either be enabled at installation time, or by changing the user source option after installation. When enabling LDAP, a number of configuration settings must be specified to allow the application to connect to the LDAP server.
To synchronize your user data with LDAP:
Set the primary sync source
-
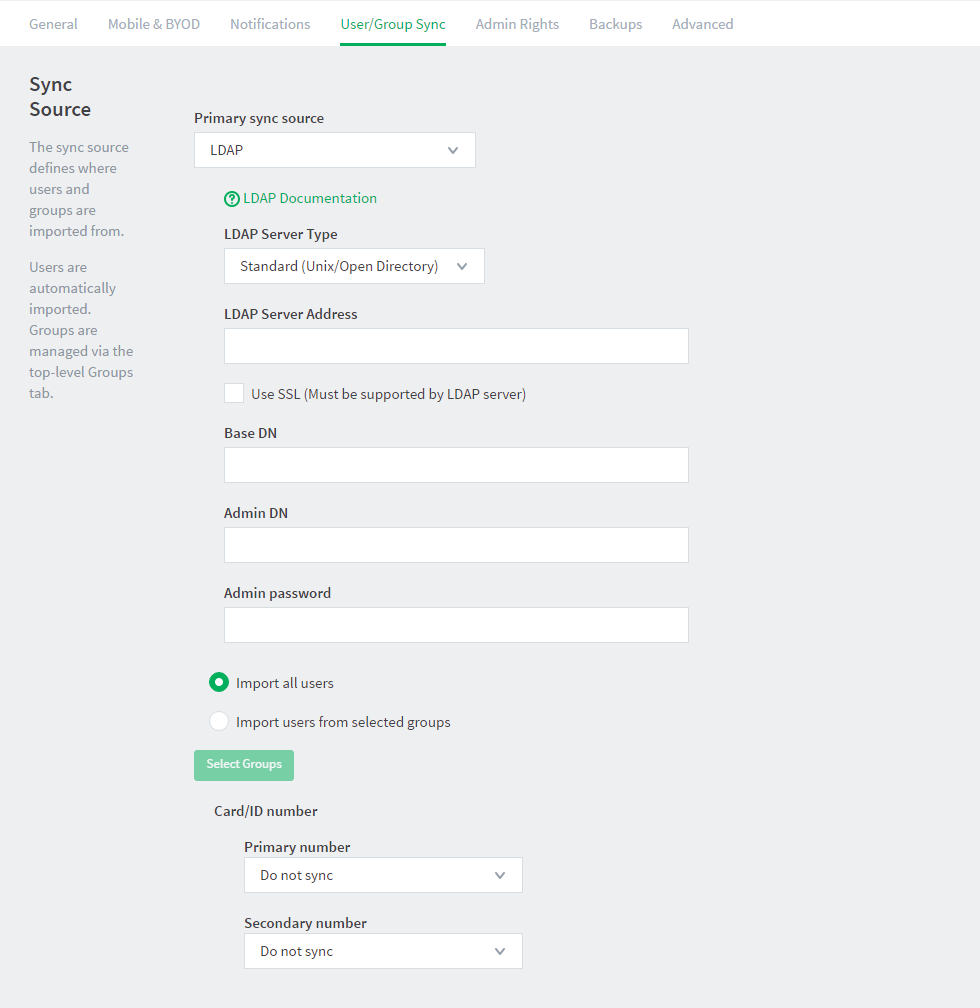
Select Options > User/Group Sync.
The User/Group Sync page is displayed.
-
In the Sync Source area, in Primary sync source, select LDAP.
-
Complete the following fields as required:
-
LDAP Server Type—Determines which LDAP fields are used to get user and group information. PaperCut NG/MF supports the following server types:
-
Unix / Open Directory
-
Microsoft Active Directory
-
Novell eDirectory
However, it is easy to support other server types by adjusting the LDAP fields PaperCut NG/MF searches. For more information, see Advanced LDAP configuration.
-
-
LDAP Server Address—The hostname or IP address of the LDAP server.
-
Use SSLSecure Sockets Layer (SSL) is the standard security technology for establishing an encrypted link between a web server and a browser. This link ensures that all data passed between the web server and browsers remain private and integral. The protocol uses a third party, a Certificate Authority (CA), to identify one end or both end of the transactions. To be able to create an SSL connection a web server requires an SSL certificate. When you choose to activate SSL on your web server you will be prompted to complete a number of questions about the identity of your website and your company. Your web server then creates two cryptographic keys - a Private Key and a Public Key.—Indicates if an encrypted SSL connection is used to connect to the LDAP server. The LDAP server requires SSL support to be enabled and should accept connections on the standard LDAPS port 636.
-
Base DN—The Base DN of the LDAP server. This is the equivalent of the "suffix" config setting of the OpenLDAP server. For example, if the domain hosted by the LDAP server is "domain.com", then the Base DN might be DC=domain,DC=com. The format of the Base DN can differ significantly depending on configuration. Some older Novell eDirectory installations require a blank Base DN to operate. Some examples:
DC=myschool,DC=edu,DC=au DC=myorganization,DC=com OU=OrgUnit,DC=domain,DC=com DC=local
-
Admin DN—The DN of the user who has permission to connect to and query the LDAP server. This is typically an administrative user, although it can be a user that only has read-only access to the LDAP server. An example of the DN of the Administrator user on a Windows AD domain "domain.com", would be CN=Administrator,CN=Users,DC=domain,DC=com. The exact format of the DN depends on the LDAP server. Some examples:
-
Windows Active Directory: CN=Administrator,CN=Users,DC=domain,DC=com
-
Windows Active Directory (in organizational unit):
CN=administrator,OU=OrgUnit,DC=domain,DC=com
-
Mac Open Directory: uid=diradmin,CN=users,DC=domain,DC=com
-
Unix Open LDAP: uid=root,DC=domain,DC=com, or uid=ldapadmin,DC=domain,DC=com
-
Novell eDirectory: CN=root,DC=domain,DC=com, or CN=ldapadmin,OU=users,DC=domain,DC=com.
The Admin DN and password is optional if your LDAP server allows anonymous binds for querying.
-
-
Admin password—The password for the above user.
TIPSome LDAP servers are configured to allow 'anonymous' LDAP query access. In these situations, you can leave Admin DN and Admin password blank.
-
-
Select the users to import:
-
Import all users
-
Import users from selected groups—If you select the option, click Select Groups; then select the groups/OUs you want to import. This option is useful if the domain contains old users or users who do not print.
-
Advanced features, such as Nested Groups and OU are supported by the Windows Active Directory sync option. See Synchronize user and group details with Active Directory.
Add card/identity numbers
Card and ID numbers are used as an alternative to usernames/passwords for authentication at software Release Stations, or at hardware terminals attached to photocopiers. The card/ID number can also be searched in the user quick-find in the User List page. See User card and ID numbers for more information.
In PaperCut NG/MF, you can associate one or two unique card/ID numbers with each user. These are known as the primary and secondary card/ID number. You can automatically import or generate these card/ID numbers for each user.
Often card/ID numbers are already assigned by other systems, in which case you must import these numbers into PaperCut NG/MF from Active Directory or LDAP. Unlike other fields, such as full-name and email address, there is no standard field used exclusively for card numbers. For this reason PaperCut NG/MF allows specifying the field from which to import the card/ID number.
You can add card/identity numbers in the following ways:
Generate random card/ID numbers
PaperCut also allows you to generate a random card/ID number for either the primary or secondary card/ID number. To auto-generate card numbers:
-
In the Sync Source area, complete the following fields:
-
Primary number—select Auto-generate random ID (if blank).
-
Length—enter the number of digits.
Short numbers are easier to remember and faster to key in, but it is also easier to guess someone else's number. If your number is too short, PaperCut cannot generate sufficient numbers to cover all your users.
-
-
Click Apply.
The card/ID number must uniquely identify a user, so you should ensure that no two users have the same card/ID number. Make sure the card/ID numbers you have defined in your user source are unique. If PaperCut NG/MF finds a non-unique card/ID number it does not update the user's details, and displays a warning in the synchronization results. When generating card/ID numbers, you are asked to specify the length or number of digits you require in the generated numbers.
Import the card/identity number from LDAP
LDAP provides a very flexible way to store user related information. The fields available depend on LDAP server being used and how that is configured. Many LDAP servers also allow administrators to create custom fields to store additional custom user information. You should consult your LDAP server's documentation or talk to your LDAP administrator to understand which LDAP field stores the user card/ID number.
In the Sync Options area, ensure the Update users' full-name, email, home directory, department and office when synchronizing check box is selected to import card/Id numbers.
-
In Primary number, select Sync from AD/LDAP field.
-
In AD/LDAP field name, enter the name of the field containing the card/ID numbers. By default, PaperCut NG/MF uses the employeeNumber field to retrieve the primary card number. This is a standard LDAP field, but if this is not suitable, you can choose any valid LDAP user field.
-
If required, import the secondary Card/ID numbers.
-
In Secondary number, select Sync from AD/LDAP field.
-
In AD/LDAP field name, enter the name of the field containing the card/ID numbers.
NOTEIf defined, then the same regular expression that is applied to the first card number is applied to the second card as well.
-
It is important to test that the card numbers are being retrieved correctly. To test the changes, click Test Settings. If the card number is retrieved correctly, they are listed as the 4th user field in the test output.
Extract the card/id number from an LDAP/AD field using a regular expression
The vast majority of sites store the full card number in a single field in AD/LDAP. In this situation, you do not need to use a regular expression (regex) to extract the card number. A regular expression is required only under some specific circumstances, including:
-
The field contains more then just the card number. For example, if the field contained a card number and student number separated by a comma (e.g. 12345678,0003456).
-
The multi-valued LDAP/AD field contains multiple values and only one representing the card number. e.g. Some third party authentication management systems store external IDs (like card numbers) in a single multi-valued LDAP field.
NOTEFor multi-value fields, PaperCut imports all the field values separated by TABs. Use the regex to extract the required portion of the field.
To use a regular expression to extract the card/id number:
-
In the Sync Source area, select the Apply regular expression to extract primary/secondary card number from AD/LDAP check box.
-
Enter the regular expression used to extract the card number. The regular expression must contain a capture group (represented by parentheses), that represents the part of the field that the card number is extracted from.
The simplest way to create a regular expression is to start with one of the following examples.
| Regular Expression | Description |
|---|---|
| ([\d]+) | Extracts the first sequence of digits. e.g. if the field contains 12345678,005678 then 12345678 is extracted. |
| ([\d]{5}) | Extracts the first sequence of 5 digits. e.g. if the field contains 12345678 then 12345 is extracted. |
| =([\d]+) | Extracts the sequence of digits after the = character. e.g. if the field contains 12345678=56789" then 56789 is extracted. |
| ([\d]+)::abc | Extracts the sequence of digits preceding the text ::abc. This is a common notation when storing identities in a multi-valued field in LDAP. The ::abc notation is used to indicate the different identity types. In this example, if the field contains 1234::xyz 5678:qrs 9876::abc then 9876 is extracted. |
For more information on regular expressions and a test tool, see http://www.fileformat.info/tool/regex.htm. If you need assistance, please contact support.
Set the secondary sync source (optional)
Enabling a secondary sync source allows PaperCut to merge the results from two independent sources. Examples of where this is useful include:
-
A school with an Active Directory domain for the majority of users and a separate LDAP server that is used and managed by one department.
-
An organization with a new LDAP server and an old legacy LDAP server with separate but unique users who have not been migrated to the new server.
-
A university with an Active Directory for the Windows student workstations and an Open Directory for the staff Mac workstations.
When enabled, PaperCut queries both sources to find users and groups. Usernames are treated as globally unique, so the same username existing in both sources is treated as the same user (in this case, the details for the user are merged, with the primary sync source taking priority). If there is an error connecting to or synchronizing against either source then no actions takes place.
To set a secondary sync source:
-
In the Secondary Sync Source (Advanced) area, select the Enable secondary sync source check box.
-
Complete the secondary sync source details as described above. These fields are the same as those for the primary sync source.
Set the sync options
The options listed in the Sync Options area control how the synchronization will take place.
-
In the Sync Options area, select any of the following options as appropriate:
-
Update users' full-name, email, department and office when synchronizing—if a user's details in PaperCut do not match those in the synchronization source, update the details in PaperCut NG/MF.
-
Import new users and update details overnight—synchronization automatically occurs each night at approximately 12:55am. This option never deletes users from PaperCut.
-
Delete users that do not exist in the selected source—deletes users from PaperCut if they no longer exist in the selected synchronization source.
This option affects only users added via the synchronization source (e.g. the domain) and does not delete Guest and anonymous user management. Users that do not exist in the Sync source are deleted only when you manually synchronize (click Synchronize Now).
This option does not delete users when automatically synchronizing overnight.
-
-
To test the operation, click Test Settings.
A Testing sync settings popup dialog box displays the details of users and user groups that will be modified (updated, added or deleted) when the actual sync operation is run.
TIPYou can configure the maximum number of deletion candidates that are displayed in the Testing sync settings popup dialog box, via the config keyA config key stores information about a specific advanced setting in PaperCut. Config keys are editable by an administrator in the Config Editor. user-source.test-sync.max-pending-deletion-entries-displayed.
By default a maximum of 100 deletion candidates are displayed.
For information about setting config keys, see Using the Advanced Config Editor.
-
Click Apply.