Application Server failover
Overview
Making sure your PaperCut NG/MF Application ServerAn Application Server is the primary server program responsible for providing the PaperCut user interface, storing data, and providing services to users. PaperCut uses the Application Server to manage user and account information, manage printers, calculate print costs, provide a web browser interface to administrators and end users, and much more. is always available is critical to maintaining the uptime of printing within your organization. The list of options to achieve the coveted 99.9% uptime is endless. PaperCut NG/MF fits perfectly with almost all of the industry-standard technologies that help provide high availability.
If you are the type of organization that is already using a network load balancer to make other applications readily available, then these steps will walk you through how you can include your PaperCut NG/MF Application Server as part of this infrastructure to help maintain maximum uptime.
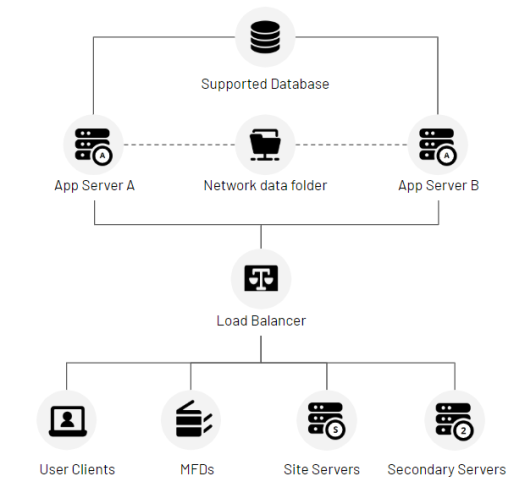
At a high level, this solution utilizes your Network Load Balancer (NLB) to provide Application Server high availability. It involves setting up multiple copies of your PaperCut NG/MF Application Server so that there can be a seamless transition between them should an outage occur to the active server.
When the network load balancer is configured, the various PaperCut components such as the User ClientThe User Client tool is an add-on that resides on a user's desktop. It allows users to view their current account balance via a popup window, provides users with the opportunity to confirm what they are about to print, allows users to select shared accounts via a popup, if administrators have granted access to this feature, and displays system messages, such as the "low credit" warning message or print policy popups. or an embedded application on an MFD point to the load balancer. Traffic is then forwarded to the fully operational and active Application Server.
This section describes how to configure Application Server failover with PaperCut. There’s a lot to go over, so get yourself some coffee and strap in!
The active/passive methodology
Our solution uses an active/passive methodology rather than a primary/secondary structure. This means that any server that you configure behind the NLB can act as the active server—so make sure all Application Servers are sized appropriately and have equal resources.
In the event of a server failure, the load balancer will seamlessly switch to the next available passive server. When that happens, you’ll need to resolve the problem on the failed server and manually restart it before it can re-enter the rotation as a passive server.
-
For seamless Application Server failover, the data folder of the Application Server needs to be shared (or common) across all standby passive servers. Depending on your PaperCut NG/MF configuration, there may be other folders you should move to your shared storage. For details, please check the Additional configurations section.
-
Our PaperCut Application Server failover requires knowledge of working with a Network Load Balancer, shared storage, and highly available SQLStructured Query Language (SQL) is a special-purpose programming language designed for managing data held in a relational database management system (RDBMS), or for stream processing in a relational data stream management system (RDSMS). databases. We recommend administrators are familiar with these topics before starting the configuration.
-
For other supported methods of high availability, please refer to Clustering and high availability.
Requirements
-
PaperCut version 20 or higher
-
A Network Load Balancer
-
2+ servers (virtual or physical)
-
A highly available external database (RDBMSA Relational database management system (RDBMS) is a program that lets you create, update, and administer a relational database. Most commercial RDBMS's use the Structured Query Language (SQL) to access the database, although SQL was invented after the development of the relational model and is not necessary for its use.)
-
Microsoft SQL Server
-
PostgreSQL
-
MySQL
-
Oracle
-
-
A persistent network drive accessible by all servers
-
All print queues and PaperCut Mobility Print installations are hosted on PaperCut Secondary or Site Servers. These components cannot be hosted on the Application Server when using this solution.
Configure the Application Server(s)
Configure the initial Application Server
-
Install PaperCut and then stop the Application Server service.
-
Upsize to an external database.
Each Application Server must use the same database instance.
-
Start the Application Server service and confirm that PaperCut NG/MF is fully functioning.
-
Stop all of the PaperCut services (PaperCut Application Server service, PaperCut Print ProviderA Print Provider is a monitoring service installed on a secondary print server to allow PaperCut to control and track printers. This monitoring component intercepts the local printing and reports the use back to the primary Application Server. service, etc.).
-
Go to [app-path]/server.
-
Open the server.properties file in a text editor with elevated permissions.
-
Make the following changes to the file:
- Remove the # symbol to uncomment the following lines:
high-availability-guard.enabled = Y
high-availability-guard.fail-over-internal-secs = 30
high-availability-guard.startup-timeout-secs = 300
Take a look at configuration keys if you need details.
-
Change the high-availability-guard.enabled config option to Y.
-
Save the file.
- Remove the # symbol to uncomment the following lines:
-
Make the data folder common across the Application Servers.
-
Rename the existing [app-path]/server/data folder to data.bak.
-
Create a shared folder on a fast, high-performance external drive. For example, on Network Attached Storage.
NOTEThe PaperCut Application Server service should run under a user account that has read/write access to the new shared network folder.
-
Copy the contents of data.bak to the new shared folder.
-
Mount the shared folder onto the Application Server.
 Example for Windows
-
Mount the new shared folder. Make sure to save the credentials.
-
Create a symbolic directory link between the data folder path and the new shared folder.
Example:
mklink /D "C:/Program Files/PaperCut [MF or NG]/server/data" "\\Server Name\Shared Folder Name"TIPCreating a directory link is important as it tells the OS to route requests for the data folder to the shared data folder on the mounted drive.
Example for Linux and macOS
Mount the new shared folder directly as the data folder.
Example:
mount -t cifs //ServerName/SharedFolderName -o username=papercut,password=secret,dir_mode=0777,file_mode=0777 /PaperCutInstallationPath/server/data -
-
-
Start all of the PaperCut services (PaperCut Application Server service, PaperCut Print Provider service, etc.).
NOTEAt this stage, we have installed and configured PaperCut NG/MF on the first server. Before continuing with the configuration, we recommend carrying out an end-to-end test of the system you have set up to ensure the Application Server is functioning as expected.
-
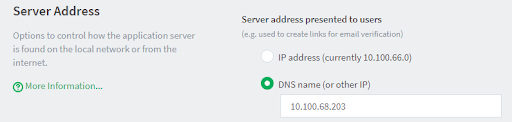
Open the Admin web interface and navigate to Options > Advanced > Server Address.
-
Set the IP address of the NLB to be the advertised IP address for PaperCut.
This makes the recipient of any packet that PaperCut sends respond to the Network Load Balancer rather than the active Application Server that handled the packet.
-
IMPORTANT
Since multiple hosts will use this certificate, use either a Wildcard certificate or a certificate that supports “Subject Alternative Names”.
Configure additional Application Servers
For each additional Application Server that will operate behind the network load balancer, complete the following
-
Install PaperCut and then stop all of the PaperCut services (PaperCut Application Server service, PaperCut Print Provider service, etc.).
-
Copy the server.properties and the application.license file from the server you have already set up, and overwrite this file on the current server.
-
Make the data folder common across the Application Servers.
-
Rename the existing [app-path]/server/data folder to data.bak.
-
Mount the shared folder onto the Application Server.
Example for Windows
-
Mount the new shared folder. Make sure to save the credentials.
-
Create a symbolic directory link between the data folder path and the new shared folder.
Example:
mklink /D "C:/Program Files/PaperCut [MF or NG]/server/data" "\\Server Name\Shared Folder Name"
Example for Linux and macOS
Mount the new shared folder directly as the data folder.
Example:
mount -t cifs //ServerName/SharedFolderName -o username=papercut,password=secret,dir_mode=0777,file_mode=0777 /PaperCutInstallationPath/server/data -
-
-
Make sure the PaperCut Application Server service is running under a user account that has read/write access to the shared network folder you set up earlier.
-
Start all of the PaperCut services (PaperCut Application Server service, PaperCut Print Provider service, etc.).
-
Confirm when attempting to access the Admin web interface on your new server that the below message is displayed:

-
An alternative option for setting up your additional server(s) is to clone the virtual machine. After doing this, and before starting the PaperCut Application Server service, make sure to delete the server.uuid file from [app-path]/server].
-
For seamless Application Server failover, the data folder of the Application Server needs to be shared (or common) across all standby passive servers.
Configure the Network Load Balancer
The Network Load Balancer must be able to do HTTP GET requests to carry out server checks.
-
Set up a Network Load Balancer so that all incoming connections route to the active Application Server.
-
Log in to PaperCut NG/MF as an admin and go to Options > Advanced.
-
In the System Health Monitoring section, copy the HTTP header.

-
Add it to the end of this URL and change the : to an =
/api/health/application-server/status?disk-threshold-mb=1&
Example:
/api/health/application-server/status?disk-threshold-mb=1&Authorization=MAJhuB55LDEm4quGi2XzaogOwqhbUYLm
TIPThe Network Load Balancer can use the URL to determine if the server is currently running or not. The active Application Server will reply with a JSON and a HTTP 200 OK response while the passive server will respond with a HTTP 503 (no JSON).
-
In the load balancer settings, paste the above URL as the monitoring URL.
-
If the load balancer allows a monitoring interval, we recommend setting it to 30 seconds. A lower number will unnecessarily increase the load on the Application Server.
-
-
Configure the operating system environment to accept forwarded traffic. For most network load balancers on the market, this would be referred to as Direct Server Return (DSR).
NOTEThis is an important step, as, by default, your Application Server will not accept the traffic from the Network Load Balancer. By configuring Direct Server Return (DSR), this makes sure that packets that arrive will not be rejected or delayed as they pass through the system.
-
Configure all external components (secondary servers, user clients, MFDs, etc.) to point to the virtual service IP address or hostname that has been set up on the Network Load Balancer.
Test
Test that high availability is set up correctly.
| Test | How |
|---|---|
|
Test if the active server is handling traffic. |
Attempt to load the PaperCut NG/MF admin web interface using the IP or hostname of the server that you want to test—not the IP/hostname of the NLB. If the server is in the active state, you will see the PaperCut login page. |
|
Test if the passive server is ready to pick up the load. |
Attempt to load the Admin web interface using the IP or hostname of the server that you want to test—not the IP/hostname of the NLB. If the server is in the passive state, you will see a page that looks like this:
|
|
Test if a device is connected via the NLB. |
Change the IP/hostname that the device is configured for to be the IP of the NLB and restart the device. If the device connects, the NLB is correctly handling the traffic. |
|
Test if secondary components (user client, secondary serverA PaperCut secondary server is a system that directly hosts a printer, that is, a print server with a Print Provider installed. A secondary server can be a server style system hosting many printers, a desktop style system hosting printer(s) also shared to other network users, or a desktop style system with the printer used only for local users (not shared)., etc.) are connected to the NLB. |
Change the configured IP and restart (same process as above). |
| Perform a failover | Trigger a failure on the active Application Server and confirm that traffic is routed to and operation continues automatically on another server in the pool. We recommend performing this multiple times for each server in the pool. |

When testing is complete, remember to return all servers to their default ready state.
Set up system notification for application failures
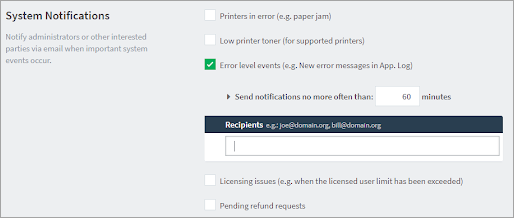
You can subscribe to App log updates so that if there’s a failover event, you are automatically notified.
-
In the Application Server Options > Notifications tab, under System Notifications, select Error level events and enter the email address of each recipient.
-
Check the SMTP Server Options are set up so that the server can send out email notifications.
If an Application Server fails, you’ll see this message in the App Log:

-
We also recommend setting up monitoring and notifications on the Network Load Balancer, so you are aware if any of the servers in the pool become unavailable.
Configuration keys
| Config Key | Description |
|---|---|
| high-availability-guard.enabled |
Enable or disabled the high availability feature. The default is disabled. |
| high-availability-guard.fail-over-interval-secs |
The passive server communicates with the active server using the database. If the passive server does not receive any communication from the active server for a certain period, the active server is deemed inactive. This config value is the time in seconds that the active server can be inactive before the passive server takes over. The default value is 30 seconds. |
| high-availability-guard.startup-timeout-secs |
A server will assume the role of an active server on startup if it determines that there are no other servers active. If this active server fails to start correctly, a timeout is in place to trigger a failover if the server isn’t running before the timeout completes. This config value is the time in seconds that the active server has to reach the fully running state before the failover is triggered. The default value is 300 seconds. |
Additional configurations
Upgrade Application Servers
Follow the normal upgrade path with some small adjustments: https://www.papercut.com/kb/Main/Upgrading
-
Stop the PaperCut Application Server service on all servers.
-
Upgrade all servers.
-
Start the PaperCut Application Server services one at a time.
Cloned VMs
This only applies if you cloned a VM when you created the additional Application Servers. If the same server.uuid file is used on different servers, it can lead to database corruption.
-
Go to the folder [app-path]/PaperCut MF/server/
-
Delete the server.uuid file.
-
Restart the Application Server service on the cloned VM. A new server.uuid file is recreated containing a unique UUID for that VM.
Print Deploy
If you are using PaperCut Print Deploy, then you will also need to move the folder, which contains all the information about the print queues, on to shared storage. Several files will also need to be copied from the first server you created to any additional Application Servers.
-
On each Application Server perform the following:
-
Stop the PaperCut Print Deploy Server service.
-
Navigate to the Print Deploy data folder: [app-path]/providers/print-deploy/[win, linux or mac]/data
-
Rename the repository folder to repository.bak
-
Follow the steps below to make the repository folder common across the Application Servers.
-
Make available the shared storage you wish to use for Print Deploy to the Application Server. Make sure to save the credentials.
NOTEThis shared storage must be a unique location and not be the same as the Application Server(s) shared storage configured previously.
-
Create a symbolic directory link between the repository folder path and the new shared folder.
Example for Windows
mklink /D "C:/Program Files/PaperCut [MF or NG]/providers/print-deploy/win/data/repository" "\\Server Name\PaperCutPrintDeployData"
Example for Linux and macOS
mount -t cifs //ServerName/SharedFolderName -o username=papercut,password=secret,dir_mode=0777,file_mode=0777 /PaperCutInstallationPath/providers/print-deploy/[linux or mac]/data/repository
-
-
-
From the first Application Server you installed:
-
Copy and overwrite the following files and folder contents to the same location on all additional Application Servers
-
Folders and all of the contents:
[app-path]/providers/print-deploy/[win, linux or mac]/data/config
[app-path]/providers/print-deploy/[win, linux or mac]/data/translations
-
Individual files:
[app-path]/providers/print-deploy/[win, linux or mac]/data/tls.cer
[app-path]/providers/print-deploy/[win, linux or mac]/data/tls.pem
-
-
Copy the contents of the repository.bak folder to the new repository folder.
-
-
On each Application Server perform the following:
-
Configure the PaperCut Print Deploy Server service to run under a user account with read/write access to the shared storage location.
-
Restart the PaperCut Print Deploy Server service.
-
Web Print
All potential servers must use the same web-print-hot-folder.
The web-print-hot-folder is included within the data folder structure of the PaperCut NG/MF Application Server [app-path]\server\data\web-print-hot-folder and will be copied as the Configure the Application Server(s) step 8 above.
-
Copy the web-print-hot-folder used in the configuration for Web PrintWeb Print enables printing from user-owned devices without the need to install printer drivers and manage server authentication. servers.
-
Paste it into the same mounted drive you used for the data folder.
-
Create a similar link to the folder for each server using mklink or the equivalent.
Custom branding
For custom branding to persist across all potential servers, copy the [app-path]/PaperCut [NG or MF]/server/custom folder to each of the Application Servers.
Custom reports
For custom reports to work across all potential servers, the [app-path]/PaperCut [NG or MF]/server/reports folder on each Application Server needs to be moved to shared storage.
-
On each Application Server perform the following:
-
Stop the PaperCut Application Server service.
-
Navigate to the PaperCut NG/MF folder: [app-path]/PaperCut [NG or MF]/server
-
Rename the reports folder to reports.bak
-
Follow the steps below to make the reports folder common across the Application Servers.
-
Make available the shared storage you wish to use. Make sure to save the credentials.
-
Create a symbolic directory link between the reports folder path and the new shared folder.
Example for Windows
mklink /D "C:/Program Files/PaperCut [MF or NG]/server/reports" "\\Server Name\Shared Folder Name"
Example for Linux and macOS
mount -t cifs //ServerName/SharedFolderName -o username=papercut,password=secret,dir_mode=0777,file_mode=0777 /PaperCutInstallationPath/server/reports
-
-
-
From the first Application Server you installed, copy the contents of the reports.bak folder to the new reports folder.
-
On each Application Server perform the following:
-
Configure the PaperCut Application Server service to run under a user account with read/write access to the shared storage location.
-
Restart the PaperCut Application Server service.
-
Custom reports can be created and maintained in the same way they have always been, regardless of which Application server is active.
User Clients
If there’s a failover incident, the user clients need to seamlessly switch over to the new active server. For that to happen, user clients must point to the network load balancer’s IP address. The user client’s configuration is propagated when it’s installed from the server.
In both Application Servers, update the User Client config to point to the network load balancer’s IP address.
-
Open <PaperCut Installation>\client\win\config.properties
-
Update the server-ip property to the IP address of the virtual service on the network load balancer.